Table of Contents
diSPIM Manual
The diSPIM is a flexible and easy-to-use implementation of Selective Plane Illumination Microscopy (SPIM) that allows for dual views (d) of a sample mounted on an inverted (i) microscope. This document concentrates on the assembly, setup, and alignment of the diSPIM. The vast majority of these instructions apply regardless of the inverted microscope frame on which the SPIM head is mounted, but configuration specific manuals are in the works.
Overview
Two objectives are placed at right angles to one another, each 45° from vertical, above a horizontally-mounted sample. A light sheet is created from one objective and then imaged through the other objective. A stack of images is collected by moving the light sheet through the sample or the sample through the light sheet. The advantage of being dual-sided is that the role of the two objectives can be reversed to collect a second stack from a perpendicular direction. The two optical paths are usually symmetric, and are designated Path A and Path B. (The two paths are described in detail in the diSPIM Plugin User Guide.) The two datasets can be computationally merged for improved resolution isotropy.
The core assembly, the SPIM head, can be mounted on various inverted microscopes. Thus far, microscope-specific adapter brackets1) exist for the following microscopes:
- ASI RAMM frame (Figure 1)
- Leica DMI-6000
- Nikon TE-300, Ti, TE-2000, Ti2
- Olympus IX-71/81, IX-73/83
- Zeiss Axio-Observer
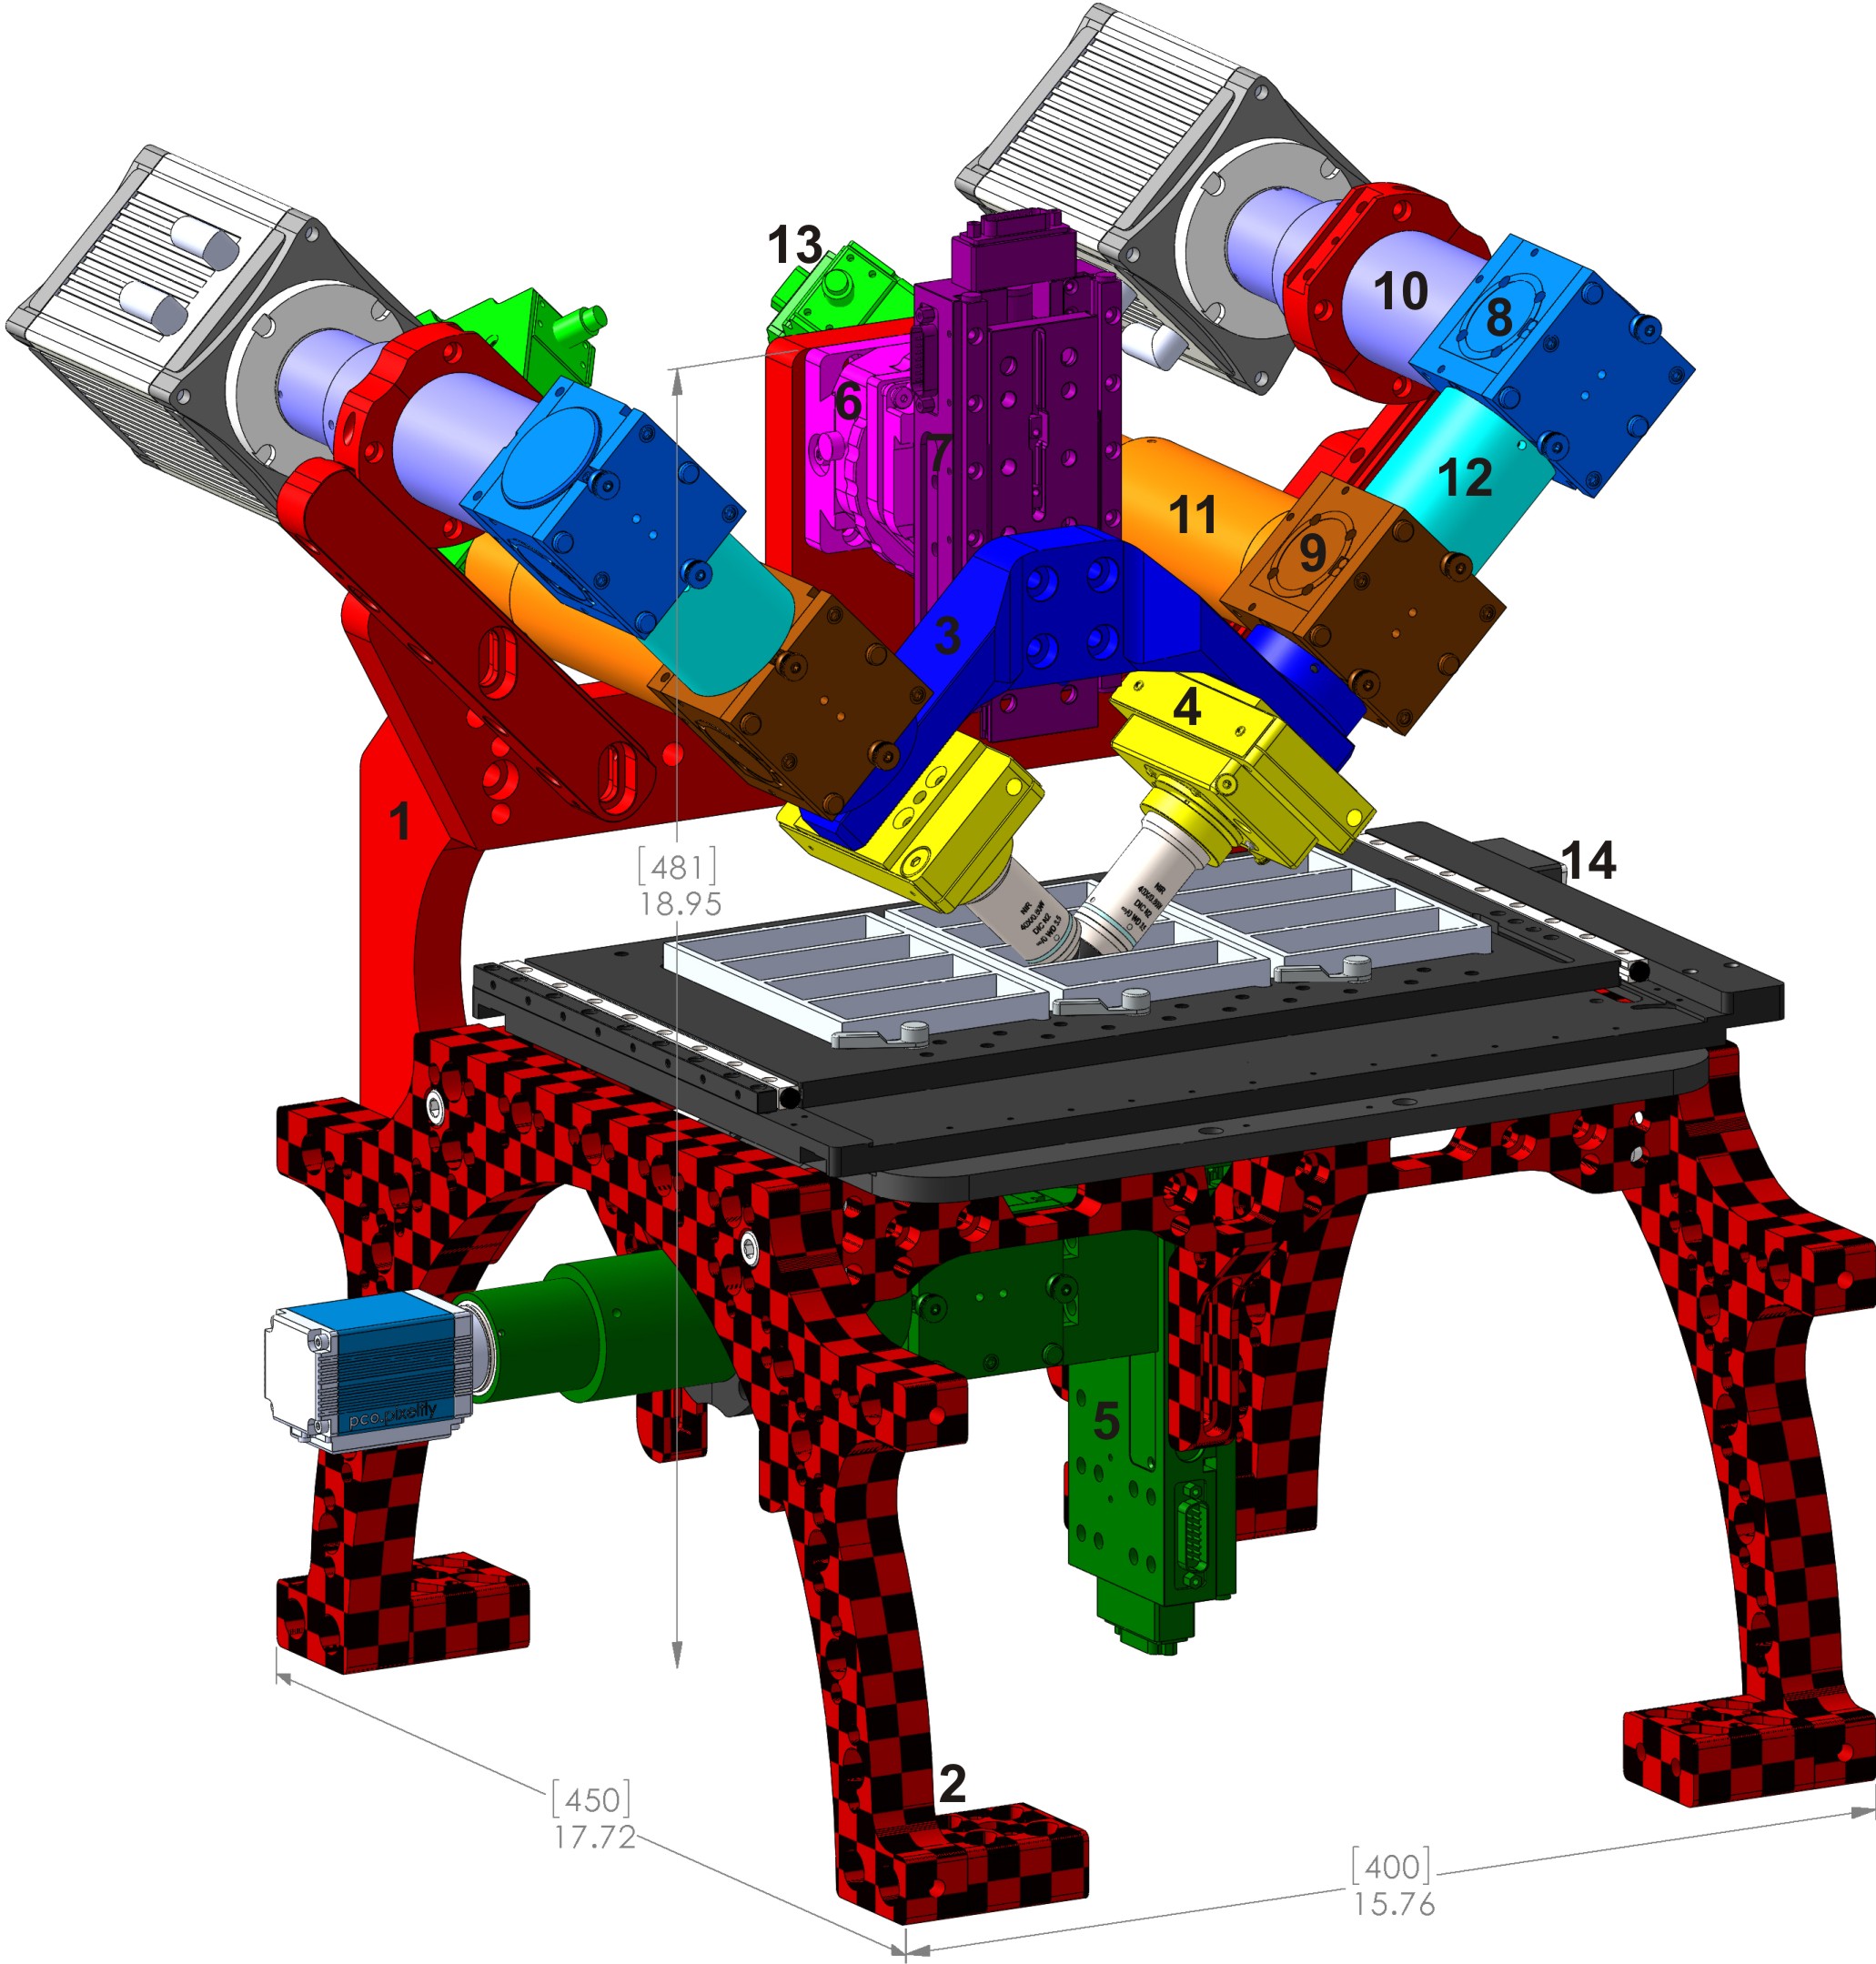 Figure 1: Typical complete diSPIM system on RAMM frame showing major components. 1) SPIM-MOUNT , 2) SPIM-RAMM , 3) SPIM arm mount (RAO-0046 ), 4) piezo objective mover APZOBJ-200 or similar, 5) MIM inverted microscope with LS-50M stage, 6) CDZ-1000 centering stage or CDZ-R block, 7) LS-50M stage, 8) MIM-CUBE-II w/ mirror, 9) MIM-CUBE-II w/ fluorescence filters, 10) C60-TUBE_B imaging tube lens, 11) C60-TUBE_160 scanner tube lens, 12) 50mm extension tube, 13) MM-SCAN_1M light sheet scanner, 14) MS-2500 XY stage.
Assembly
The relevant sections of the diSPIM assembly video are embedded.
SPIM Head
Tools: 6 mm hex driver
The video is cued up to show the process for mounting a diSPIM onto an ASI RAMM frame, but the principles apply to other scopes as well.
The first step of assembly is to attach the SPIM Head to your microscope frame. The SPIM head and mounting bracket is shipped as a unit. Slide the crossbar (and attached SPIM head, etc) onto the dowel pins protruding from the risers. Secure with the provided bolts and a 6 mm hex driver where indicated in Figure 2.
Notice: If your system uses piezo objective movers, take care that you do not rest the SPIM Head on (or otherwise apply mechanical stress to) the piezos; they can be permanently damaged.
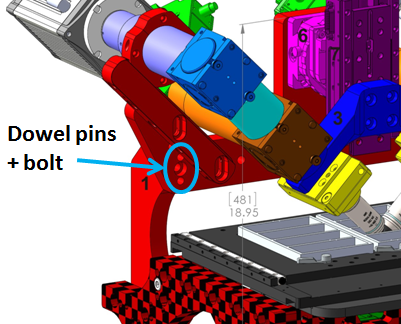 Figure 2: SPIM head mounts via 2 dowel pins and a bolt at the indicated location regardless of the microscope frame. (RAMM frame pictured)
Red Shipping Bracket
Tools: 5 mm and 6 mm hex drivers
RAMM frames are shipped with a red bracket supporting the inverted scope; it must be removed. For detailed instructions with pictures, please visit ASI's documentation site.
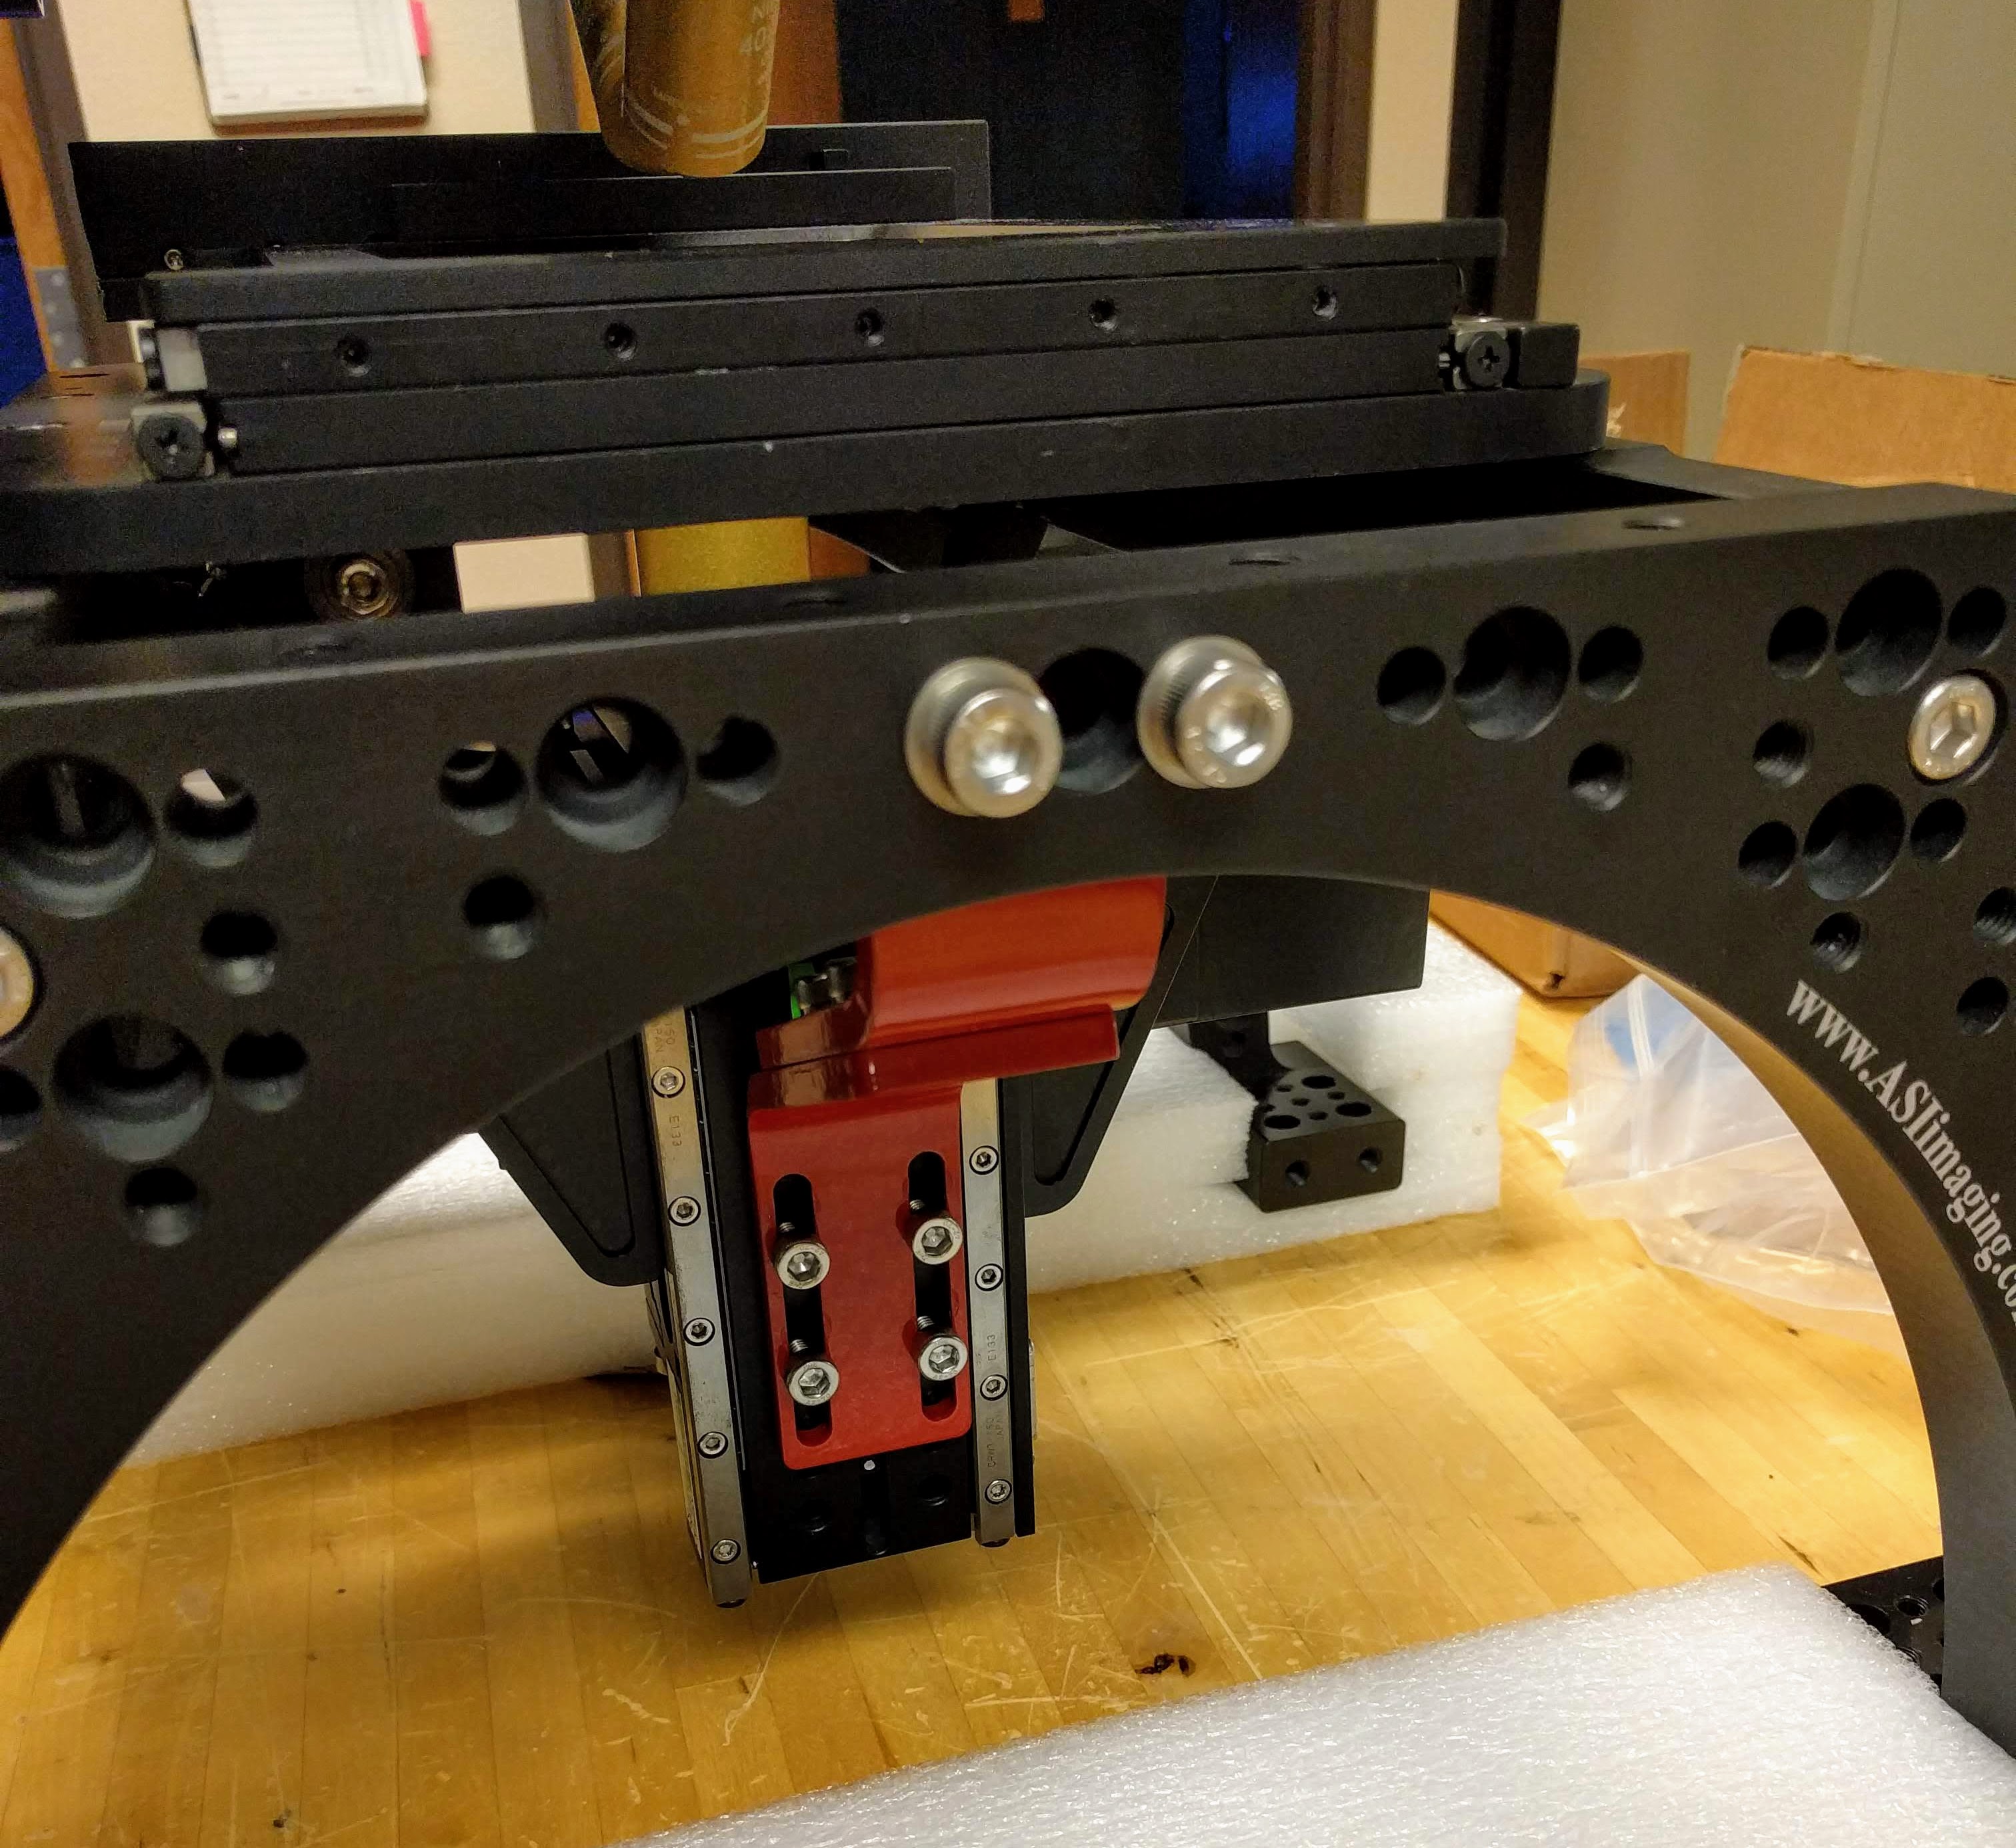 Figure 3: The red shipping bracket connects the inverted scope's linear stage to the RAMM frame.
Scanners
Tools: 2 mm hex driver
The video is cued up to show the process for mounting the scanners.
Locate the scanners (light sheet generators), C-mount adapters, scanner tube lenses, and spacers. Attach the scanners to the C-mount adapters, as in Figure 4. Attach the tube lens assembly to the lower CUBE-III adapter ring via three set screws requiring a 2 mm hex driver, Figure 5.
The scanners should be attached to the tube lenses so the fiber connectors are facing up and in toward the center at a 45° angle from vertical, as shown in Figure 7. Coarse rotation of the scanner is best done by loosening the set screws between the tube lens and C-mount adapter. Be sure all of the set screws on the tube lenses, spacers, and cubes are snug and the that scanners cannot wiggle around on the mount. Fine rotation can be done by grasping the tube lens firmly and turning it; the set screws will slip a bit, allowing the tube body to rotate relative to the spacer or C60-CUBE-III.
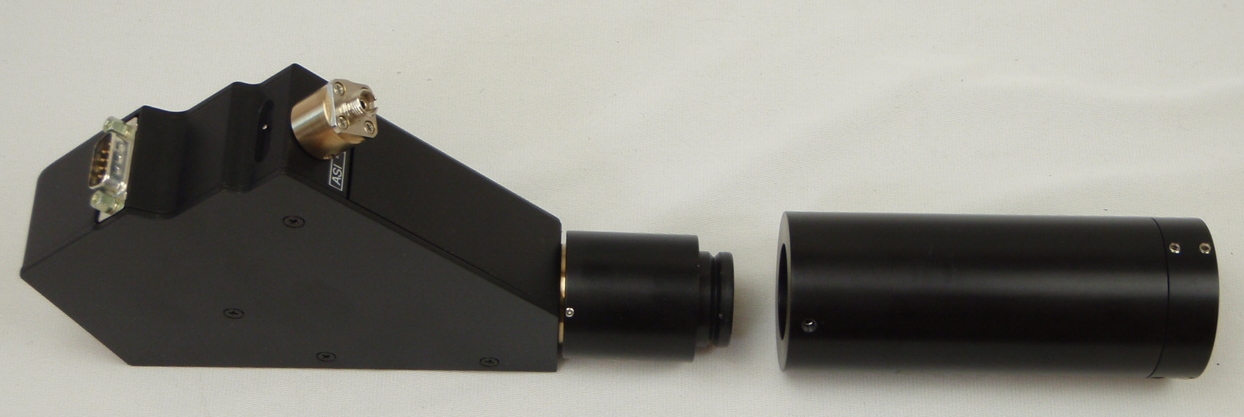 Figure 4: Scanner attached to C-mount adapter; tube lens ready to be installed on the CUBE-III
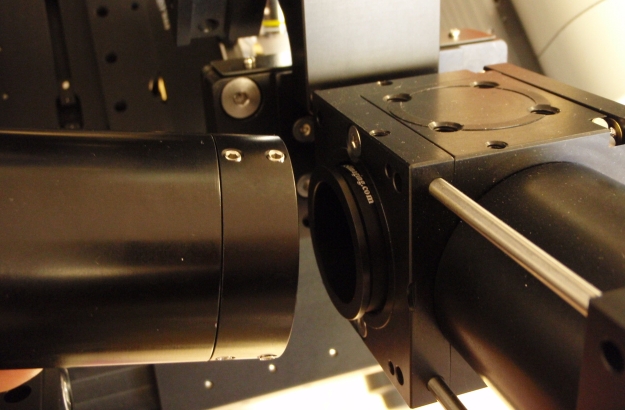 Figure 5: Scanner tube lens assembly mounted before the scannner with C-mount adapter is installed
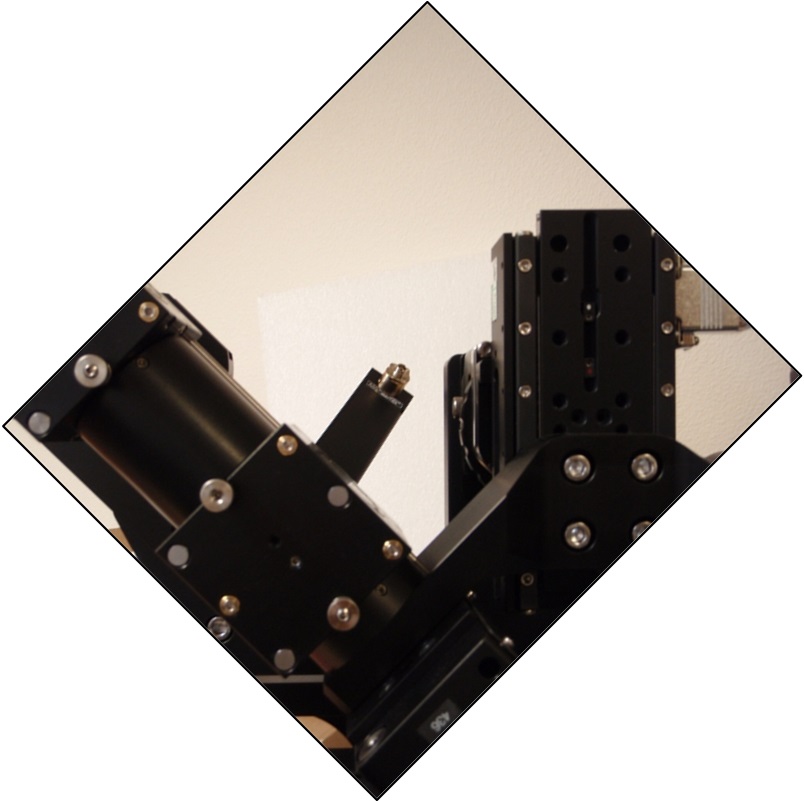 Figure 6: Path A scanner with poor alignment
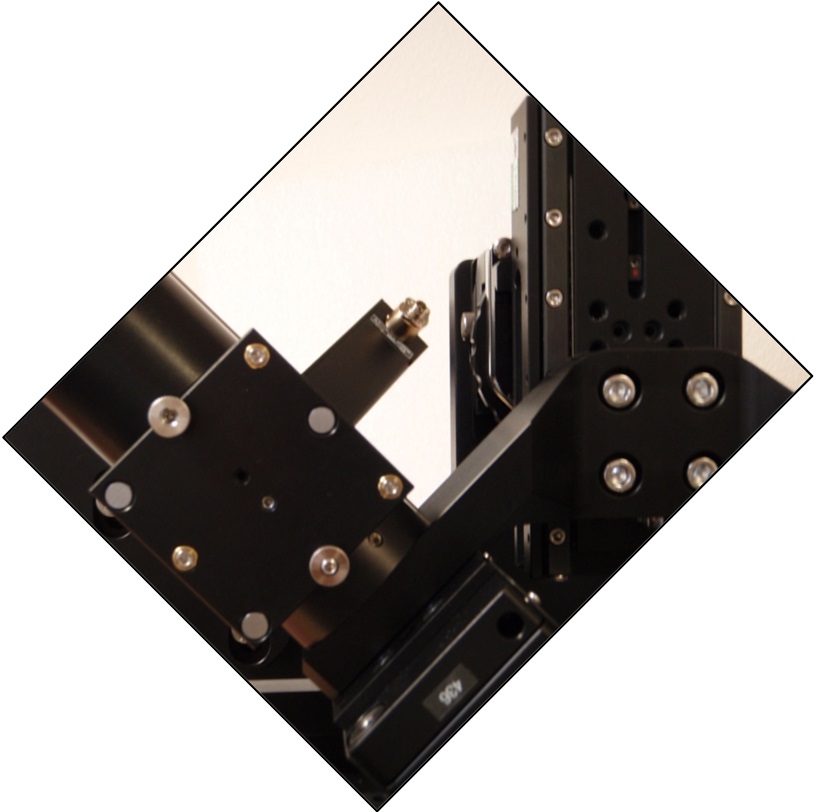 Figure 7: Path A scanner with good alignment
Cameras
Compatibility
Support for the SPIM cameras must be added to the plugin code on a case-by case basis.2) Please contact the plugin authors with requests to add support for other cameras. Currently the supported cameras are:
- Andor sCMOS cameras
- Hamamatsu Flash 4
- PCO Edge
- Photometrics Prime 95B
If your cameras use Camera Link, install the frame grabber cards and drivers in the host computer according to the manufacturer’s instructions. Connect each camera’s data cables and power cable. The camera trigger cables should be connected to the Tiger PLC. There are more details on each camera in the section on Hardware Configuration.
Mount Camera Tube Lenses
Tools: M5 hex driver
In the standard configuration for diSPIM on a RAMM frame, as in Figure 1, each camera tube lens is fastened to the SPIM-MOUNT3) with a ring clamp. The end of the tubes should come within approximately 1 mm from the upper (mirror) CUBE-IIIs. When the objectives are lowered into position for viewing a sample, adjust the bolts holding the tube support arms so the camera tube lenses are centered on the CUBE-IIIs.
Orient & Connect
Tools: 2 mm hex driver
The video is cued up to show the process for mounting and orienting the cameras.
Depending on the accessibility of your system, it may be advantageous to connect all of the camera's cables (power, data, trigger) before mounting them to their tube lenses. As with the scanners, a C-mount-to-tube-lens adapter is used. Screw the adapter's C-mount onto the camera before orienting and mounting them.
For thin samples, having the beam enter the camera's field of view (FOV) from the top or bottom may be advantageous because the light sheet's intersection with the coverslip is a horizontal line and can be read out with fewer rows. However, the cameras are usually oriented so the beam enters the FOV from the side so the cameras’ light sheet mode, or rolling shutter, can be utilized. There are two common ways of orienting the cameras that differ by 180° for both cameras: the ASI convention and the Shroff lab convention. They both have the cameras tilted 45° from vertical (else the beam would appear diagonally in the field of view) and 90° from one another, with the beam entering from the side. Depending on the camera orientation, a constant rotation step may be necessary when beginning the registration step of the data analysis.
The convention the Shroff lab uses in their Nature protocols paper has the cameras rotated so that the beam enters from the same side of the field as the camera is on. On Path A, the beam from the left scanner appears to the right camera as entering from the right. The convention ASI uses has the beam cross the field of view in the same direction that it travels across (the front-view of) the microscope. On Path A, the beam from the left scanner appears to the right camera as entering from the left.
(After deciding how to orient the cameras, label the corner that goes “up” for future reference in case you have to remove and replace the camera.)
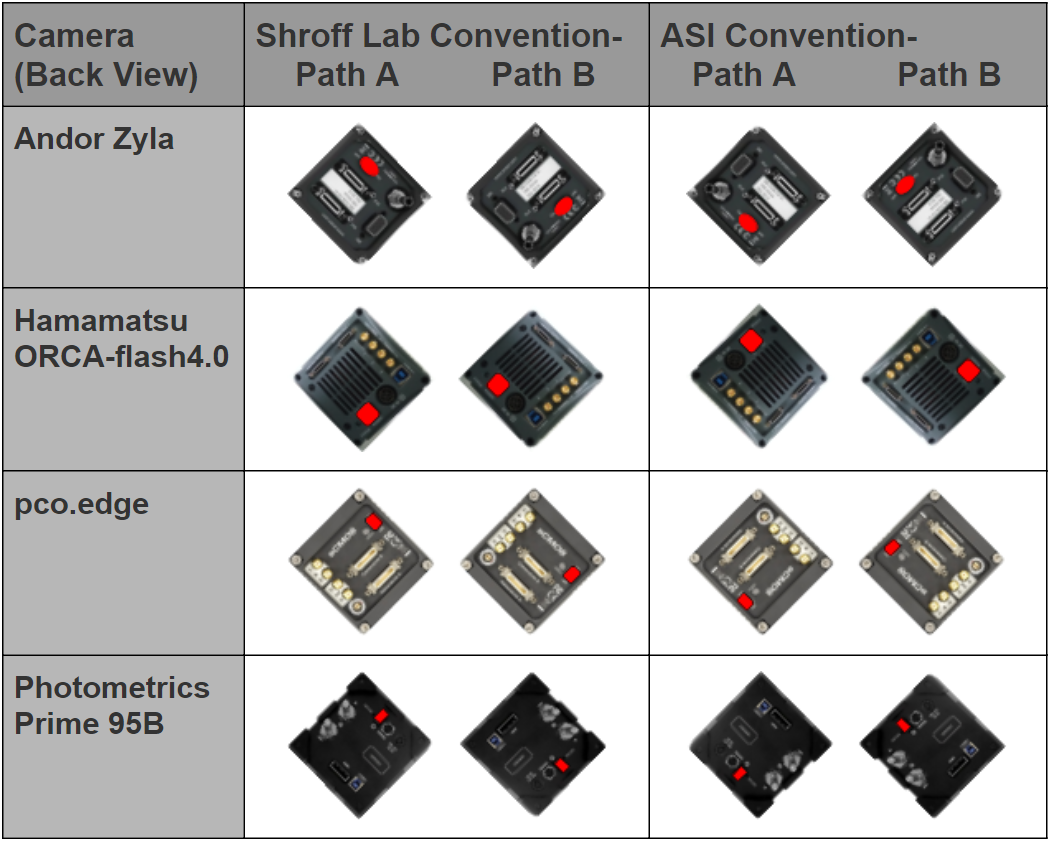 Figure 8: Currently supported sCMOS cameras oriented in Shroff Lab and ASI conventions as seen from the back of the microscope; power switches highlighted in red
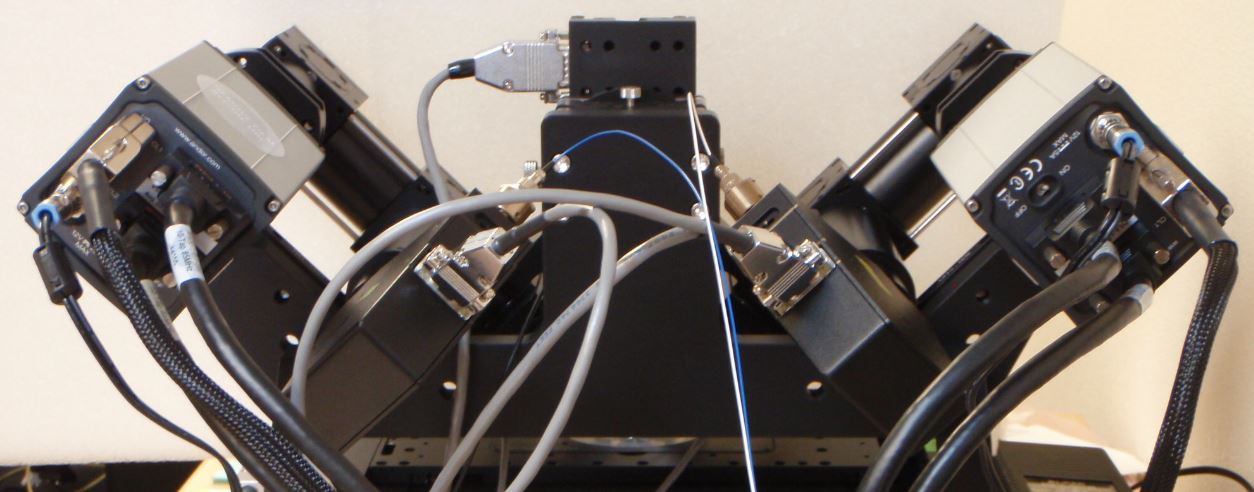 Figure 9: Andor Zyla cameras oriented according to ASI convention.
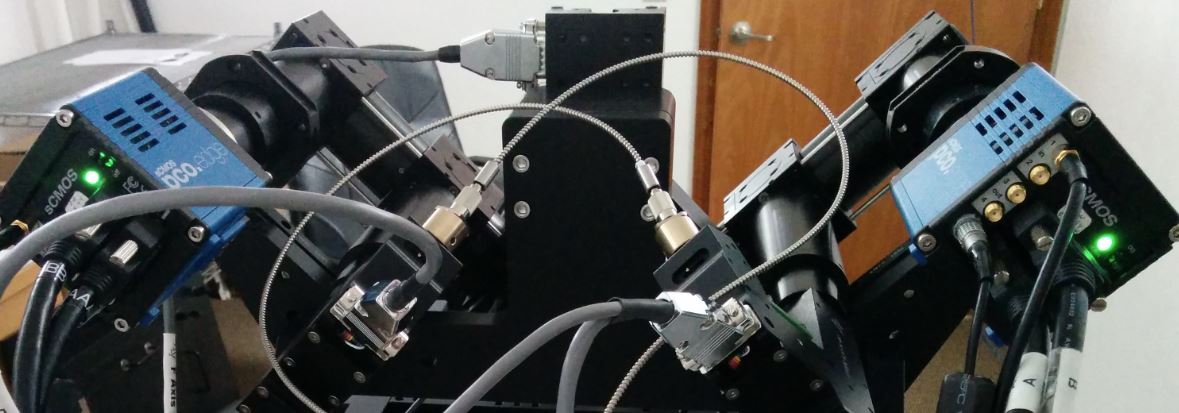 Figure 10: PCO Edge cameras oriented according to Shroff lab convention.
Objectives
Tools: M1.5 hex driver
The video is cued up to show the process for mounting the objectives with a discussion of the two optical paths, Path A and Path B at the end.
If your system was delivered before 2015, refer to the document on pre-2015 piezos.
The objective mounting assembly includes a objective lateral positioner assembly (OBLPA) for one side of the SPIM head and a replacement spacer for the other, a piezo objective mover (POM), and the bushing that the objective screws into; see Figure 11. The assembly mounts to the right angle bracket via dovetail joint and is secured into position via set screw.
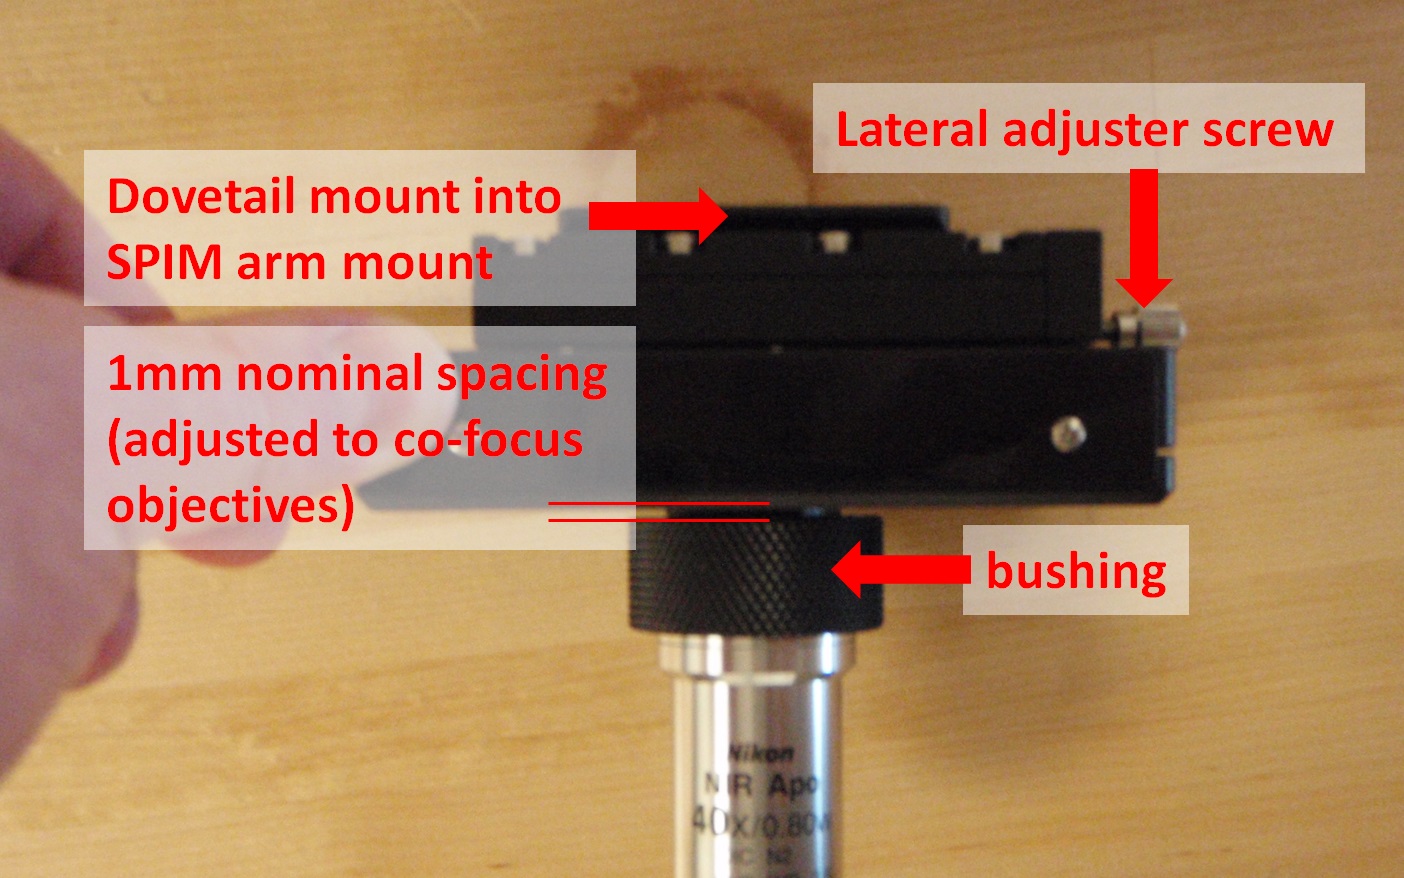 Figure 11: Objective mounting assembly top to bottom: objective lateral positioner assembly (OBLPA), piezo objective mover (POM), bushing, objective
Remove either one of the objective mounting assemblies; use a 1.5 mm hex driver to loosen the center set screw on the end of the right angle bracket, as in Figure 12. Grip the OBLPA or replacement spacer by the front and back (avoiding unnecessary stress on the piezo), and pull towards you (while pushing on the right angle bracket). Screw an objective into the bushing that is still mounted; add the other objective to the assembly you just removed. Re-insert the assembly (it will “click” into position) and tighten the set screw.
Notice: If your system uses POMs, take care that you do not unnecessarily apply mechanical stress to the piezos when screwing the objectives into their bushing; they can be permanently damaged.
Use the OBLPA adjustment screw and the two objective bushings to move the objectives until they are visually symmetric from the front, as in Figure 13, and visually aligned when viewed from the side of the microscope.
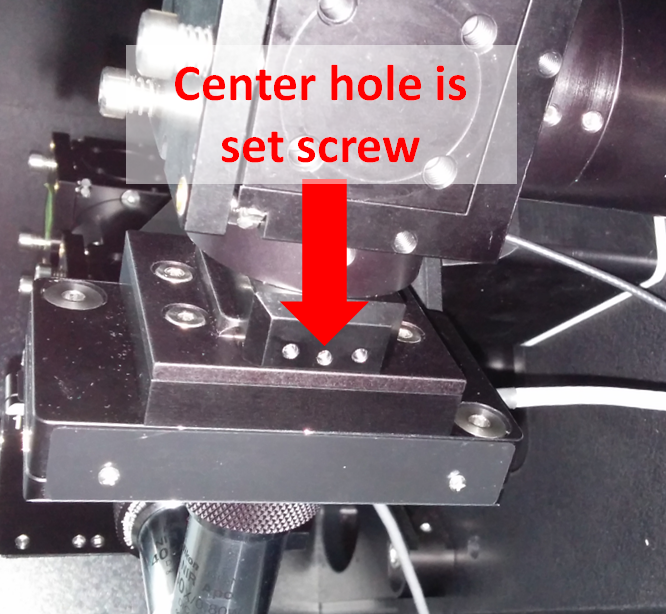 Figure 12: Side view of SPIM head: set screw for securing the piezo assembly to the SPIM arm and on either side is a screw with ball-nose spring plunger that allows causes the assembly to "click" into place
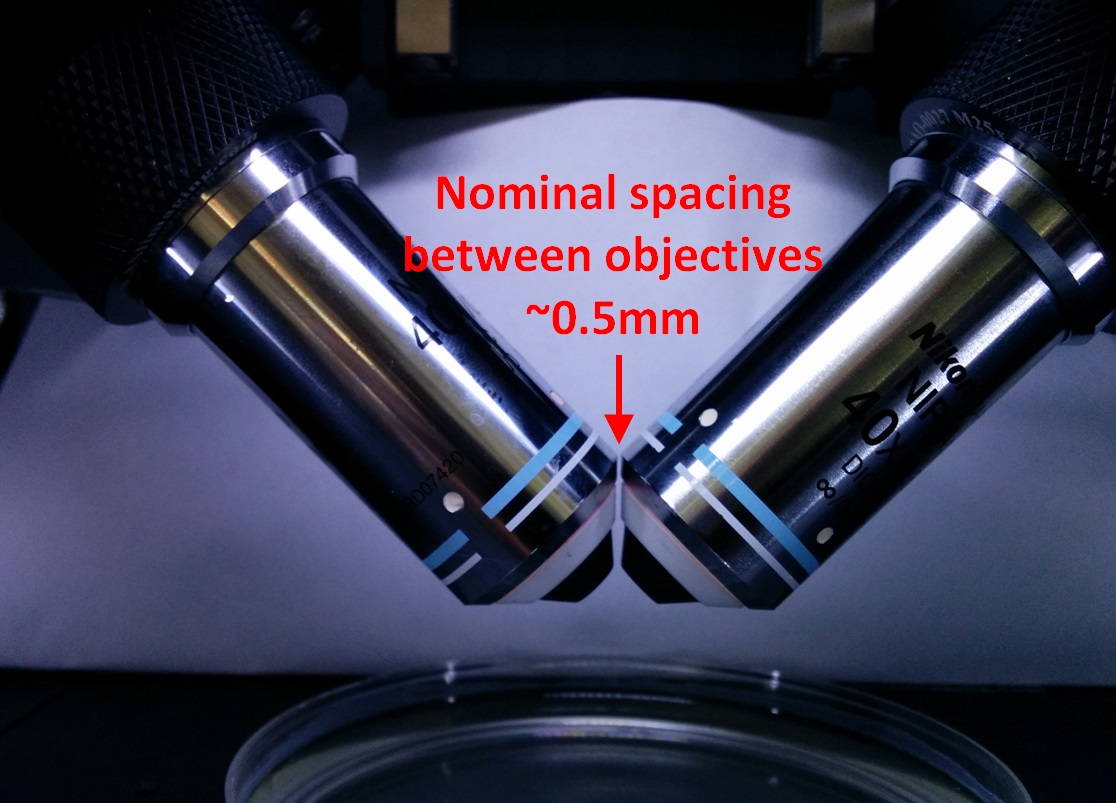 Figure 13: Nikon 40x, 0.8 NA, 3.5 mm WD objectives co-focused with ~0.5 mm gap
Cables
Tiger controller
The electrical components of the diSPIM are controlled by ASI’s modular TG-1000 which comes in an 8- or 16- variety. Set up the controller in a location where the indicator lights are visible. See the controller page for details on Tiger firmware; full documentation of the controller is on ASI's website. The Tiger controller’s power switch should always be switched to “off” when connecting or disconnecting cables. The Tiger controller uses a universal power cable (as for a computer) that plugs into the back of the unit.
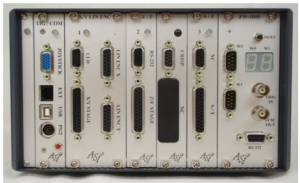 Figure 14: Tiger controller with 8 slots
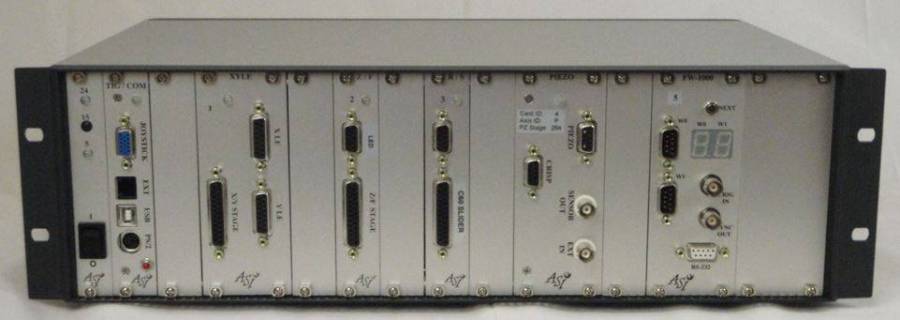 Figure 15: Tiger controller with 16 slots
Connect each card’s cables:
(0) TIG/COM
- USB 2.0 Type B to host computer USB 2.0 Type A
- DE-15 to four-axis Joypod (joystick/knob) DE-15
1: X/Y
- DB-25 to X-axis then Y-axis
- Hirose 4 pin to dimmable LED illuminator SubMiniature v.B
2: Z/F
- DB-25 to inverted microscope focus Z-axis then SPIM focus F-axis
- Hirose 4 pin to dimmable LED illuminator SubMiniature v.B
3: MICROMIRROR
- DE-09 (like VGA) to either Path A scanner (axes A/B4)) then Path B scanner (axes C/D), or scanner with anti-striping micromirrors
4: P
- DE-09 to P-axis (right) POM
5: Q
- DE-09 to Q-axis (left) POM
- Check serial numbers on the POMs and controller faceplates to be sure to connect the cables to the correct controller module.
6: PLC5)
- BNC to Light Path A camera trigger
- BNC to Light Path B camera trigger
- N/A standardly; can be configured as global shutter or ongoing acquisition signal
- BNC to Laser side select
- BNC to Laser #1 on/off
- BNC to Laser #2 on/off
- BNC to Laser #3 on/off
- BNC to Laser #4 on/off
Other cables
Connect the power and/or data cables to the two cameras and two scanners if you have not already done so.
Specialty cables from ASI are labeled, but the two cameras and scanners are identical, so take special care to keep straight which cables go where so that the control software can work as intended. The POMs look identical but are labeled “P” and “Q”; take care to install them correctly as well.
Laser and Fiber Optics
Many possible laser configurations that are theoretically supported. A single fiber coupled laser with a splitter can serve both scanners. In this configuration both output fibers have light simultaneously, but the scanners can be steered to their blanking position6) to act as (imperfect) shutters with ~0.1% transmission. More commonly, a laser merge module is used to control multiple laser lines with dual outputs and a routing switch.
Whatever your setup, hook up your laser and run the fiber optics to the scanners if you have not already.
Filters and Mirrors
Tools: ASI ring tool, small Phillips head screwdriver, 2 mm hex driver
The video is cued up to show the process for installing an excitation filter, emission filter, and dichroic filter.
Install dichroics and filters in the Dichroic Cube, aka D-CUBE, according to manufacturer's instructions. It accommodates 25 mm diameter emission and excitation filters, and a 26 x 28 mm dichroic mirror; the standard D-CUBE accommodates 1 or 2 mm dichroics, but there is another version for 3 mm dichroics. If using a 1 mm dichroic, use the included bronze spacer. If excitation filters aren’t used, that half of the D-CUBE can be left out entirely. After the filters are installed in the D-CUBE, the D-CUBE is installed on the male dovetail on the removable faceplate of the CUBE-III.
Notice: It is easy to warp dichroic mirrors enough to induce aberrations; only lightly tighten the retaining clip of the D-CUBE.
The CUBE-III faceplates are removed from the CUBE-III body via the three spring-loaded shoulder bolts. Install the D-CUBE on a CUBE-III faceplate's male dovetail and secure it into position via the two screws in the front plate; one eccentric set screw, one nylon tipped. (Align the D-CUBE slot with the eccentric screw and tighten until the cam engages the slot. Get the D-CUBE into a neutral/central position and tighten the nylon-tipped set screw to hold the cube in place.) Reinstall the CUBE faceplates and dichroic filters into the appropriate C60-CUBE-IIIs.
Next, install the right angle mirror/s in the appropriate C60-CUBE-III (again on the faceplate's male dovetail) and reinstall the in order to complete the imaging path/s.
The video is cued up to show the process for installing filters and mirrors on a diSPIM; many of the principles apply to other SPIM configurations and scopes as well.
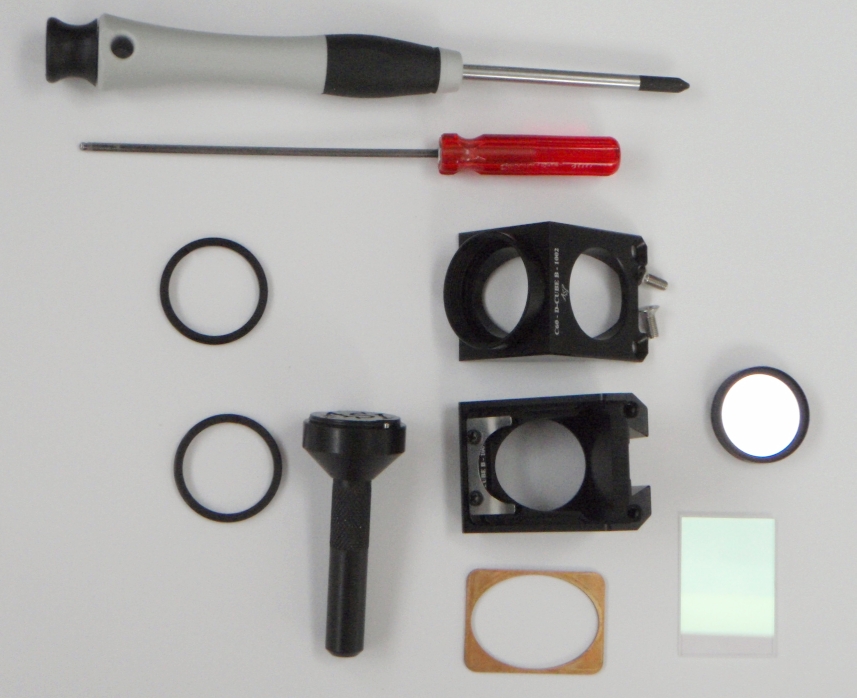 Figure 16: Disassembled dichroic/filter cube, D-CUBE; installed into CUBE-III
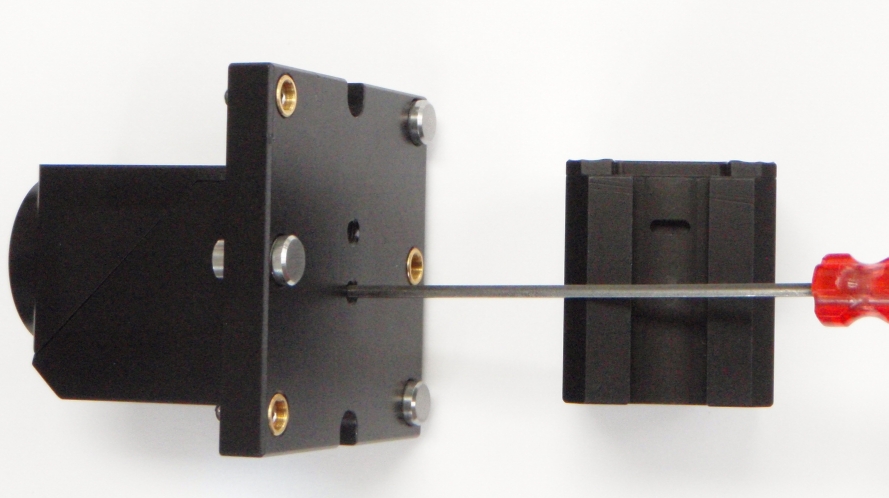 Figure 17: D-CUBE installed on the dovetail mount (CUBE-II pictured), left, with a bottom view of the filter cube, right
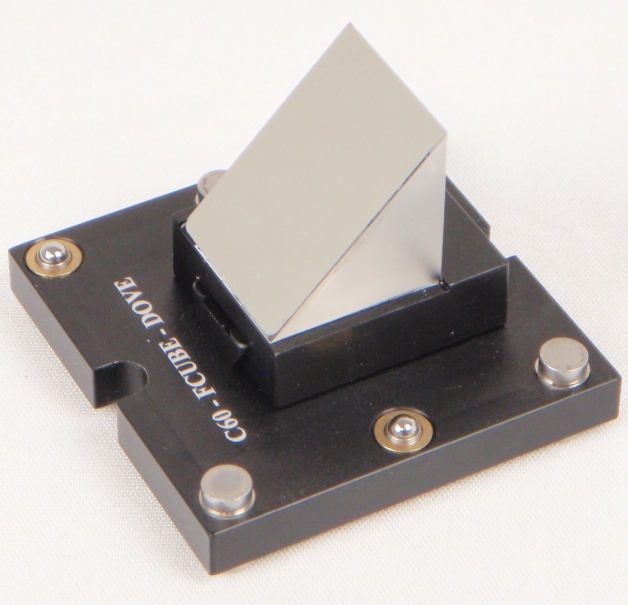 Figure 18: Right angle mirror installed on the dovetail mount
Alignment
The relevant sections of the diSPIM alignment video are embedded.
Getting started with Micro-Manager
Micro-Manager is a free and open-source GUI software package available at https://micro-manager.org/. It includes a plugin that facilitates alignment and use of the system. If you are not familiar with Micro-Manager, it is worth reading the User’s Guide and Hardware Configuration Guide before proceeding. Directions for getting started are presented below; find more details in the Micro-Manager diSPIM Plugin User Guide. The diSPIM plugin is fully functional but also continually being improved; accessing new features is as simple as installing the latest Micro-Manager version. Nightly builds are usually functional and include the latest improvements; a major release happens every quarter. If you discover problems with Micro-Manager, please report it to the developers under Help > Report Problem. If you encounter problems in the diSPIM plugin, or have feature requests, please contact the plugin authors.
Hardware Configuration
The video is cued up to show the process for configuring your hardware in Micro-Manager and creating the extremely useful configuration groups “Startup” and “Shutdown”.
Certain cameras, e.g. AndorSDK3 and PCO cameras, require drivers be copied into the Micro-Manager install directory; consult the Micro-Manager wiki regarding individual devices or manufacturer’s instructions for details.
Use Tools > Hardware Configuration Wizard to create a Micro-Manager hardware configuration with all the relevant devices.
- Turn on the Tiger controller. Select ASITiger > TigerCommHub from the list of available devices. Click Add… then Scan to load all of its peripherals (with the possible exception of the LED shutter).
- Add both cameras, i.e. two instances of the camera. Support for the SPIM cameras must be added to the plugin code on a case-by case basis.3) Please contact the plugin authors with requests to add support for other cameras. Currently, there are four supported cameras, each with special considerations:
- Andor sCMOS: Use the AndorSDK3 adapter. The bit depth defaults to 12-bit but if you want different the best fix is to add an assignment in Micro-Manager’s “System” group “Startup” preset (see the Configuration Guide).
- Hamamatsu Flash 4: Use the HamamatsuHam device adapter. Trigger polarity defaults to negative; the best fix is to add an assignment in Micro-Manager’s “System” group “Startup” preset (see the Configuration Guide).
- PCO Edge: Use the PCO_Camera adapter. Property PixelRate defaults to slow, but for fast frame rates you probably want the fast scan; the best fix is to add an assignment in Micro-Manager’s “System” group “Startup” preset (see the Configuration Guide).
- Photometrics Prime 95B: Use the PVCAM adapter. Timing calculations won't be accurate until a snap or live has been run after changing any camera setting.
- Select Utilities > Multi Camera. Assign the properties “MultiCam-Physical Camera 1” and “MultiCam-Physical Camera 2” to the two cameras, ideally using the special “System” configuration group with preset name “Startup” as described in the Micro-manager wiki page.
Normally the laser on/off is controlled by Tiger PLC outputs. Lasers (on outputs 5-8) can be given a user-defined label in Micro-Manager. Define presets using the property “OutputChannel” of the PLogic device (a shutter). In Micro-Manager, the lasers should only get turned on and off via the Tiger controller and the PLogic shutter, with the correct laser selected by the OutputChannel property. You should not directly turn the laser on/off using the device adapter properties of the laser.
Plugin
The video is cued up to show a brief tour of the plugin (with attention to the Devices tab at 12:25).
Open the diSPIM plugin through the Micro-Manager window: Plugins > Device Control > ASI diSPIM. Keep the main Micro-Manager window accessible; the plugin generally does not duplicate functionality provided there. The GUI will preserve most of your settings, others are stored on the Tiger controller (e.g. sheet sizes). The Devices tab must be configured before most of the plugin’s features may be accessed.
Stage limits
Tools: 1.5 mm hex driver
Setting the limit magnets on the motorized stages prevents crashes that can break coverslips or otherwise damage equipment; hardware limits are the most foolproof way to prevent crashes.7) The limit magnets move with the stage plates; when a magnet approaches a Hall effect sensor affixed in the stage body, the firmware detects a limit condition and stops the stage. The polarity of limit magnets relative to the stage is essential to their function. When an axis is at a limit, the LED of the corresponding Tiger panel will flash rapidly. You can also query the limit condition over serial using the RS <axis>- or RS <axis>+ command. Programs such as Advanced Serial Port Monitor allow sending such a command repeatedly for easy monitoring. If the Devices tab of the diSPIM plugin has been configured, you can use the Navigation tab to control the stages. Alternatively, you can use the Joypod stand alone controller.
Single axis stages
Tools: 1.5 mm hex driver
The video is cued up to demonstrate setting the F-axis limit magnet.
Sometimes limit magnets in Z stages are not color coded; be cautious to insert the magnet with the same polarity it was removed.
Tip: Regardless of whether a stage moves up or down in real space, the sample is numerically down (negative) to ASI controllers.
F-axis (SPIM head)
In contrast to the upper limit, the lower limit of the upper single axis stage (Figure 1 part 7) is the most important limit to set, and also the most difficult. Nominal spacing between the typical Nikon 40x SPIM objectives and the coverslip is ~250 um, so the limit must be set with a fine accuracy to allow the needed range while preventing a crash. Additionally, the SPIM head must be mounted level with respect to the coverslip.
To set the lower limit of the F-axis:
- Prepare a coverslip with a feature on the upper surface, e.g. make a small dot with a permanent marker, and place it in the sample holder.
- Use the inverted objective on the lower Z stage: Z-axis, to focus on the coverslip feature. If focus cannot reach the coverslip’s top surface, the limit magnet is probably too low; move it upwards.
- Very carefully and gradually, lower the SPIM head to the coverslip watching carefully for the moment that the objectives touch the coverslip by noting the change in focus in the bottom camera.
- Reach under the stage and push up alternately on both sides of the sample chamber to verify that the SPIM head is level with respect to the coverslip. If it is not, raise the SPIM head up before adjusting it.
- While monitoring the Tiger Z/F LED for rapid flashing, use a 1.5 mm hex driver to move the top magnet of the Z stage: F-axis downward until the limit is found. There is a range of a few millimeters over which the limit will be reported; place the magnet at the top of that range so the Hall effect senses it unless the stage moves up slightly.
- Check that this hardware-limit stops the motion appropriately by moving a small distance up and then back down (e.g. by issuing the command R F=10000 followed by R F=-10000 or dialing back and forth with a control knob). The stage should stop short of the prior position, with the objectives nearly touching the bottom of the sample holder (get the position before and after movement by checking the navigation tab or issuing the WHERE command).
Z-axis (inverted scope)
These steps do not apply to SPIM systems mounted on non-ASI inverted microscopes.
Lower limit
This prevents the lower Z stage from crashing the objective mount into the attached cube. This limit magnet is usually set by ASI technicians during factory assembly. To set the lower limit8) of the Z stage: Z-axis:
- Gradually move the inverted objective away from the sample (e.g. using the joystick wheel) until there is a few millimeters of space between the cube mounted to the side of the lower stage and the lower objective holder.
- While continuously monitoring the Tiger Z/F LED, use a 1.5 mm hex driver to move the top magnet downward until the LED rapidly flashes. Adjust it so that the magnet is on the top end of the range. (If the magnet is in a housing, that housing may be rotated by 180° if needed.)
- Check that the limit stops the motion appropriately by moving a millimeter or so towards the sample and then away by the same amount. The Z stage: Z-axis should stop just short of the prior position, before a crash occurs.
Upper limit
This step is less critical because the lower Z stage is not likely to be moved around much, but hardware limits are still recommended to prevent crashing into the bottom of the sample chamber. The limit can be set anywhere between the focus position and where the inverted objective touches the sample chamber bottom. To set the upper limit9) of the Z stage: Z-axis:
- Raise the SPIM assembly up a few millimeters from the coverslip in the sample holder so the subsequent steps won’t break the coverslip.
- Gradually raise the lower objective (e.g. using the joystick wheel) until the sample holder is moved upward by the inverted objective. Watch the sample holder from the side to see its vertical movement. Lower the objective until the sample holder is stationary again.
- While monitoring the Tiger Z/F LED, use a 1.5 mm hex driver to move the bottom magnet upward until the LED rapidly flashes. Adjust so that the magnet is on the bottom end of the range. (If the magnet is in a housing, that housing may be rotated by 180° if needed.)
- Check that the limit stops the motion appropriately by moving a mm or so up and then back down the same amount (e.g. by issuing the R Z=10000 command followed by R Z=-10000). The objective should stop itself slightly short of the prior position, but still very close to the bottom of the sample holder.
XY-axes
Tools: 1.5 mm hex driver
The video is cued up to demonstrate setting the XY-axes limit magnets; note that we now recommend setting the X-axis magnets first.
Set the limits of the XY stage to prevent the objectives from crashing into the sample holder, which can cause many different problems the least of which is perturbing objective alignment. The magnets are in color coded housings that are positioned along a track, Figure 19, and secured by a set screw and 1.5 mm hex driver. If your sample holder is small, each magnet housing may need to be rotated 180° so that the magnets are positioned close enough to one another while still enabling the set screws to secure the housing in the track. However, the limits magnets cannot function properly if the housings swap sides; the magnet housing with a red dot limits axis-positive travel, with a white dot limits axis-negative travel.
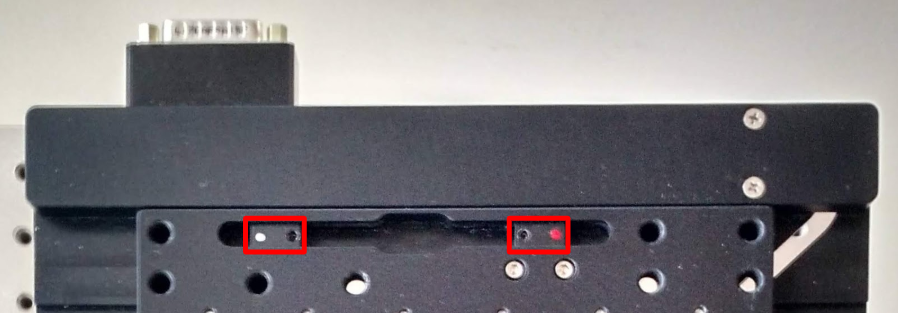 Figure 19: XY limit magnets are in housings that can be positioned along a track and secured by a set screw.
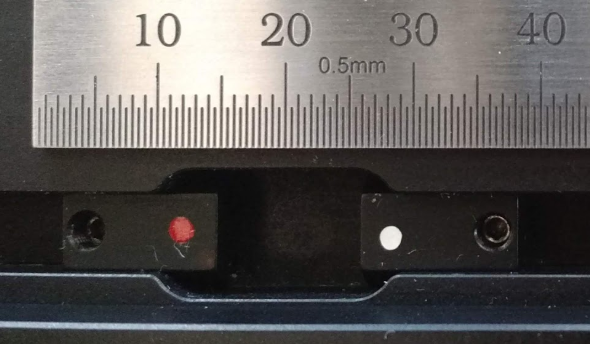 Figure 20: Close-up of rotated (vs swapped) XY limit magnet housings
To set the limits of the X-axis:
- Start with the SPIM assembly lowered down to its Z-axis limit position as set in the prior sequence.
- Move the XY stage in the Y-axis until the X-axis limit magnet track is visible.
- Move the XY stage in the X-axis (left-right) until the objectives are just about to crash (or are barely crashing) into the side of the sample chamber.
- Monitor the Tiger X/Y LED for rapid flashing while moving the limit magnet until the limit condition is barely reached. (Rotate the magnet housing 180° if needed.)
- Repeat steps 3 and 4 above for the other side of the X-axis.
- Use the joystick first on the slow speed setting then on the fast speed setting to check that the hardware limits stop the motion before the objectives crash into the sides of the sample holder.
To set the limits of the Y-axis:
- Move the XY stage in the Y-axis (forward-back) until the objectives are just about to crash (or are barely crashing) into the sample chamber.
- Monitor the Tiger X/Y LED for rapid flashing while moving the limit magnet until the limit condition is barely reached. (Rotate the magnet housing 180° if needed.)
- Repeat steps 1 and 2 above for the other side of the Y-axis.
- Use the joystick first on the slow speed setting then on the fast speed setting to check that the hardware limits stop the motion before the objectives crash into the front or back of the sample holder.
Figure 18: The limit magnets are in housings that can be positioned along a track, secured by a set screw.
Figure 19: Small sample chambers may require the limit magnet housings be rotated 180° in order to get the magnets close enough together while still being able to secure the housings via their set screw.
The relevant sections of the diSPIM alignment videos are embedded.
Optical alignment
Goals: The qualities of final alignment (for both SPIM optical paths), include all of the following:
- beam/sheet plane coincident with imaging focus plane, near the center of the piezo and/or slice travel
- sheet centered in imaging camera field of view
- beam perpendicular to imaging camera field of view
- beam waist centered on imaging camera
- for dual view, epi spot centered on epi camera
- when mounted on an inverted microscope, sheets centered in bottom camera’s field of view (i.e. co-alignment of all three objectives)
For single-view systems there are more adjustments than required to achieve good alignment of the single light sheet plane and detection focal plane and does not have an epi view. This makes it easier to align, but also makes it possible to adjust things so that the illumination is far from the center of the illumination objective so this should be checked by eye.
Overview
Before acquiring data, the optical paths must be aligned. This is the trickiest thing for new diSPIM users to learn. If the system is not disturbed, the alignment can last for months. Crashing the equipment or changing objectives or filters usually requires at least partial realignment.
Do a coarse mechanical alignment by eye, then proceed to fine alignment. Think of the fine alignment process as a giant inward spiral; there are many adjustments to make, and working through them iteratively allows you to zero in on perfect alignment.
We are concerned with getting both the beam position and angle correct, along with getting both objectives “looking” at the same place. Fortunately, the adjustments to do so are mostly independent of each other. Table 1 can be derived by understanding the light path.
| Adjustment | Position? | Angle? | Comments |
|---|---|---|---|
| Tilt of dichroic mirror (Cube-III) | Some | Yes | Position effect usually small 10) |
| Tilt of camera mirror (Cube-III) | Yes | No | Set during scanner alignment and not after |
| Z position of SPIM head | No | No | |
| Objective bushing (focus) | Maybe minor | Maybe minor | If the bushing isn't perfectly concentric then slight movements can occur but this isn't usually a problem |
| Linear objective adjustment | Yes | Maybe minor | |
| | | | |
| | | | |
Coarse alignment
Co-align objectives by eye
If you haven't already done so, use the OBLPA adjustment screw and the two objective bushings to move the objectives until they are visually symmetric from the front, as in Figure 13, and visually aligned when viewed from the side of the microscope.
Rotate cameras and scanners by eye
Adjust the angles of the cameras and scanners to be parallel/perpendicular to the SPIM arm cubes as well as possible by eye. With careful sighting along parallel surfaces you can align them to better than 1° of rotation.
Warning: Be very careful with exposed laser beams; wear appropriate eye protection else serious injury may occur.
Check micromirror
This step is not necessary; feel free to skip it. Remove the CUBE-III faceplate and attached filter cube assembly, Figure 17, place the square alignment target, Figure 21, over the opening. Turn the controller off to be sure that the scan mirror is not being deflected, power on the laser, and observe where the laser is hitting the target. If the laser spot is well within the first target ring, install the dichroic mirrors into the CUBE-IIIs and proceed with alignment.
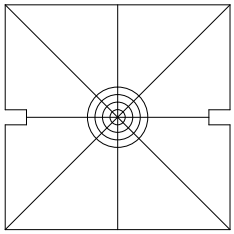 Figure 21: Square target; fits on CUBE-III in place of the face plate (after downloading and printing at full size)
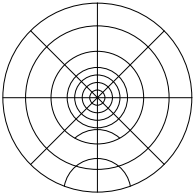 Figure 22: Round target; trim to fit desired size (after downloading and printing at full size)
Adjust dichroic tilt
Turn on the laser and use the kinematic adjusters on the CUBE-III to adjust the dichroic mirror tilt so that the laser beam comes out of the objective approximately straight.11) It may be helpful to use a 45° surface like a folded business card, as in Figure 23. This is a coarse adjustment only.
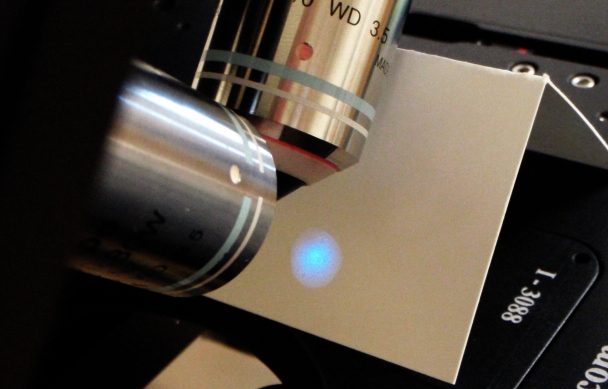 Figure 23: Scanner mirror and iris diaphragm are imaged by the laser on a target in the far-field of the objective. The emerging beam is adjusted to be centered leaving the objective.
Tip: CUBE-III face plates should be positioned entirely by the kinematic adjusters, not at all resting on the body of the CUBE-III.
Scanner Beam
Check the centering of the scanners since it is easy to do at this point. You should be able to see the extent of the scanner mirror with the scanner iris fully open. The center of the Gaussian beam, iris aperture, and scan mirror should be nearly or completely together; in practice this is hard to perfect. If you are not satisfied, contact ASI for assistance.
Fine alignment
The video is cued up for an overview of the fine alignment.
The process detailed below uses Micro-Manager and its diSPIM plugin to provide a live view from the SPIM cameras. The principle is to spiral toward refinement; because most adjustments affect other adjustments, do not worry about perfection on the first iterations. After initial setup only Phase 1 steps are likely to need minor adjustments.
Before you begin:
- Launch Micro-Manager
- Load the hardware configuration
- Open the diSPIM plugin - in the Micro-Manager window, go to Plugins > Device Control > ASI diSPIM
- Go to the Devices tab In the ASI diSPIM plugin window and configure it to match your system
- Set a relatively long exposure time, e.g. 100 ms
- Use the Navigation or Setup Path X tabs
- control movement
- control cameras
- verify the piezos and scanners are in their neutral positions (at zero)
A uniform dye solution12) works well for Phase 1, but a solution or 2D sample of fluorescent beads13) is better for Phase 2.
Outline
- Phase 0 (coarse alignment by eye as described above)
- Phase 1 (iterative)
- 1.1 Co-align SPIM objectives to focus and center beams.
- 1.2 Tilt dichroic mirrors for horizontal beams uniformly in/out of focus.
- 1.3 Tilt imaging mirrors to center epi spots.
- 1.4 Adjust lateral position of objective.
- 1.5 Go back to 1.1 and repeat until no adjustments needed
- Phase 2 (may have to be repeated for initial alignment, and again when scanners or cameras are changed or disturbed)
- 2.1 Focus collimators to center beam waists in FOV.
- 2.2 Rotate scanners for uniform focus across the sheets.
- 2.3 Rotate cameras for vertical sheets from epi view.
- Go back to 1.1
- Phase 3 (performed just once for initial alignment and again for objective change)
- 3.1 Establish the coverslip location.
- 3.2 Align the inverted scope with the SPIM objectives.
- 3.3 Cross-calibrate the piezo and light sheet movement.
- Phase 4 (performed for any new sample)
- 4.1 Check that light sheet and detection plane are coincident; adjust offset in plugin if needed.
Phase 1
Repeat the steps of Phase 1 steps multiple times as you spiral in on alignment.
Cofocus SPIM objectives
Configure the Setup Path tabs:
select the checkboxes for 1) the “excitation beam” and 2) “Change settings on tab activate”, and
use the “On tab activate” drop down menu to select the Imaging camera.
Adjust:
- both objective bushings, and
The goal is to have both beams in focus (roughly at first, as in Figure 24, but better and better in subsequent iterations of Phase 1, as in Figure 25).
The video is cued up to demonstrate cofocusing the SPIM objectives using Micro-Manager.
This is best done by alternating between steering and focus adjustments, alternating sides, moving halfway to focus at a time until both beams are centered and focused. (See the troubleshooting page if you cannot focus for lack of bushing travel.) Keep in mind that the nominal spacing between the objective bushing and piezo is 1 mm as pictured in Figure 11.
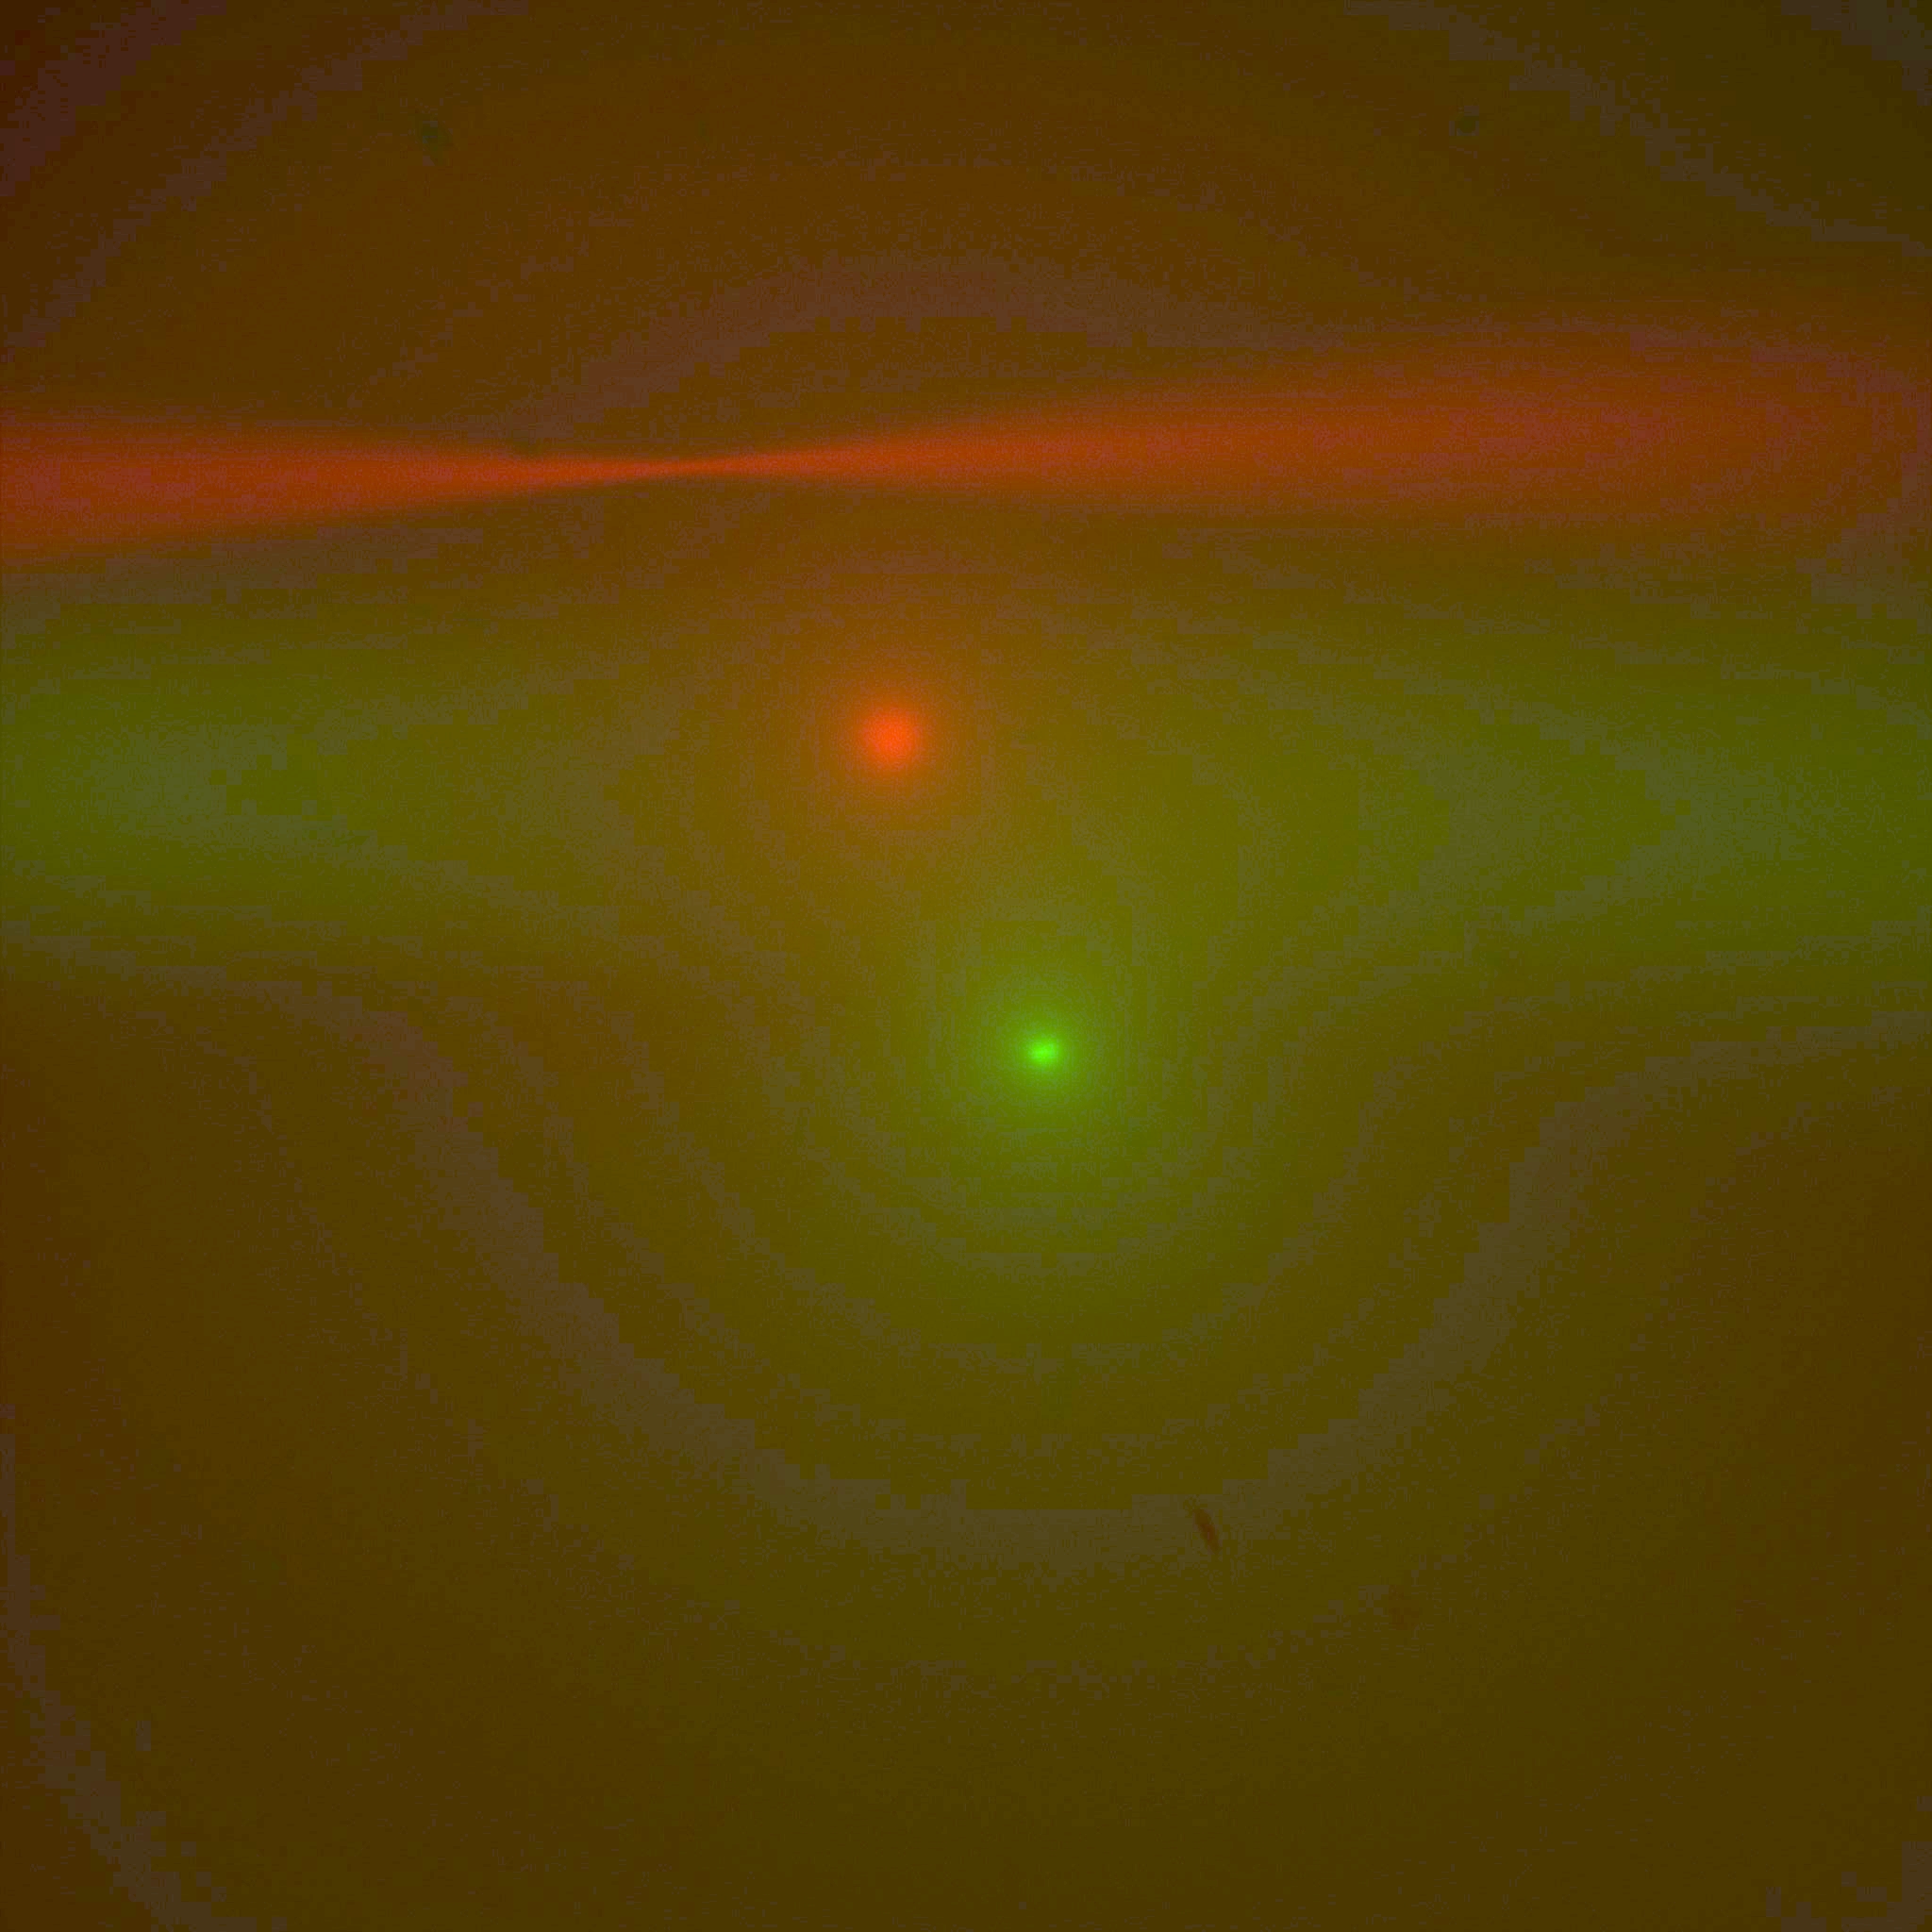 Figure 24: Multi camera, live mode: both beams and epi-spots, still largely unfocused and malaligned
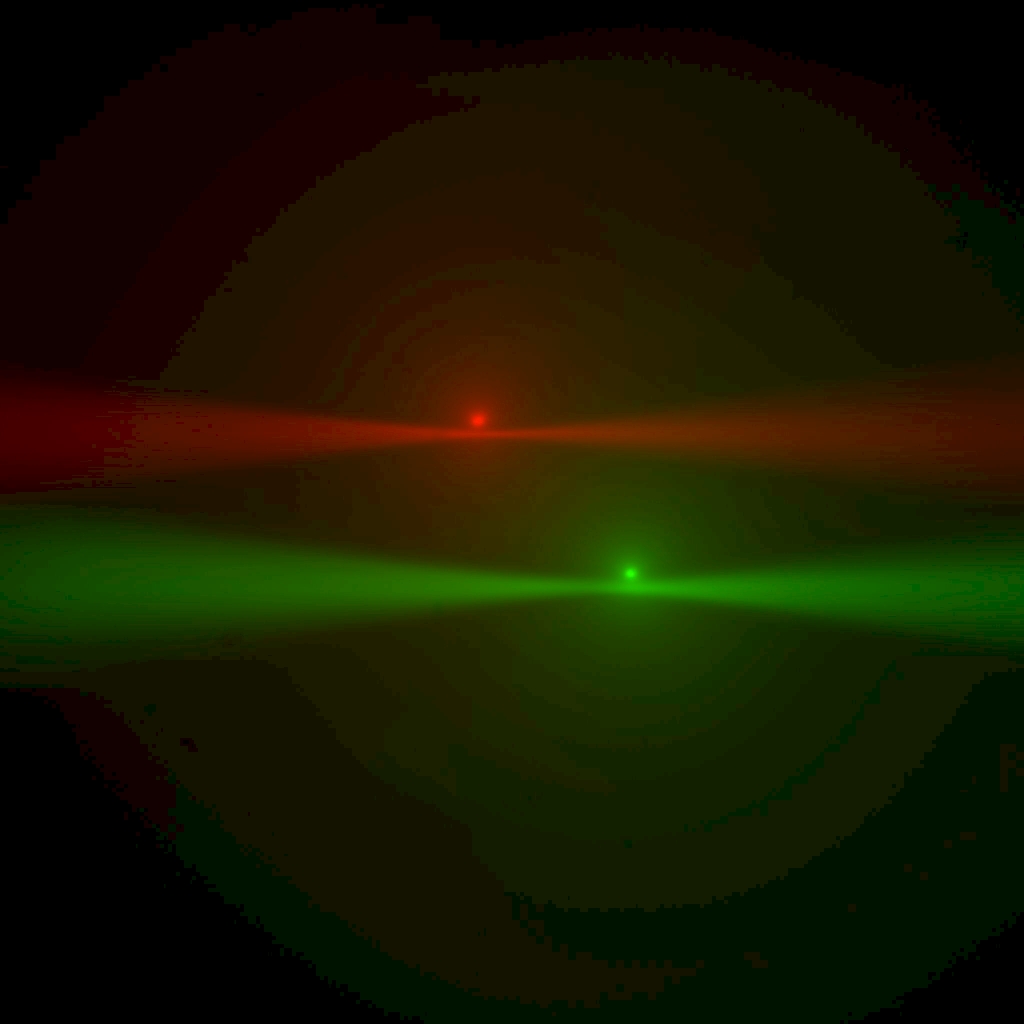 Figure 25: Multi camera, live mode: as alignment improves, each beam waist nears the epi-spot
Dichroic tilt
Adjust: Dichroics' CUBE-III kinematic adjusters (Figure 26)
End goal: Both beams uniformly in/out focus15) and horizontal (in the Live mode window), as in Figure 28
The video is cued up to demonstrate adjusting the tilt of dichroic.
In the Navigation tab, verify that the the piezos and scanners are in their neutral positions (at zero). Use only the imaging camera, working on one beam at a time.
Check the uniformity of focus across the beam by adjusting the imaging piezo (e.g. using the joystick knob) or the slice position to see if the beam comes in and out of focus uniformly or with a horizontally rolling focus. Use CUBE-III kinematic adjuster A alone, or B and C in tandem, to get the beams properly positioned. It may be helpful to use a LUT (false-color heat map) on a single-camera view to aid in judging uniformity.
Next, adjust kinematics B or C (alone or in opposition) to get the beam horizontal. Confirm that this did not affect the uniformity of focus. The grid overlay in Micro-Manager (Plugins > Acquisition Tools > Pattern Overlay) can be helpful by providing reference lines.
Though not necessary, some may prefer to close the scanner iris to achieve a pencil beam as seen in Figure 28 so that the waist of the beam is not distracting.
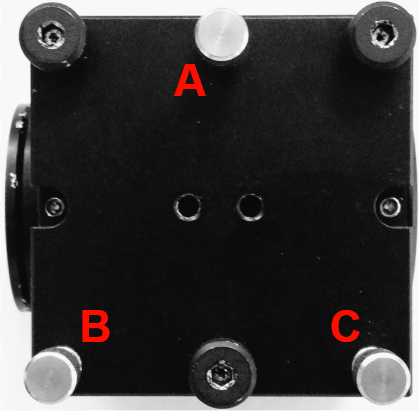 Figure 26: CUBE-III kinematic adjuster A alone, or B and C in tandem, to get the beams uniformly in/out of focus; use adjusters B or C (alone or in opposition), to tip beam horizontally (in the Live mode window
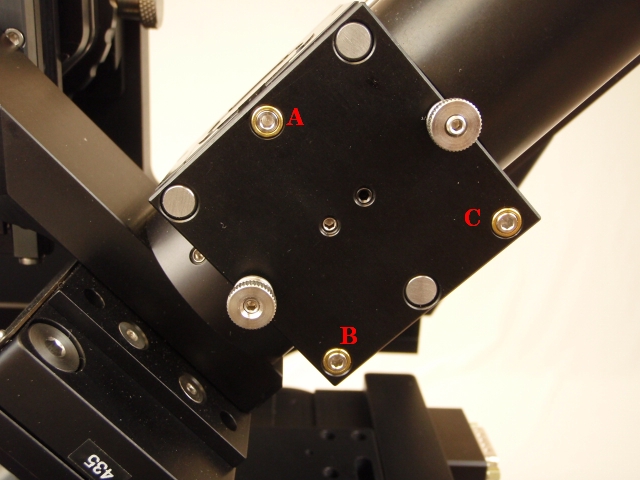 Figure 27: The CUBE-III kinematics level the beam horizontally and affect the (left-right) uniformity of focus
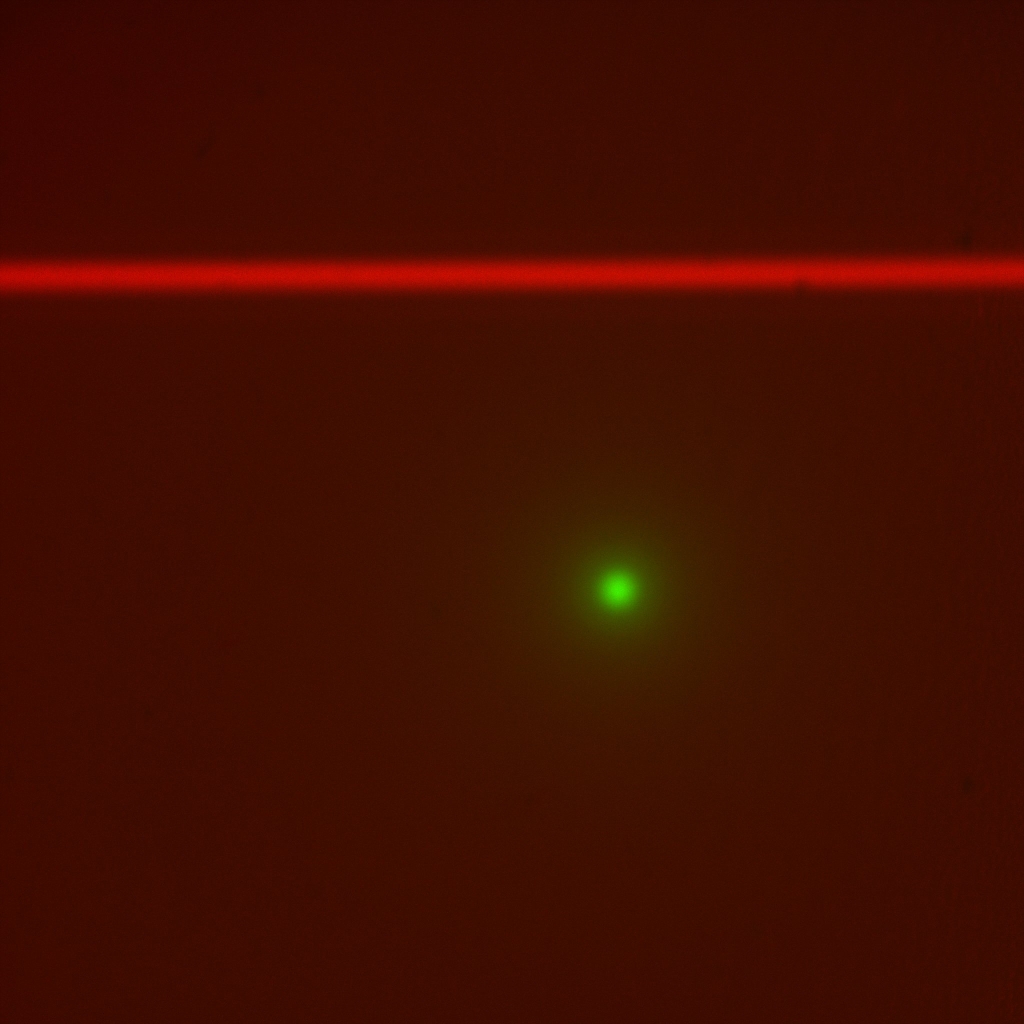 Figure 28: With correct dichroic tilt, the beam appears horizontal and in focus; this image was taken in Multi camera view so the epi-spot of the same beam is visible
After the first couple of times you complete this step, jump back to cofocusing the SPIM objectives again.
Imaging mirrors
Adjust: Right-angle mirrors' CUBE-III kinematic adjusters (Figure 26)
End goal: Epi-spots centered on the camera
The video is cued up to demonstrate cofocusing the SPIM objectives using Micro-Manager.
Eventually, in Multi camera mode the two images will overlap as in Figure 29. The crosshair in Micro Manager (Plugins > Acquisition Tools > Pattern Overlay) can be used to mark the center of the image.
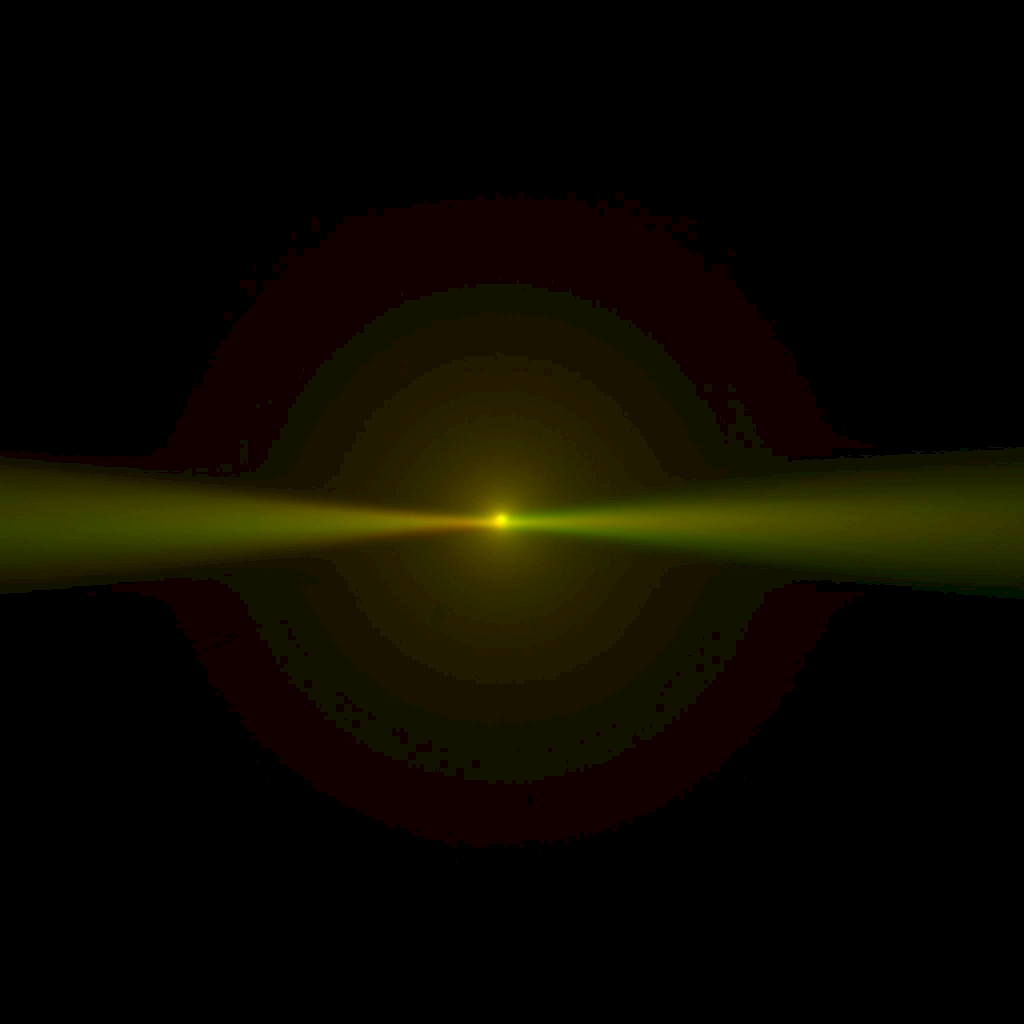 Figure 29: The CUBE-III kinematic adjusters for the right-angle mirrors in front of the cameras are adjusted to bring the epi-spots to the center of the camera frame
Tip: Approximate in initial passes, but demand more perfection as the spiral tightens, keeping in mind that adjustments made in Phase 2 will have an effect. In Phase 1, look at beams not sheets.
Repeat Phase 1 until no adjustments are necessary, and again after Phase 2 if any adjustments were made. Proceed to Phase 2 when the beams and images are well focused and positioned.
The video is cued up to demonstrate a second iteration of Phase 1.
Phase 2
Use a solution or 2D sample of fluorescent beads16) for Phase 2. Phase 2 should only have to repeated once or twice for the initial alignment and revisited anytime the collimators, scanners, or cameras are changed or disturbed; it is callous to sample changes.
Collimator
Adjust: Collimator that connects the fiber optic to the scanner body
End goal: Beam waists centered
The video is cued up to demonstrate adjustment of the collimator.
If it is not already open, open the iris completely to see the beam waist (i.e. focus point). When the beam waist is centered horizontally, the epi-spot will appear at its smallest and maximum intensity.
To center the waist, insert the small black eccentric tool, seen in Figure 30, into the side of the collimator and engage the lip on the lens mount. Once engaged, turning the tool will move the focus point along the beam. If needed, slightly loosen the retaining set-screw on the opposite side of the collimator while still engaging the lens mount with the collimator adjuster tool as in Figure 31. (The lens assembly can slip out of the collimator housing entirely if you loosen the set screw without the tool engaged; if that happens, unscrew the fiber collimator from the scanner housing to put it back together.17)) Only small movements should be needed.
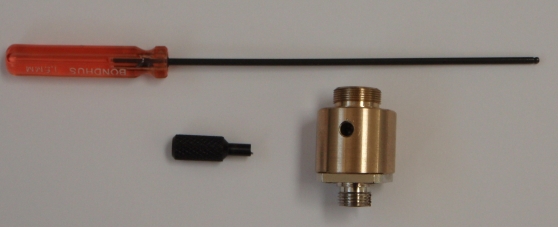 Figure 30: Collimator adjuster tools
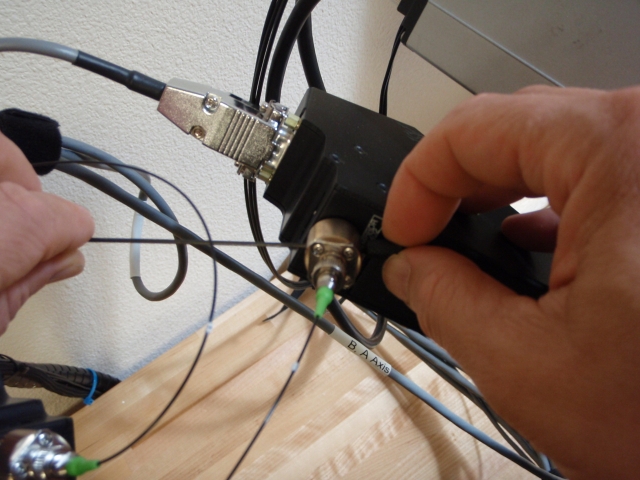 Figure 31: Adjust the focus of the collimator to center the beam waist
Scanner tilt
Adjust: Rotation of the scanner body
End goal: Uniform (vertical) focus of the sheet as seen by the imaging camera
The video is cued up to demonstrate adjustment of the scanner rotation.
In one of the Setup Path tabs, select the checkboxes for both beam and sheet, and click on Imaging and Live buttons. Adjust the “Sheet width” to fill most of the camera FOV. The optimal method uses a solution of freely diffusing beads (or Zebra highlighter pen). Take an autofocus stack and judge whether the sheet comes in and out of focus uniformly rather than with a vertically rolling focus. A secondary method uses a dye solution; both edges of the sheet should be well focused near the beam waist, see Figure 32 and Figure 33. A third method moves the stationary beam from one side of the FOV to the other (via the Navigation panel) and comparing focus at the two locations. Check both scanners.
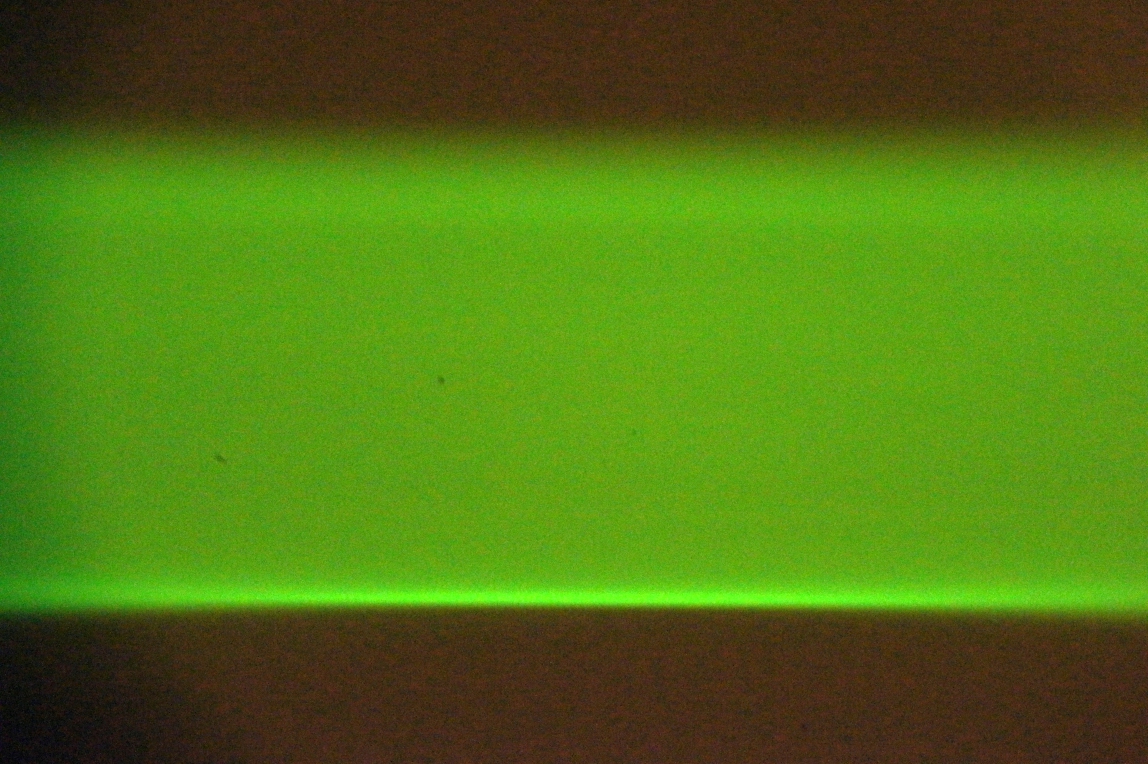 Figure 32: Uneven vertical focus of the sheet indicates the scanner should be rotated
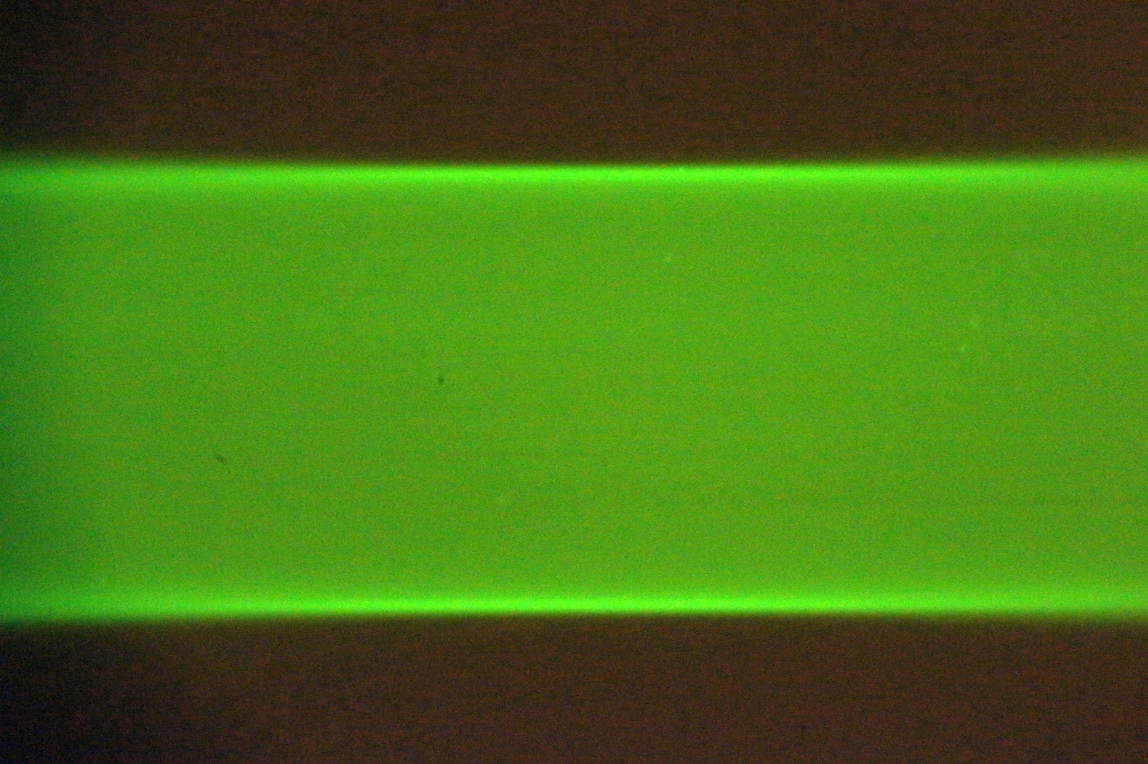 Figure 33: Uniform vertical focus of the sheet indicates the scanner is in the correct orientation
If the focus is not (top-bottom) uniform, the scanner needs to be rotated. Usually you can grip the scanner tube lens and rotate it slightly (while watching the fiber collimator to judge movement). If you had to twist one or both scanners, return to the beginning of Fine Alignment Phase 1.
Camera tilt
Adjust: Rotation of the camera (and camera's tube lens)
End goal: Epi-view of the sheets produces a vertical line in the camera image
Tools: 2 mm hex driver
The video is cued up to demonstrate adjustment of the camera's rotation.
If the epi-view of the sheet is not vertical, slightly loosen the set screws holding the camera's C-mount adapter to the tube lens, rotate the camera/adapter as needed, and retighten the screws. Because we already verified the scanner orientation, any remaining tilt must be in the camera. Check both cameras.
If you make any changes in Phase 2, return to the start of Phase 1.
Phase 3
Phase 3 should be performed just once for initial alignment and again selectively for objective or sample changes.
Establish coverslip location
Adjust: SPIM Head height (electronically), “SPIM Head height” coordinate value, SPIM Head rotation
End goal: Both sheets hitting the coverslip in the center of the cameras' FOVs
Tools: M5 hex driver
The first video is cued up to demonstrate how to find the coverslip with the SPIM objectives; the second video shows how to rotate the SPIM Head (in case that is necessary).
Turn on both sheets and Multi-camera Live mode.
Slowly lower the objective pair into the dye solution. As the objectives near the coverslip, reach under the sample chamber and delicately lift it to check how close the objectives are. Note if one objective is closer to the coverslip than the other; if it is, use the controller to raise the SPIM Head and slightly loosen the 4 bolts holding the SPIM Head with a 5 mm hex driver so you can level it. Repeat those steps until the objectives are equally close to the coverslip, and the coverslip becomes apparent where the fluorescent beam stops, Figure 34. The objectives will touch, or nearly touch, the bottom of the chamber. On the Navigation tab, click the Set 0 button for the SPIM Head Height coordinate value. (Zeroing the SPIM Head Height coordinate value at the coverslip or just above it can save a lot of time between samples.) When it’s time to change samples, click the Load sample button on the Navigation tab to raise the SPIM Head, swap samples, and click the Go To 0 button.
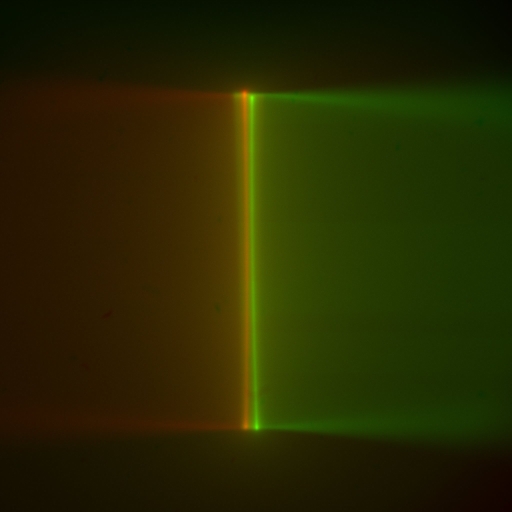 Figure 34: Multi camera, live mode: converging light sheets in dye cross each other just before disappearing when they encounter the coverslip; the sheets appear vertical in the camera image
Align bottom objective with SPIM objectives
Adjust: Inverted microscope objective position (manually for lateral motion, electronically for axial motion), “Lower Z Height” coordinate value
End goal: Light sheets hitting the coverslip in focus and centered in the inverted scope's camera's FOV
The video is cued up to demonstrate alignment of the inverted scope objective with the SPIM objectives.
Click on the Bottom camera and Live buttons on the Navigation tab and locate the light sheets intersecting the coverslip. Center the image by adjusting either the CDZ-1000 XY translator (item 6 in Figure 1), or on RAMM systems: the inverted microscope’s objective adjuster. For larger front to back adjustments, add shims between the SPIM mount and the CDZ; for side to side adjustments, shift the Z-Stage:Z-axis in the dovetail mount to the CDZ. Focus using the lower Z-stage:F axis. On the Navigation tab, click the Set 0 button for the Lower Z Height coordinate value. Sample spotting is much easier if you take note of the relative position of the light sheets to the bottom camera in XY and Z. Setting appropriate Z-references helps in this regard.
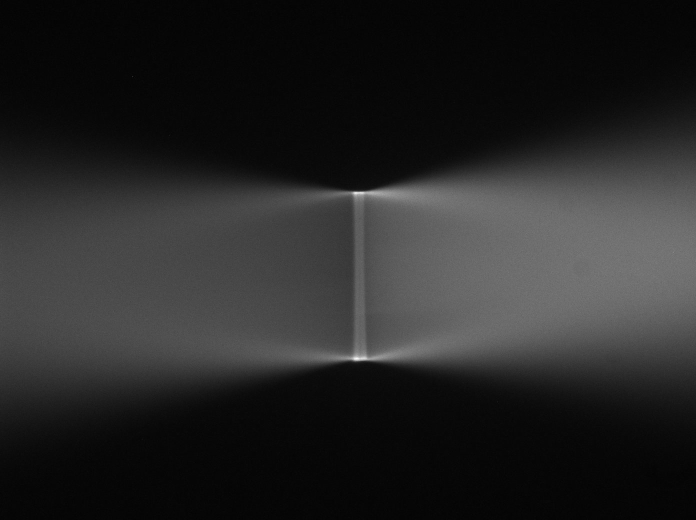 Figure 35: Inverted microscope's view of the light sheets shown in <imgref ConvergingSheets
Cross calibrate piezo and scanner movement
Adjust: Values in the Piezo/Slice Calibration section of the Setup Path tabs via the 2-point button
End goal: Light sheets hitting the coverslip in focus and centered in the inverted scope's camera's FOV
The video is cued up to demonstrate alignment of the inverted scope objective with the SPIM objectives.
Use either a focused beam in dye, or a sheet with a field of fluorescently labeled objects. When imaging real samples, you may wish to verify this calibration step fairly often, in which case you can use fluorescent objects in the sample as targets rather than the focused beam waist described here.
Use the Setup Path tabs. Establish a focused beam in the dye solution. Set the manual controls so that the left knob controls the imaging piezo and the right knob controls the Sheet Beam, Slice Position.
Detailed instructions can be found in the Micro-Manager diSPIM Plugin User Guide.