This is an old revision of the document!
Table of Contents
Manual
This online manual grew out of the ASI diSPIM User Manual which is no longer being actively updated (updates are on this wiki instead ![]() ). As of June 2015 some of the internal links and references of the online manual are broken because of imperfect exporting from the original document.
). As of June 2015 some of the internal links and references of the online manual are broken because of imperfect exporting from the original document.
The section “Aligning scanners separate from the microscope” is not here, for now see the original ASI diSPIM User Manual section 5.6; most users will never need to do this step, or will need to do it infrequently. Contact ASI if your scanner seems mis-aligned.
Overview
The diSPIM is a flexible and easy-to-use implementation of Selective Plane Illumination Microscopy (SPIM) that allows for dual views (d) of the sample while mounted on an inverted (i) microscope.
The diSPIM has two (usually symmetric) optical paths for light sheet imaging. Two objectives are placed at right angles above a sample mounted horizontally. A light sheet is created from one objective and then imaged using the other objective. A stack of images is collected by moving the light sheet through the sample. The role of the two objectives can be exchanged to collect another stack from a perpendicular direction, and then the two datasets can be computationally merged to yield a 3D dataset with isotropic resolution.
The diSPIM “head” can be mounted on various inverted microscopes. A microscope-specific adapter bracket accepts the SPIM-MOUNT to which the SPIM assembly attaches.1) Thus far brackets exist for the following microscopes:
- ASI RAMM frame (shown in figure below)
- Leica DMI-6000
- Nikon TE-300, Ti, TE-2000, Ti2
- Olympus IX-71/81, IX-73/83
- Zeiss Axio-Observer
The rest of this document will concentrate on the function, alignment and operation of the diSPIM microscope. The vast majority of the instructions apply regardless of the inverted microscope frame on which the diSPIM “head” is mounted.
Figure ## shows the main components of the diSPIM as mounted on a RAMM frame.
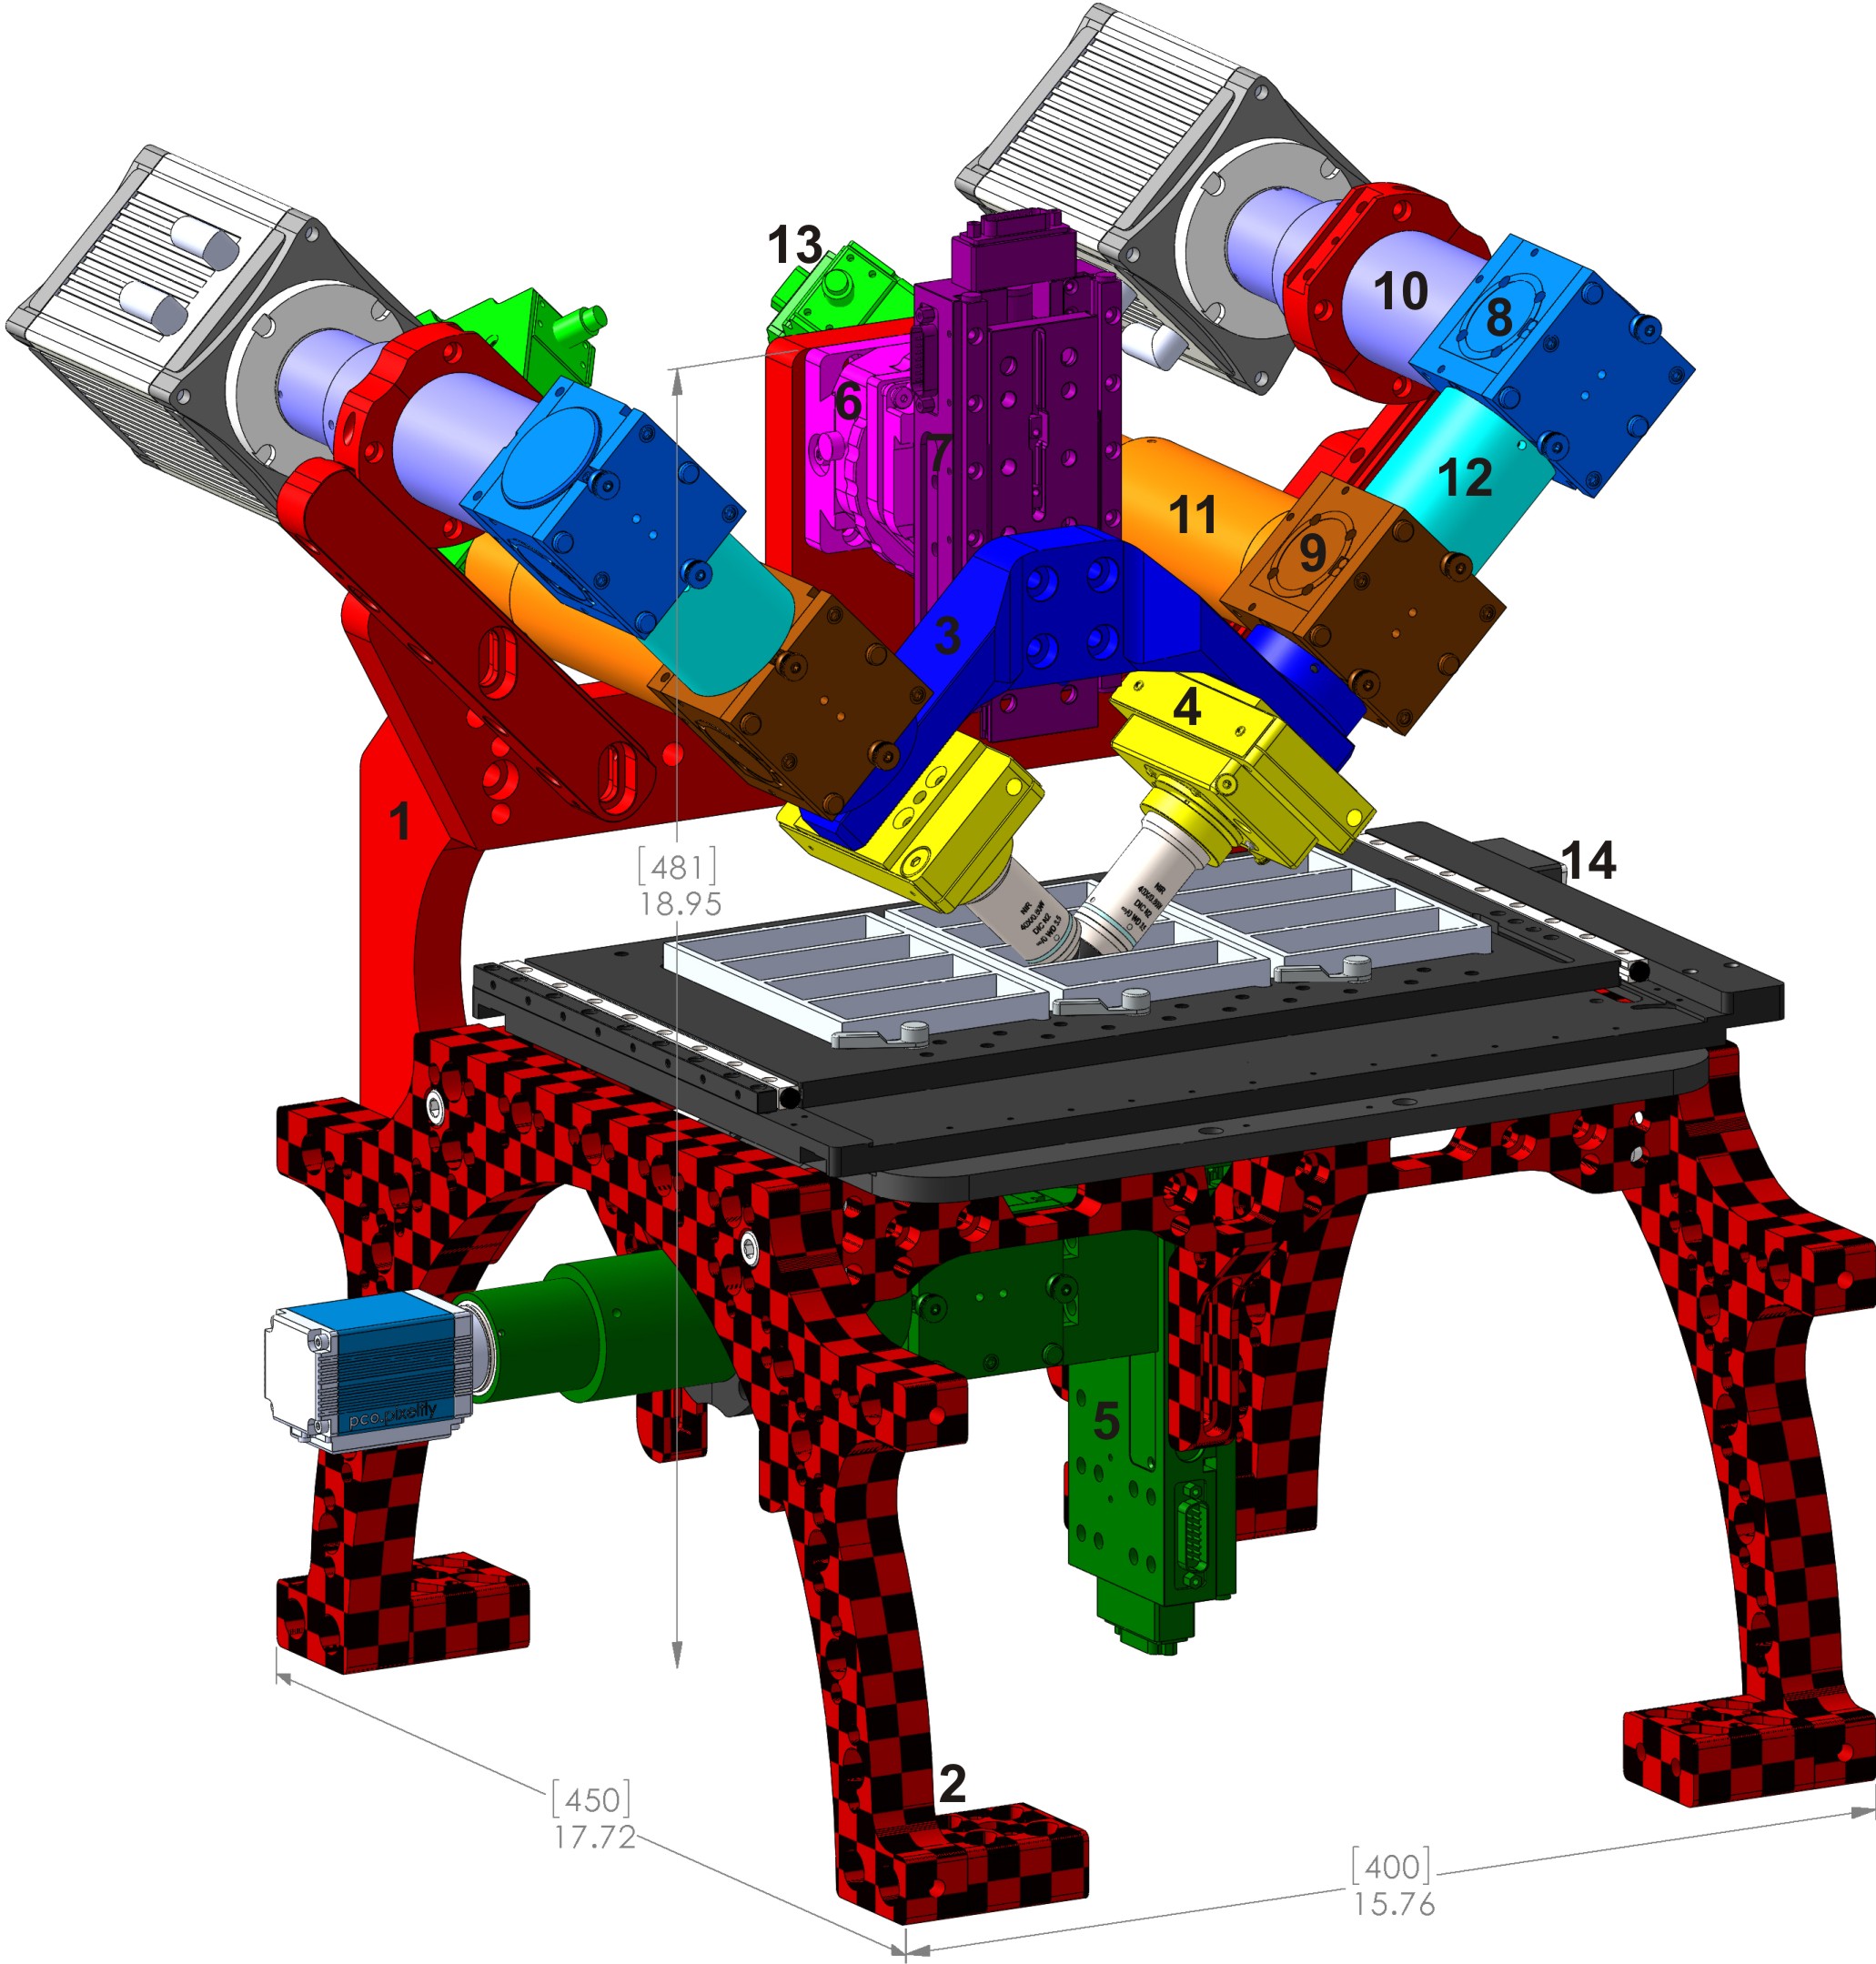 Figure ##: Typical complete diSPIM system on RAMM frame showing major components. 1) SPIM-MOUNT , 2) SPIM-RAMM , 3) SPIM arm mount (RAO-0046 ), 4) piezo objective mover APZOBJ-200 or similar, 5) MIM inverted microscope with LS-50M stage, 6) CDZ-1000 centering stage or CDZ-R block, 7) LS-50M stage, 8) MIM-CUBE-II w/ mirror, 9) MIM-CUBE-II w/ fluorescence filters, 10) C60-TUBE_B imaging tube lens, 11) C60-TUBE_160 scanner tube lens, 12) 50mm extension tube, 13) MM-SCAN_1M light sheet scanner, 14) MS-2500 XY stage.
Assembly
The steps in this section are demonstrated in the following YouTube video: https://www.youtube.com/watch?v=TAgbr6IrTqw.
Attach the SPIM assembly to the microscope frame
The SPIM assembly is shipped separately and mostly assembled. The RAMM frame stand or the microscope mount assembly has two vertical arms on the back where 2 dowel pins each (total of 4) connect the microscope frame to the SPIM-MOUNT . Slide the complete SPIM assembly onto the dowel pins and fastened in place with the bolts provided (M8 thread with M6 Allen head). See Figure 2. If you need to set down the SPIM assembly, be careful not to rest it on the piezo objective movers (where the objectives will go) but instead tip it backwards and rest it on the arm and tube lenses to protect the piezos.
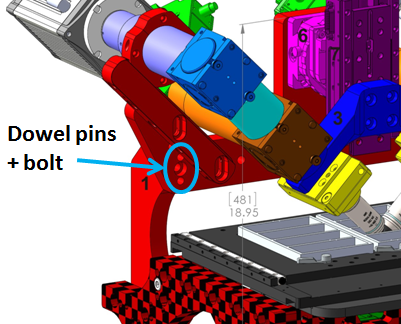 Figure 2: RAMM frame with SPIM assembly, showing location of dowel pins and bolts.
Once you have the SPIM assembly attached to the microscope frame, the next step is to add the scanners and cameras to the tube lenses using the C-mount adapters.
Attach the scanners
Locate the scanner tube lenses, C-mount adapters, and scanners. Attach the scanners to the C-mount adapters as shown in Figure 4. If needed, attach the tube lens assembly to the lower MIM-CUBE-II using a 2 mm Allen wrench to secure the three set screws to the adapter ring. Originally a 15 mm spacer was used, but a 7.5 mm or 10 mm spacer is generally preferred for the Nikon 40x objectives. This spacer serves to put the scanner in “4f” configuration so that tilting of the scanner's mirror appears as a pure translation in the image plane and is not accompanied by any rotation which leads to a fan-shaped light sheet.
On a few early systems the scanner tube lenses were fixed to the frame, similar to the camera tubes, instead of being fixed to the cubes. This is no longer recommended. Some hardware changes may be required to retrofit to the recommended configuration with the scanners fixed to the filter cube (Figure 5); contact ASI for details.
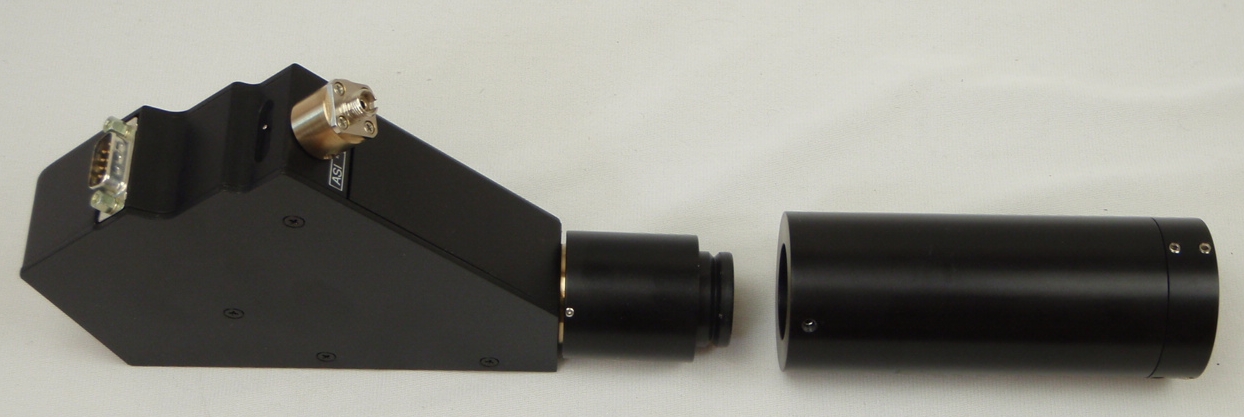 Figure 4: Scanner attached to C-mount adapter with tube lens assembly ready to be installed.
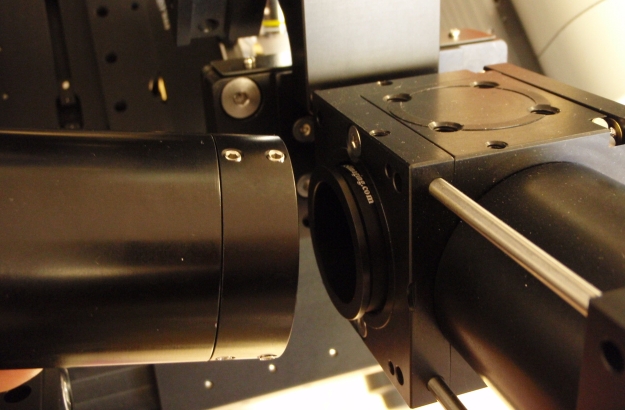 Figure 5: Tube lens assembly is attached to lower cubes on the microscope.
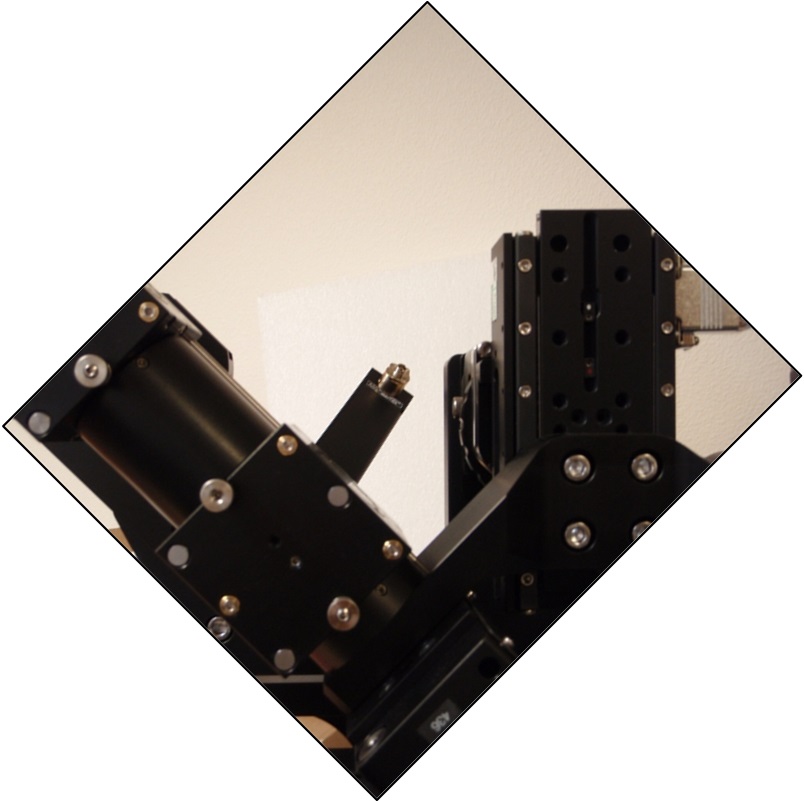 Figure ##: Scanner attached at C-mount with poor alignment
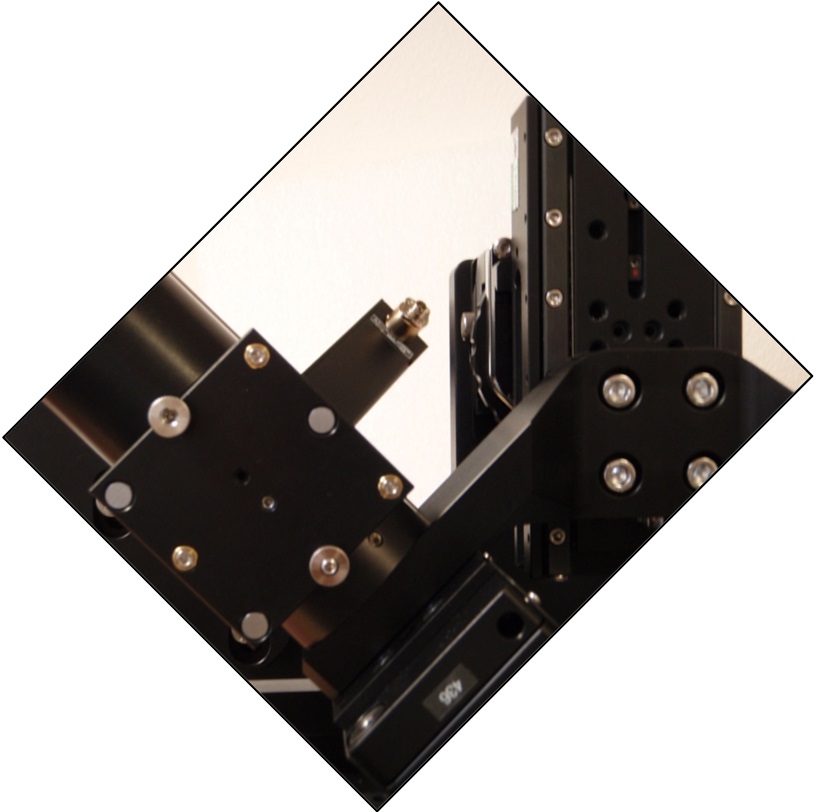 Figure 7: better alignment
The scanners should be attached so the fiber connectors are facing upwards and in toward the center at a 45 degree angle as shown in Figure 7. The cables to the scanner should say “B,A” and “D, C”. In other words, the scanner assembly is aligned parallel / perpendicular to the MIM-CUBE-II. Be sure all of the set screws on the lens tubes, cubes, and C-mounts that hold the scanners are snug and the that scanners cannot wiggle around on the mount. Coarse rotation of the scanner is best done by loosening the set screws between the tube lens and C-mount adapter. Fine rotation can be done by grasping the tube lens and turning it (the threads of the lens assembly will slip some, allowing the tube body to rotate relative to the end of the tube lens near the lens). There are a few rare cases where the scanners may be rotated by 90 degrees, with fiber connectors down and towards the center, and in that case different scanner cables are required.
Attach the cameras
The camera tube lenses are fastened to the SPIM-MOUNT with a pair of ring clamps that clamp the tube lenses to the frame. The end of the lens tubes should come to within about 1mm from the mirror cube on the SPIM arm. This allows the entire objective pair assembly to be moved up and down for focus without needing to move the cameras. When the objectives are lowered into position for viewing a sample, the camera tube lenses assembly can be adjusted so that the tube lenses are centered on the mirror cube. Two M8 Allen head bolts hold the lens tube support arms to the frame. By loosening those bolts it is possible to adjust the position of the lens tubes to be centered on the mirror cube.
Note that there are two common conventions for mounting the camera as described below, the ASI convention and the Shroff lab convention, that differ by 180 degrees for both cameras.
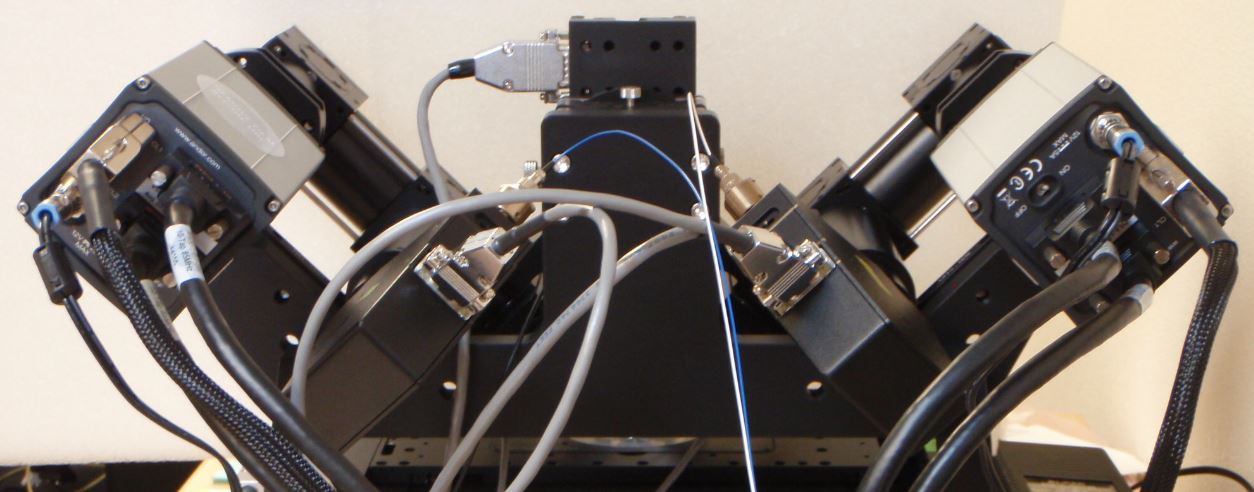 Figure 9: Andor Zyla cameras oriented according to ASI convention.
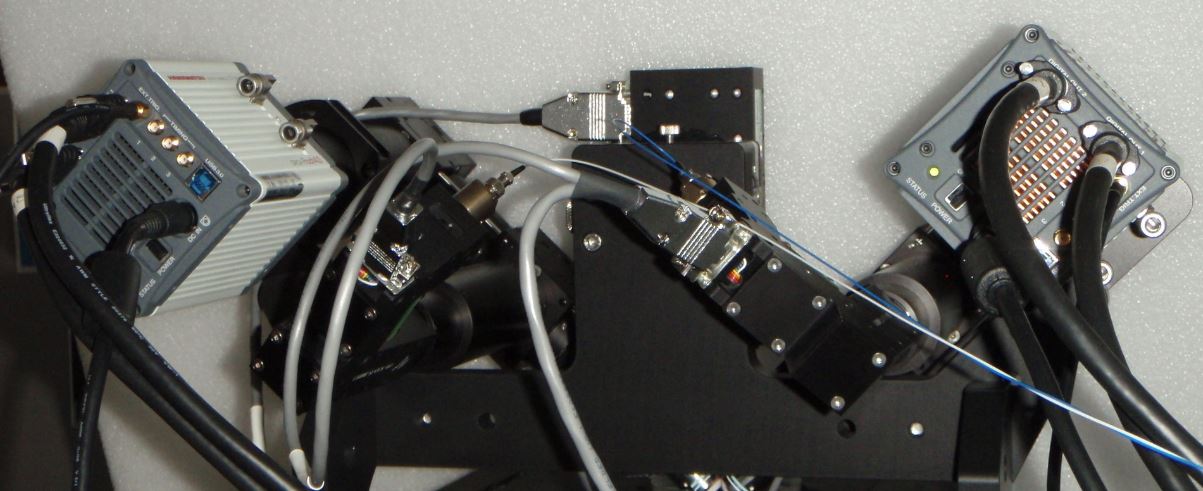 Figure ##: Hamamatsu Flash4 cameras oriented according to Shroff lab convention.
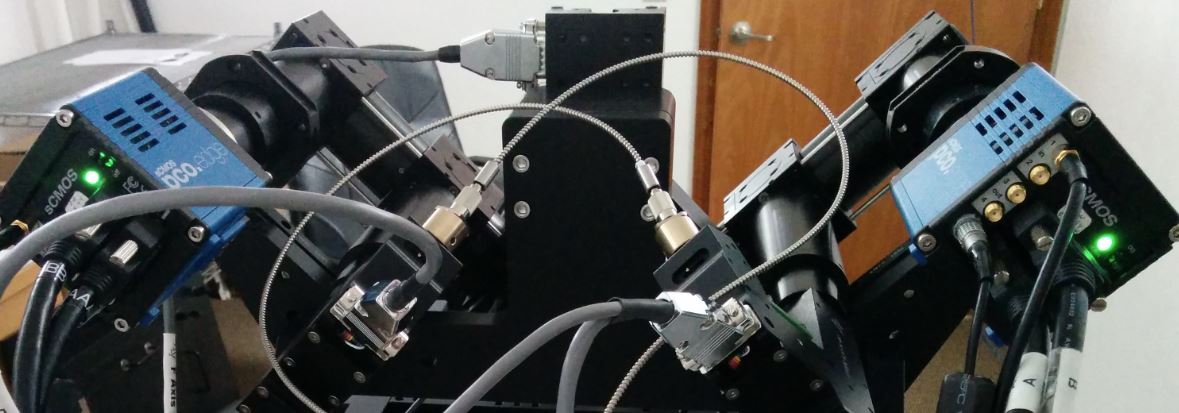 Figure 10: PCO Edge cameras oriented according to Shroff lab convention.
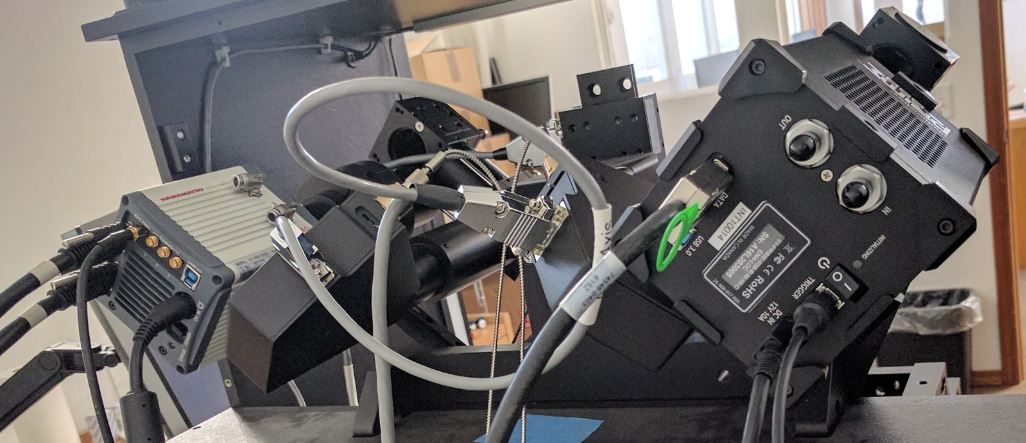 Figure ##: Photometrics Prime 95B and Hamamatsu Flash4 cameras oriented according to Shroff lab convention.
The user has a choice of camera orientation.
Having the beam enter the camera's field of view from the top or bottom may be advantageous for thin samples, because then the light sheet's intersection with the coverslip is a horizontal line and can be read out with fewer rows than if the beam enters the field of view horizontally. However, usually the cameras are oriented so that the beam appears to be coming in from the side, in part for historical reasons and also so that the light sheet mode of the cameras can be utilized.
The convention of the Shroff lab and their Nature protocols paper is to have the cameras rotated so that the beam appears to enter from the same side of the field as the camera is on, e.g. the beam coming from the left scanner (“Path A”) will appear on the right camera as entering from the right. This is confusing to some people and they would rather have the beam entering the field of view from the same direction that it enters in the microscope in front of them, e.g. the beam coming from the left as seen by the right side camera just as it actually is entering the imaging chamber from the left side scanner; this is the ASI convention. The difference between these two conventions is rotating each camera by 180 degrees. Depending on the camera orientation a constant rotation step may be necessary when beginning the registration step of the data analysis.
For the beam to appear horizontally in the camera field of view, the cameras need to be tilted at 45 degrees from vertical for both the Shroff lab and ASI conventions. The scanners are also tilted by 45 degrees. Figures Figure 9, Figure ##, Figure 10, and Figure ## respectively show Andor Zyla in the ASI convention, Hamamatsu Flash4 in the Shroff lab convention, PCO Edge in the Shroff lab convention, and one Photometrics 95B and one Hamamatsu Flash4 in the Shroff lab convention.
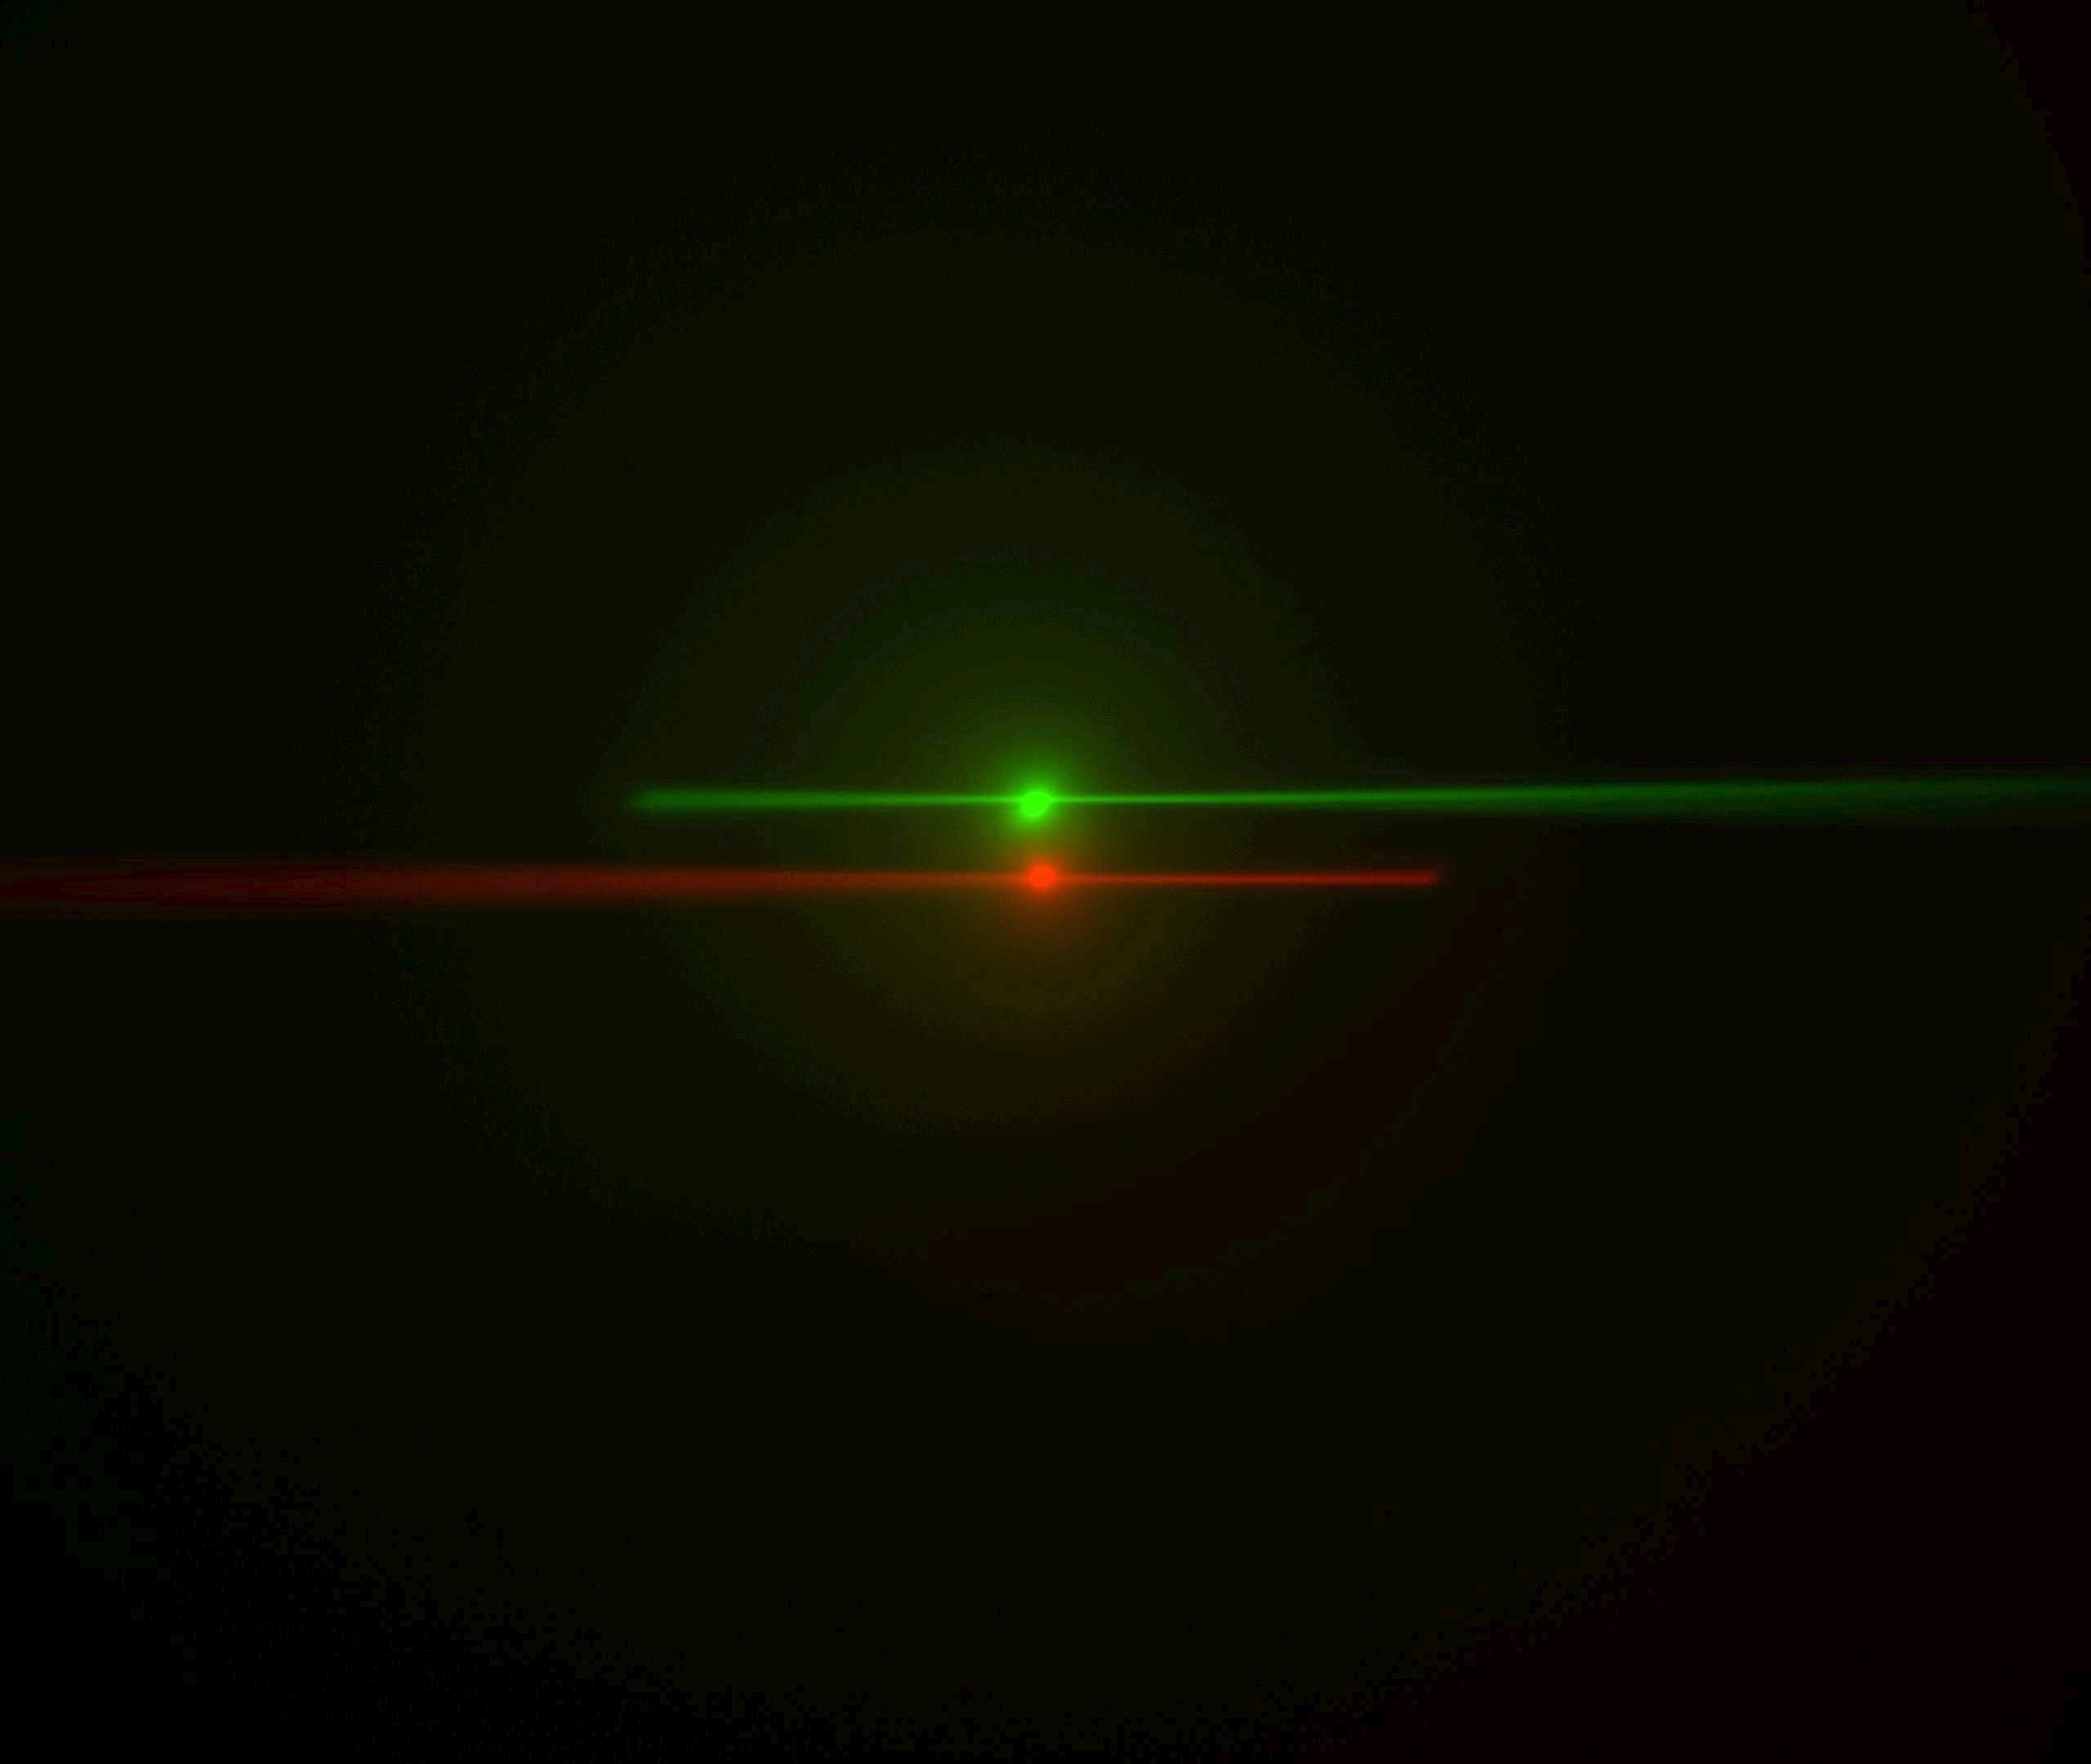 Figure ##: Laser beams seen by cameras in the ASI orientation; rotate this 180 degrees for the Shroff lab convention. The green image is from the left-side camera and shows the beam from the right-side scanner entering from the right and eventually striking the coverslip where it stops. The red image is from the right-side camera, shows the beam from the left-side scanner entering from the left. The bright spots are the epi-fluorescent excitation from the scanner on the same side as the respective cameras. The following statement will be understood after going though the alignment: the objective lateral alignment is perfect because the epi and beams exactly overlap, but the camera mirrors need to be adjusted slightly to put both epi spots in the image center.
Insert the objectives
The method for inserting the objectives was significantly simplified in the piezo mounting scheme introduced in early 2015. Older systems can be upgraded with the new piezo mounting scheme. The main benefit of the new scheme is eliminating the AOA objective adjuster, replacing it by a smooth linear stage, which greatly eases objective alignment. In the new scheme the piezos easily slide out of the arm for easy exchange and cleaning of objectives. The linear adjuster is fixed instead of being moved by the piezo, improving speed slightly. Finally, the bushings include teflon glides to keep them snug.
Refer to the appropriate section to insert your objectives.
With pre-2015 piezos
At one point ASI recommended screwing in the objectives one at a time, retracting the objective bushings fully to make space, and subsequently returning the bushings to the desired position. However, to lessen mechanical stresses on the piezo actuators, ASI now recommends assembling the objective with bushing and piezo objective mover (and lateral adjuster if present) separately from the microscope and then attaching it to the SPIM arm mount. This way the objective bushings do not need to be retracted beyond their normal travel, nor do you risk damaging the objective threads as you begin screwing it in slightly off-axis.
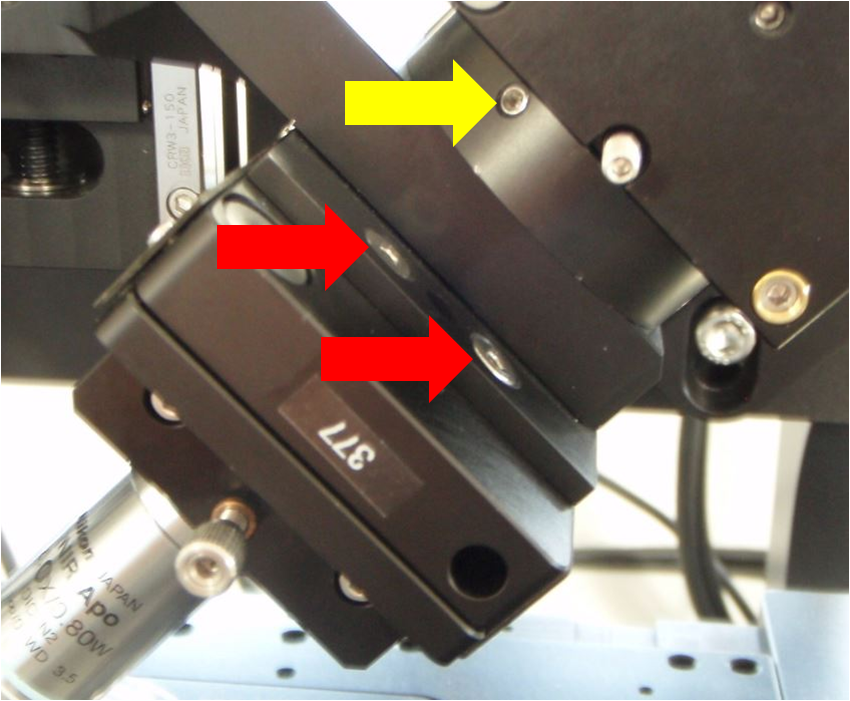 Figure ##: Close-up view of the screws holding the lower cube and rest of SPIM arm to the arm mount (yellow arrow) and also the screws holding the piezo objective mover to the SPIM arm mount (red arrows)
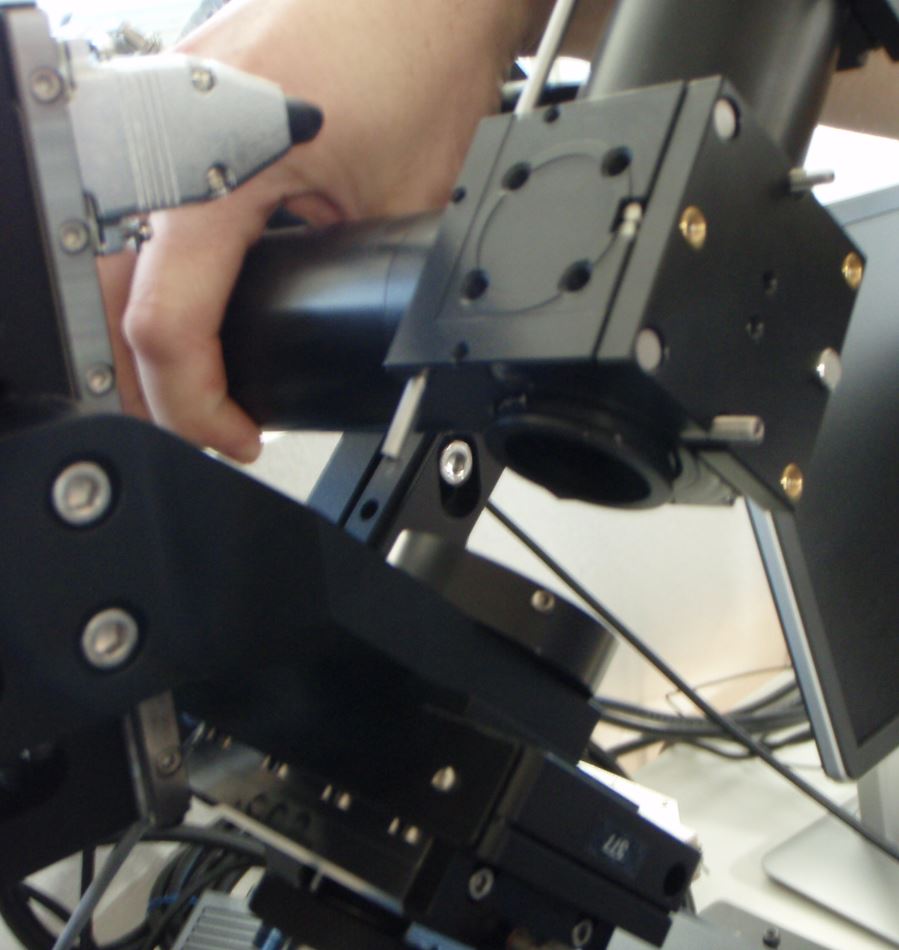 Figure ##: Separating the SPIM arm from the mount
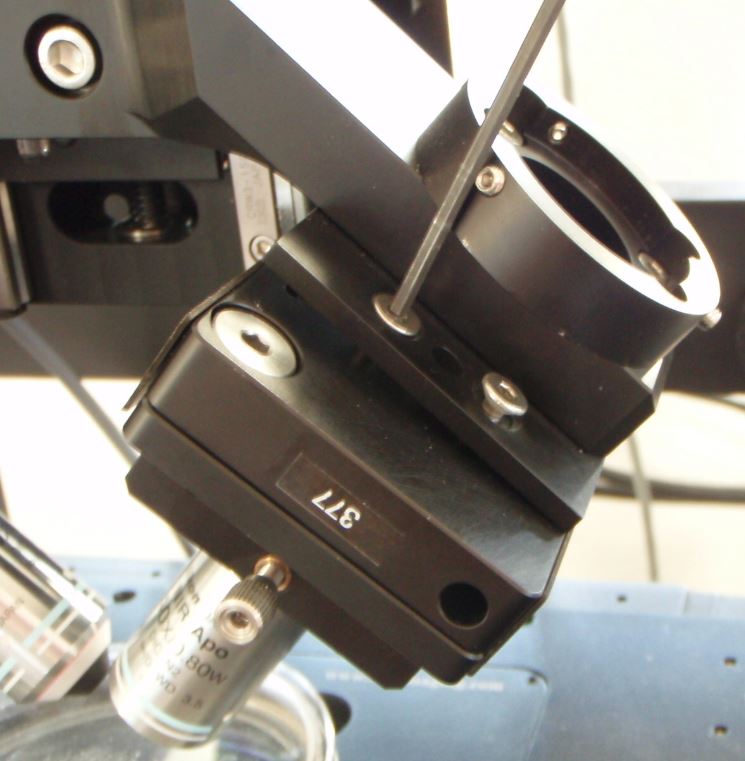 Figure ##: loosening or removing the screws holding the piezo objective mover to the SPIM arm mount.
Begin by removing one SPIM arm, intact, from the arm mount so you can access the screws connecting the piezo objective mover to the arm mount. It does not matter which side you remove. On the arm that you will remove, detach the electrical connector to the scanner along with its fiber optic cable. Loosen the three set screws around the ring connecting the arm mount to the bottom cube (connection between labels 3 and 9 in Figure ##); this is the screw marked with a yellow arrow in Figure ##) and its mates. After loosening the set screws you may need to pull slightly on the SPIM arm to disengage the support dowel between the lower cube and the arm mount. Note that the SPIM arm is heavy. Gently set it aside.
Next remove the piezo objective mover (APZOBJ) from the SPIM arm mount as shown in Figure ##. Loosen the four screws made accessible by removing the SPIM arm; these are the screws marked with red arrows in Figure ##. It is possible to fully remove the piezo objective mover and everything attached to it from the arm mount, but usually it is sufficient to simply loosen the 4 screws. Next, insert the objective into the bushing on the loosened piezo objective mover. Make sure the bushing is appropriately tightened; the nominal spacing between the objective bushings and the piezo or fixed mount is 5 mm on both sides, which means about 6 mm of bushing thread goes into the APZOBJ or PZMAG-AOA . The objective bushings (RAO-0004 and RAO-0023) thread into their respective piezo device or translatable mount in a smooth but snug fashion. Newer objective bushings have Teflon glides to keep them snug; the earlier version can be retrofitted with judicious use of Teflon (plumber’s) tape. ASI no longer recommends using the lock nut provided with early SPIM systems. The gap between the objective bushings and the piezo or fixed mount should be about 5 mm on both sides (about 2 mm if you have the lock nut installed).
If needed, now is the time to insert the objective on the other side of the diSPIM. It is easy to access the side of the diSPIM that was left intact now that much of the other side is removed (if needed you can raise the upper Z stage).
Re-attach the piezo objective mover with objectives by screwing it into the SPIM arm mounting plate. Finally, reattach the SPIM arm to the arm mount.
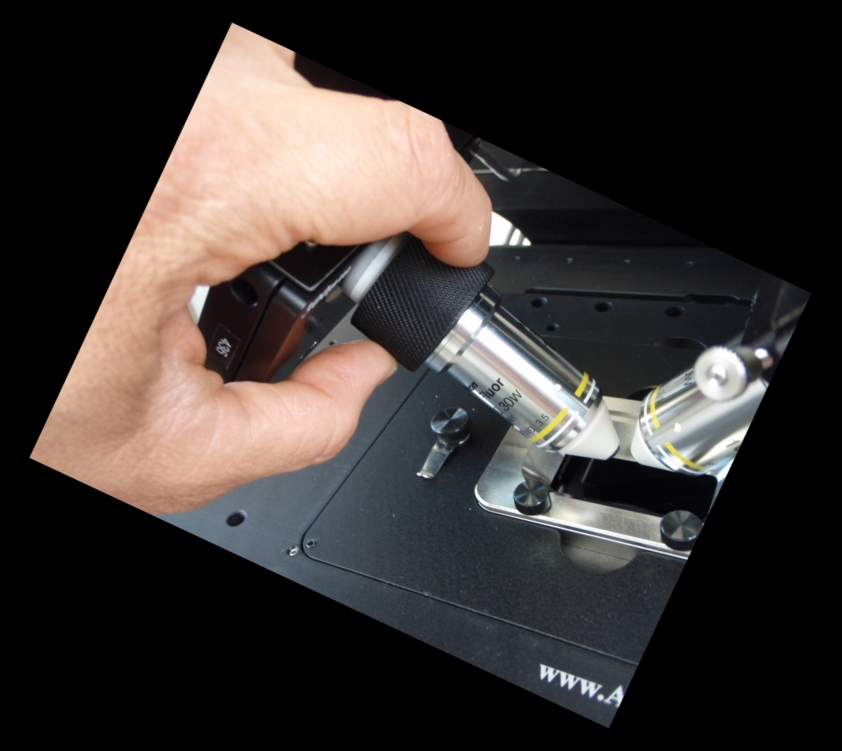 Figure ##: Left objective focus bushing
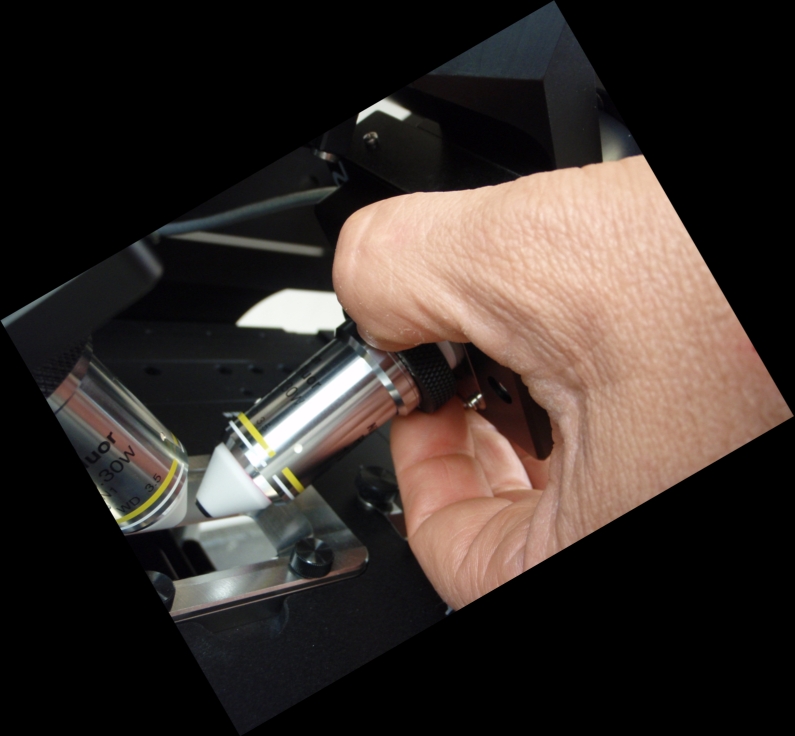 Figure ##: Right objective focus bushing
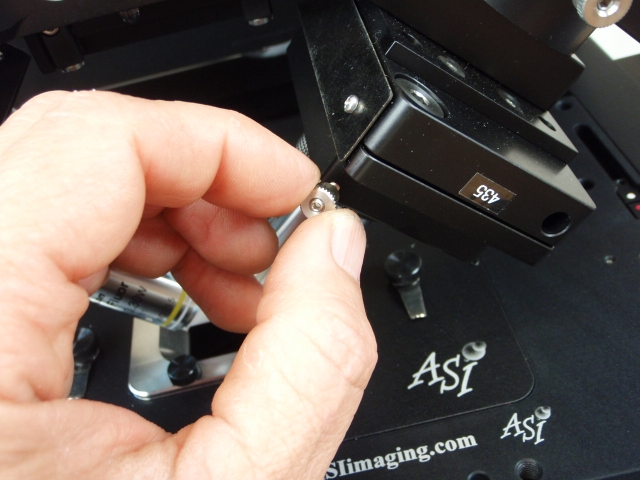 Figure ##: Lateral objective adjustment screw. The vertical objective position adjuster
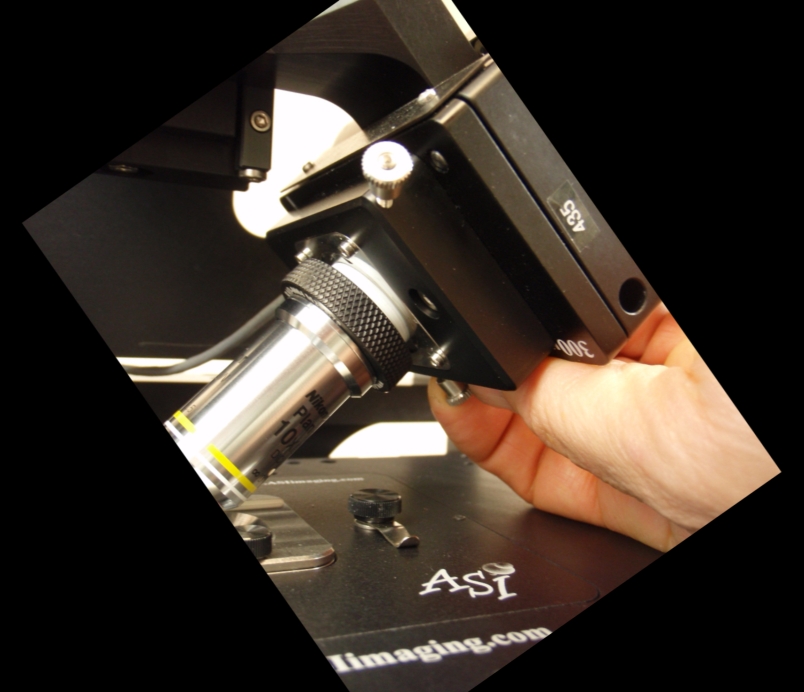 Figure ##: The vertical objective position adjuster is used mainly to lower the objective when changing lenses. Its effects are similar to the left objective focus bushing, and hence redundant
With everything reassembled, get the two objectives aligned (co-focused) “by eye” as best as possible using the bushings and the objective adjusters. For two Nikon 40x NA0.8 3.5 mm WD objectives, the gap between objectives is between 0.2 and 0.5 mm. Use the adjusters shown in Figure [fig:Three-orthogonal-objective] to move the objectives into position until they are visually symmetric from the front of the microscope and aligned forward and backward as well, as shown in Figure 13.
We recommend avoiding use of the vertical objective position screw (Figure ##) after the objectives have been aligned by eye. Make the vertical adjuster screw is not loose but also not so tight that the lateral adjustment is impossible. Because the lateral and vertical position adjusters are coupled you may need to work the screws against each other.
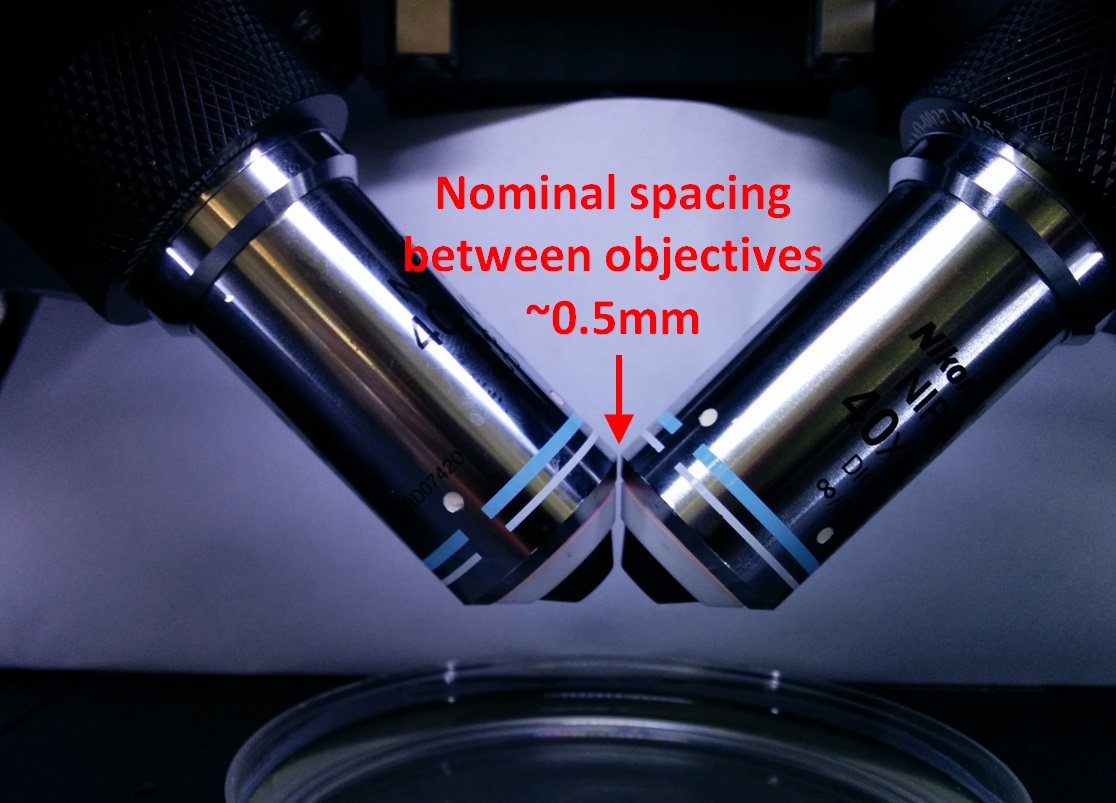 Figure 13: Close-up view of the two objectives when aligned.
In further adjustments we will move the objective focus bushings on both sides to focus and manipulate the right objective laterally using the lateral objective screw (Figure ##).
With 2015 piezos
Inserting the objectives is significantly easier with the 2015 piezo mounting scheme. The piezo actuators and everything attached to them slide in and out of the SPIM arm mount (RAO-0046 ) using a dovetail mechanism. A new lateral fine adjuster sits between the piezo objective mover and the SPIM arm mount. The objectives are brought into co-focus in 3-dimensional space by three orthogonal adjustments: the lateral adjuster and screwing or unscrewing the two objective bushings into the piezo top plate.
![Set screw location for loosening the piezo assembly from the SPIM arm mount.[fig:Set-screw-location] Set screw location for loosening the piezo assembly from the SPIM arm mount.[fig:Set-screw-location]](http://dispim.org/_media/docs/manual/piezo_dovetail.png?w=300&tok=3745e2) Figure 12: Set screw location for loosening the piezo assembly from the SPIM arm mount.[fig:Set-screw-location]
Figure 12: Set screw location for loosening the piezo assembly from the SPIM arm mount.[fig:Set-screw-location]
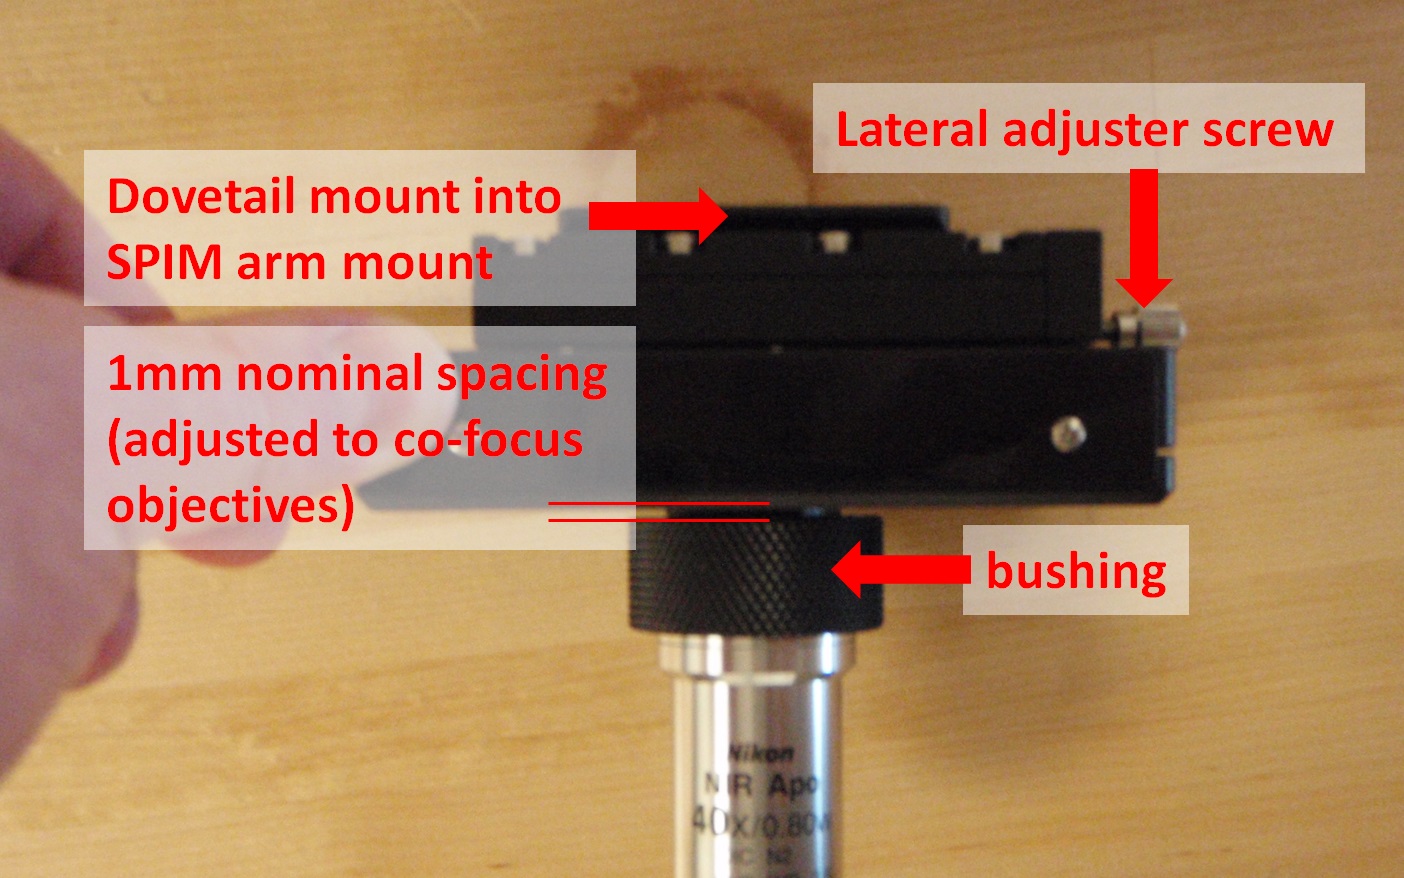 Figure 11: 2015 piezo objective mover with lateral adjuster.
To remove the piezos from the SPIM arm mount, first loosen the set screw on the bottom of the arm mount; it is the center screw of the three on the side of the SPIM arm mount as shown in Figure 12. This set screw secures the dovetail joint in place. Once the set screw is loosened, the lower (male) side of the dovetail slides out of the arm with a firm pull. Once the dovetail is separated it is easy to insert, remove, or clean the objective (see Figure 11). Both sides of the arm mount have the same mechanism, though it may only be necessary to remove one side.
Upon re-insertion, the dovetail will “click” into position and then the set screw should be tightened.
With the objectives inserted and everything reassembled, get the two objectives aligned (co-focused) “by eye” as best as possible using the bushings on both sides and the lateral adjuster. When aligned, the objectives will be symmetric when viewed from the front of the microscope and aligned forward and backward as well, as shown in Figure 13.
Care of piezo objective movers
The piezo objective movers are the most failure-prone component of the diSPIM system. It appears that the piezo actuators can be damaged by external stresses, including as screwing the objective bushings in so far that the piezo top plate is moved mechanically (impossible with 2015 piezos or more recent; for older systems be sure to follow the instructions in Section [sub:Insert-the-objectives-2014]), crashing into the sample chamber, or resting the SPIM assembly on top of the piezo objective movers when assembling the microscope. As a general rule, be careful not to apply external mechanical force on the piezos.
During normal use the piezos are also stressed electronically. Because the electronic stress scales quadratically with applied voltage, being in the extreme negative position (near the sample) wears out the piezo faster than using the piezo near the center position. Of course electronic stresses are part of normal operation, but if the diSPIM is not being used for a long period of time then we recommend either turning off the Tiger controller or else using the command to disable the piezo axes (this reduces the applied voltage to even less than the center position). In Micro-Manager this can be done easily using the “MotorOnOff” property of the piezo stages, setting its value to be “On” in the System-Startup configuration preset and “Off” in the System-Shutdown preset (see the Micro-Manager Configuration Guide). Then simply turning off Micro-Manager suffices to put the piezos in a good long-term state. When cared for properly we expect most piezo objective movers to last much longer than the one-year warranty period.
As of December 2014 we recommend 150 um travel piezo objective movers with increased flexure width, which reduces the tendency for side-to-side vibration of the piezo top plate in response to other vibrations (e.g. from the camera fans or imperfect isolation from the floor).
Tiger Controller
The motion components of the diSPIM microscope are controlled by ASI’s modular Tiger controller. The controller should be located near the microscope such that all cables reach and so that the indicator lights on the face of the control units can be seen easily. Full documentation of the controller can be found on ASI's documentation website.
![Tiger Controller[fig:Tiger-Controller] Tiger Controller[fig:Tiger-Controller]](http://dispim.org/_media/docs/manual/tiger.jpg?w=300&tok=3270be) Figure ##: Tiger Controller[fig:Tiger-Controller]
Figure ##: Tiger Controller[fig:Tiger-Controller]
A typical diSPIM controller contains the following modules:
TG/COM
Communications card with USB connection to host computer. Supports four-axis joystick/knob pod.
X/Y
Two-axis XY stage card. Also supports a dimmable LED illuminator.
Z/F
Two-axis card for SPIM focus (F) and lower microscope focus control (Z). May also have an LED illuminator.
MICRO-MIRROR
Four-axis micro-mirror controller card. Controls two standard light sheet scanners, or a single scanner with anti-striping micromirrors. Control logic for synchronizing the light sheet, camera triggers, and piezo motion resides on processor in this unit.
TTL / PLC
TTL buffer card or Programmable Logic card outputs lasers and camera control signals.
PIEZO P
P-axis objective piezo positioner card.
PIEZO Q
Q-axis objective piezo positioner card.
Connecting cables
Cables to all components are labelled. On the diSPIM there are identical cameras scanners and piezos on both sides so it is important to keep straight which cables go where so that the control software can work as intended.
Tiger Controller
As a safety precaution the Tiger controller should always be powered off when connecting or disconnecting cables.
Install all motion control cables to the appropriate Tiger controller module. Be careful that X/Y and Z/F cables are not interchanged. Check serial numbers on the piezo objective movers and controller face-plates to be sure to connect the cables to the correct controller module.
Connect the Tiger USB connection to the host computer. If the USB to serial driver doesn’t install automatically, get it from http://www.silabs.com/products/mcu/Pages/USBtoUARTBridgeVCPDrivers.aspx.
Programmable Logic Card (or TTL) Card Connections
The Programmable Logic Card, or PLC, was introduced in 2015 and is used for the TTL control of the cameras and lasers. Its outputs are generally connected as follows:
- Path A camera trigger (right-side camera)
- Path B camera trigger (left-side camera)
- Not connected (can be configured as global shutter or ongoing acquisition signal)
- Laser side select
- Laser #1 on/off
- Laser #2 on/off
- Laser #3 on/off
- Laser #4 on/off
Which lasers are #1–4 does not matter, because the mapping between PLC output and a user-defined label is specified in software. In Micro-Manager, define presets using the property “OutputChannel” of the PLogic device (a shutter).
If you have a TTL card (non-upgraded systems shipped in 2014 or earlier), CAM0 and CAM1 are for camera triggers of paths A and B respectively. LSR0 is for the laser on/off control, and LSR1 corresponds to the laser side select. LSR0 and LSR1 may be connected differently if you have a non-standard laser configuration; contact ASI if you need more information.
Light Path A Component Connections
For SPIM acquisition to work correctly, Path A must contain the first scanner and first piezo (usually axes A/B and P respectively).
- Left-side scanner is connected to cable end marked BA.2)
- Right-side imaging piezo P is connected to the P-axis Piezo card.
- Right side camera Trigger is connected to PLC #1 (CAM 0 on the TTL card).
Light Path B Component Connections
For SPIM acquisition to work correctly, Path B must contain the second scanner and second piezo (usually axes C/D and Q respectively).
- Right-side scanner is connected to the cable end marked DC.
- Left-side imaging piezo Q is connected to the Q-axis Piezo card.
- Left-side camera Trigger is connected to PLC #2 (CAM 1 on the TTL card).
Cameras
Install the camera cards in the host computer according to the manufacturer’s instructions, taking care to install any appropriate drivers along the way. In some cases, drivers need to be copied into the Micro-Manager install directory, consult the Micro-Manager wiki or manufacturer’s instructions for details.
Connect the camera data cables to the camera cards in the computer. The camera trigger cables should be connected as described.
Laser and Fiber Installation
There are many possible laser configurations that are theoretically supported. A bare-bones approach uses a single fiber coupled laser which is split with a fiber splitter into two outputs for the two scanners. In this configuration both output fibers have light simultaneously. The scanners act as imperfect shutters (~0.1% transmission) when steered to their blanking position.
More commonly, users have a laser merge module with dual outputs which controls of multiple laser lines and includes a routing switch that will direct the laser output one of two output fibers. The outputs on the TTL or PLC cards control the lasers. For a single-color setup, connect the TTL laser on/off control to LSR 0 and the fiber-switching signal to LSR 1 on the TTL card. For control of multiple laser lines, the PLC card is required. Generally PLC outputs #5-#8 are connected to the respective laser on/off controls and #4 is connected to the fiber-switching input.
Install filters, Filter cubes and Mirrors
Dichroic mirrors, emission and excitation filters should be installed in the C60-D-CUBE for each SPIM arm. Similarly, install the right angle mirrors for the camera tubes in the appropriate cubes. Details are shown in Figure 16.
Typical dichroics are 25.5 x 36 x 2 mm, and the emission and excitation filters are 25 mm diameter. Usually the excitation filters (and that half of the D-cube) can be omitted.
Remove the two thumbscrews the hold the front dovetail mount, C60-DOVE-II , in place. Give a slight tug and twist so the magnets holding the part in place will release the cover assembly from the cube body. Remove the dovetail mount section from the MIM-CUBE-II’s covers as shown in Figure 17. After installing the filters and/or mirrors according to the manufacturer directions, reinstall the internal cube on the dovetail and then reinstall assembled adjustable dovetail mounts, with their appropriate filter cubes or mirrors, on the microscope. Be sure the three kinematic adjusters engage their seats. Press the three magnet buttons to engage the hold-down magnets. Replace the thumbscrews and lightly tighten them.
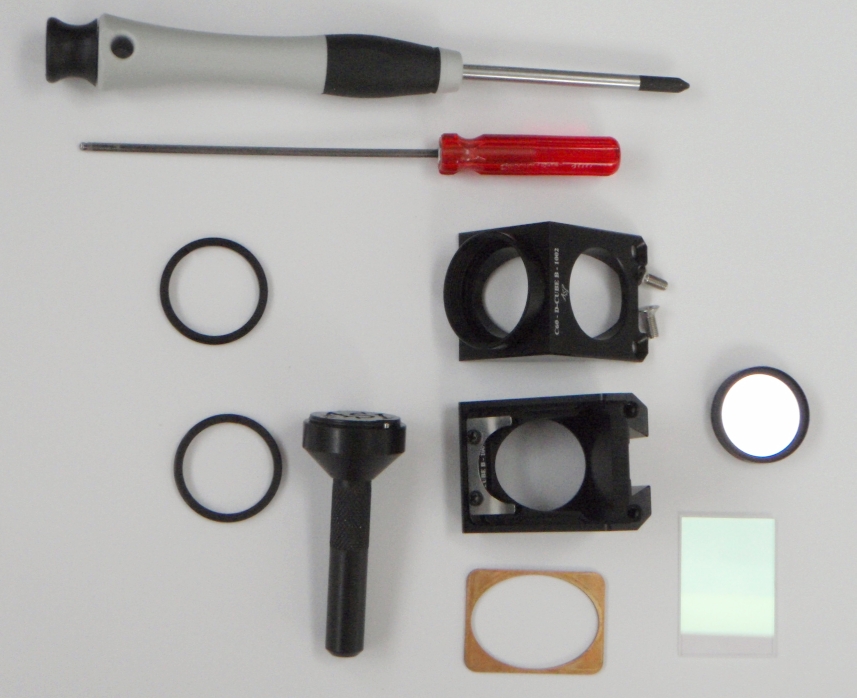 Figure 16: Internal filter cube, C60-D-CUBE, shown disassembled and ready for filters. Use the bronze spacer behind the dichroic mirror if using 1 mm thick mirrors. It is very easy to warp mirrors. Barely tighten the mirror retaining clip screws.
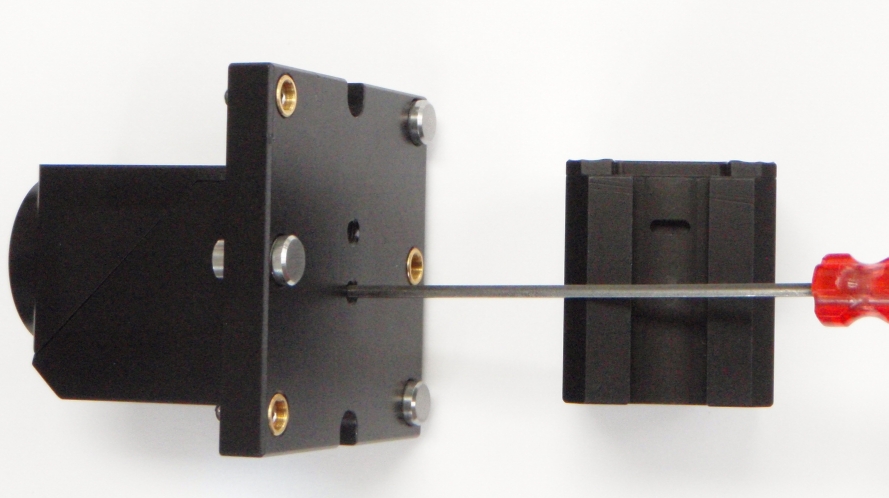 Figure 17: Cube installed on the C60-DOVE-II adjustable cube dovetail mount. There are two set screws on the dovetail mount. One has a small cam end that engages a slot in the internal cube. Align the filter cube slot with this screw and tighten until the cam engages the slot. The cam will allow the cube to be moved slightly up and down. Place in the neutral position and tighten the nylon-tipped set screw to hold the cube in place.
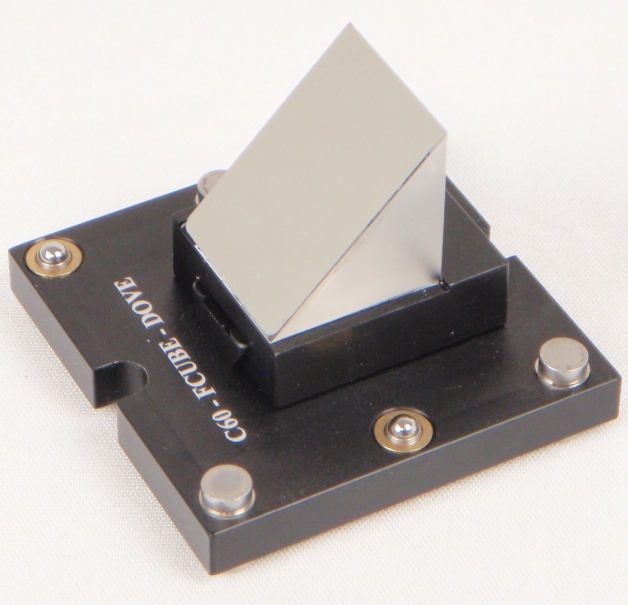 Figure 18: Right angle mirror installed on dovetail mount.
How to adjust the mirror cubes
The kinematic adjusters are used during alignment to tilt the mirrors in the MIM-CUBE-II ’s, both for camera mirrors and dichroic mirrors. You will have best results if you follow these steps.
- Loosen the thumb screws several turns. Do not manipulate the adjustment screws while the thumb screws are engaged; doing so can strip the adjustment screws.
- Grasp the cube body a apply modest pressure to the center of the adjustable face with your thumb to firmly push the kinematic adjusters into their seats. See Figure [fig:Beam-steering-adjusters.]. You may need to tighten the screws slightly so that the adjustment screws “catch”.
- Turn the three adjustment screws as necessary to steer the mirror using a 3/32” Allen driver.
- When where desired, lightly snug down the thumb screws and only then release your pressure on the cube face. Slight movement may occur depending on the order and tightness in which you tighten the thumb screws, which can be taken advantage of to make tiny adjustments.
Troubleshooting: Out of Bushing Travel
If you are out of travel for the bushings, meaning that you need to screw the bushings in farther than they will go to get both beams in focus, you can try disassemble a few pieces and put them back together again. You may only need to do this on the side you are having troubles with, but it may help to do it on both sides. This process only applies to the 2015 and later piezo mounting scheme.
On one side, usually the left, there is a spacer block between the piezo and the male dovetail piece. How that spacer gets bolted onto the piezo can shift things around by a mm or two. You want to assemble them in a way that the objective is as low as possible so the bushing will need to be extended more to reach co-focus. To disassemble and reassemble, first turn off the controller. Slide off the left objective/piezo/dovetail after loosening the set screw which secures the dovetail. Remove the objective from the bushing. Remove the 4 flathead screws which attach the male dovetail piece to the spacer block and take off the dovetail piece. That will expose two bolts that hold the piezo to the spacer block. Loosen those bolts slightly and then push the piezo in the direction so that the piezo will be as close to the XY stage (and away from the centerline of the microscope) as possible when remounted. Retighten those bolts, then reattach the flathead screws and objective and put the dovetail back on.
The procedure for the other side is similar but a bit easier. In this case the dovetail is integrated into the linear positioner so it's just a matter of loosening the two bolts that connect the linear positioner to the piezo, pushing them relative to each other so that the piezo will be as close to the XY stage as possible, then retighten the bolts and reassemble.
Micro-manager diSPIM Plugin
Micro-Manager comes with a plugin providing a GUI which facilitates alignment and use of the diSPIM system.
Micro-Manager is a free and open-source software package with many capabilities available at https://micro-manager.org/. If you are not familiar with Micro-Manager it is worth reading the User Guide and Configuration Guide before proceeding. Micro-manager is continually being improved. If you discover problems there is an easy way to report it to the developers under Help → Report Problem.
The diSPIM plugin is already fully functional but also continually being improved; accessing new features is as simple as installing the latest Micro-Manager version (nightly builds are usually functional and include the latest improvements to the plugin and the rest of Micro-Manager; a major release happens every quarter). If you encounter problems or have feature requests please contact the plugin authors.
Plugin Overview
In the main Micro-Manager window you can open the plugin under Plugins → Device Control → ASI diSPIM. Keep the main Micro-Manager window accessible; the plugin generally does not duplicate functionality already provided there. The plugin has different tabbed panels for accessing different plugin features for performing various tasks.
The GUI remembers most of its settings from run to run. Some settings are stored on the Tiger controller (e.g. sheet sizes). Before mid-November 2014 some settings were only stored when the plugin was closed before Micro-Manager.
Before Running the Plugin
Before running the diSPIM plugin, you should create or load a Micro-Manager hardware configuration with all the relevant devices. In the Hardware Configuration Wizard () add the Tiger controller () and then load all of its peripherals (with the possible exception of the LED shutter). Add the cameras, including creating two devices for the two SPIM cameras for diSPIM systems.
For diSPIM, you should also create a Multi Camera instance (in the Hardware Configuration Wizard, use Utilities → Multi Camera). You should assign the properties “MultiCam-Physical Camera 1” and “MultiCam-Physical Camera 2” to the two cameras, ideally using the special “System” configuration group with preset name “Startup” as described in the Micro-manager wiki page.
Normally the laser on/off is controlled by TTL coming from the Tiger controller PLC outputs #5-8. In Micro-Manager the lasers should only get turned on and off via the Tiger controller and the PLogic shutter (with correct laser selected by the OutputChannel property). You should not directly turn the laser on/off using the device adapter properties of the laser.
Devices Tab
Here you assign Micro-Manager devices to roles within the plugin. This is required before using most of the plugin’s features, but is you will only need to re-visit this tab if you change hardware configurations in Micro-Manager or if you launch the plugin without the devices loaded, thus causing the plugin’s settings to be overwritten.
For diSPIM mounted on non-ASI inverted microscope frames the “Lower Z Drive” device may partially work, depending on support in Micro-Manager support for that linear stage.
“Path A” and “Path B” refer to the two light paths as noted in Section [sub:Connecting-cables] and shown in the figure of the plugin’s Device tab for reference. The scanner (micro-mirror) and illumination piezo will be one one side of the physical microscope, and the imaging piezo and camera will be on the opposite side. For the scanners and piezos care must be taken to match the plugin device assignment with the physical hardware. Important: During acquisition Path A will excite the first scanner and first piezo, so make sure to assign them correctly (and arrange the cables accordingly). For ASI’s typical controller configuration, for “Path A” you should select the scanner with axes A and B (usually the left scanner), imaging piezo as axis P (usually right piezo), and the camera which is connected to the right side of the microscope, whereas “Path B” with have the scanner with axes C and D (usually the right scanner), imaging piezo as axis Q (usually the left piezo), and the camera on the left side of the microscope. The lower (inverted) Z drive is axis Z, and the upper Z drive (on which the SPIM assembly rides) is axis F. Figure ## shows a typical way the Device Tab would be filled out; this is a typical diSPIM configuration except no bottom camera is used.
For single-sided (iSPIM) you can leave the “Path B” devices blank.
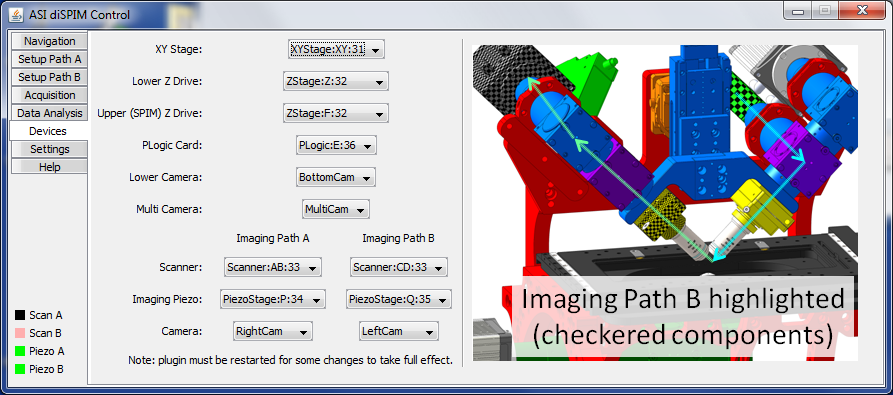 Figure ##: Device tab example.
Support for the SPIM cameras must be added to the plugin code on a case-by case basis.3) Please contact the plugin authors with requests to add support for other cameras. Currently the supported cameras are:
- Andor sCMOS cameras. Use the AndorSDK3 adapter. The bit depth defaults to 12-bit but if you want different the best fix is to add an assignment in Micro-Manager’s “System” group “Startup” preset (see the Configuration Guide).
- Hamamatsu Flash 4. Use the HamamatsuHam device adapter. Trigger polarity defaults to negative; the best fix is to add an assignment in Micro-Manager’s “System” group “Startup” preset (see the Configuration Guide).
- PCO Edge. Use the PCO_Camera adapter. Property PixelRate defaults to slow, but for fast frame rates you probably want the fast scan; the best fix is to add an assignment in Micro-Manager’s “System” group “Startup” preset (see the Configuration Guide).
- Photometrics Prime 95B. Use the PVCAM adapter. Timing calculations won't be accurate until a snap or live has been run after changing any camera setting.
Acquisition Tab
In the Acquisition tab, shown in Figure ##, you set the parameters for the SPIM acquisition and initiate acquisition. This panel is analogous to the Multi-D acquisition window in Micro-Manager, except that the positions of the imaged volume are not specified here. On this tab the joystick and wheels are not functional by default, although a check box is present to enable the same joystick settings as on the Navigation panel.
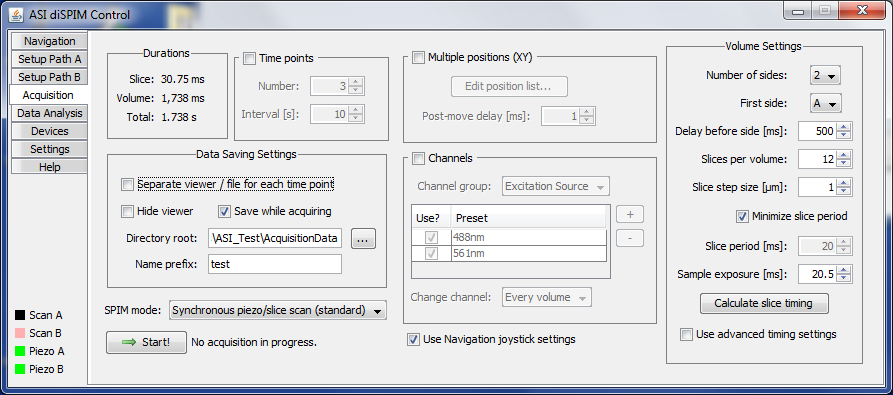 Figure ##: The acquisition tab of the diSPIM plugin with advanced timing settings disabled.
Setting the 3D ROI
Use the Setup tabs to specify the center slice position. The number of slices per volume and the slice step size determine how far on each side of the center position is imaged.
Use Micro-Manager’s usual mechanism to specify the ROI of the two SPIM cameras. Documentation in the Micro-manager User’s Guide.
Time Points
Here you specify the number of time points and the interval between them.
Under most circumstances the plugin actually triggers separate single-volume acquisitions in the controller so that the exact moment when time point starts is controlled by the PC which presumably has a very accurate time source.
If the time between finishing one time point and starting the next time point is less than 0.75 ms then a special “hardware timepoints” mode is invoked silently. In this case the controller is in charge of triggering repeated acquisitions, and the spacing between time points may not be quite as accurate. Until Sep 2016 there was a limit of 65k time points for this mode.
Data Saving Settings
Here specify where and how the data is saved.
- Separate viewer / file for each time point: performs a separate Micro-Manager acquisition for each time point, implying a separate viewer window and separate file. In general it is better to let Micro-Manager save all time points to a single file. Currently a bug prevents proper operation with separate viewers if “Hide viewer” is also selected.
- Hide viewer: suppresses the Micro-Manager viewer. Note that hiding the viewer is cosmetic only, it does not improve the computer’s ability to stream acquisition data to disk because the data collection runs in its own thread.
- Save while acquiring: saves the data to disk; if unchecked then data will be saved in RAM and the user will have the option to save it later. Obviously, for large acquisitions the data must be saved to disk directly.
SPIM Mode
Currently several modes are supported:
- Synchronous piezo/slice scan: standard use, the piezo and sheet move together through the sample.
- Slice scan only: suppresses movement of piezo but still moves the light sheet. It is useful for characterizing light sheet thickness.
- No scan (fixed sheet): neither the piezo nor light sheet moves. It is useful for characterizing vibration in the system.
- Stage scan: uses the XY stage to move the sample through a fixed light sheet. For two-sided acquisitions one view is collected in the first pass and then when “rewinding” the second view is collected. See hardware:controller#stage_scanning for more details and requirements.
- Stage scan interleaved: same as stage scan except that the stage moves half the speed and the two light paths alternate, meaning both views are collected in the same pass. Be careful if you are using a galvo to switch the laser between the sides, this can overstress some galvos.
- Stage scan unidirectional: same as stage scan except second view is taken scanning the same direction as the first view instead of in a return pass.
Acquire Button
Obvious function. Click it during an acquisition to abort. The status string informs you which time point is being acquired.
Multiple Positions (XY)
If the box is checked, the plugin will use Micro-Manager’s position list to acquire volumes and multiple locations. For each time point, each position is visited once. See the section “Position List Dialog” of Micro-Manager’s User’s guide for more details about using the position list.
Channels
The channels feature is patterned after that of Micro-Manager’s Multi-D Acquisition (documentation in the User’s Guide). It is most commonly used to take volumes with different illumination wavelengths (e.g. 488 nm and 561 nm for samples labeled with GFP and mCherry). Using the channels feature requires creating a group of presets which contain all the settings for that channel. Selecting that group in the pull-down menu and then the desired presets.
Simple per-volume channel switching is implemented and is the only choice unless a Programmable Logic Card (PLC) is present in the controller; this mode is generic and can be used with any Micro-Manager group. PLC-based channel switching is hardware-based, requiring extra setup time but then no delay during acquisition. Using the PLC, channel switching is possible on both a per-volume and per-slice basis. In this case the channel group must contain the property “Output Channel” which is used to select the correct laser to trigger; other properties in the channel group, if any, are ignored.
Volume Settings
These settings determine Use the parameters in the “Volume Settings” group to set up the stacks collected as follows.
- Number of sides: 2 for diSPIM, 1 for single-sided.
- First side: which of Path A or Path B goes first.
- Delay before side: wait period after initiating the side (moving the illumination objective into position and the imaging piezo to its start position) before beginning stack acquisition.
- Slices per volume: number of frames to acquire on each side.
- Slice step size: increment of imaging piezo (and light sheet will follow) for each slice, i.e. the Z-stack step size. For stage scanning this is the orthogonal spacing between slices, i.e. if this is 1um then the stage will move 1.41um between slices.
The time required for acquiring each slice, a single volume, and the total acquisition is displayed in the “Durations” box in the upper left.4)
Slice Settings
- Minimize slice period: when checked the plugin will have zero added delay between slices to go as fast as possible.
- Slice period: requested period of each slice, if not minimized. Must be a multiple of 0.25 milliseconds.
- Sample exposure: requested illumination time. Must be a multiple of 0.25 milliseconds.
- Use advanced timing settings: when checked the controller timing settings can be edited directly in a pop-up window. Use this if you want to adjust the values that the plugin computes.
Slice Settings for Light Sheet Mode
When the cameras are being used in light sheet mode the normal slice settings are not relevant and a different group of settings appear.
- Scan reset time: time for the beam to retrace to the starting position between slices. 3 ms is a good starting value.
- Scan settle time: time that the beam scans before reaching ROI, useful to settle to constant speed. 1 ms is a good starting value.
- Shutter width: width of the open camera shutter in microns. This adjusts the amount of confocality and hence the rejection of scattered light. Often publications recommend setting this to 1.5 or 2 times the beam thickness (which can be defined multiple ways). The narrower the shutter the more precise the light sheet synchronization settings need to be.
- Use advanced timing settings: when checked the controller timing settings can be edited directly in a pop-up window. Use this if you want to adjust the values that the plugin computes.
Advanced Timing Settings
The detailed controller timing settings are hidden by default but can be changed if the “Use advanced timing settings” box is checked. The vast majority of users will not need to use these, but rather should leave the advanced timing checkbox un-checked and use the default easy timing mode which calculates the timing parameters from the camera readout mode, ROI, and the user-set parameters of the easy timing mode. The times are quantized in quarter-millisecond increments. See ASI’s TG-1000 SPIM documentation further details.
The advanced timing settings have correspondence to controller settings as follows:
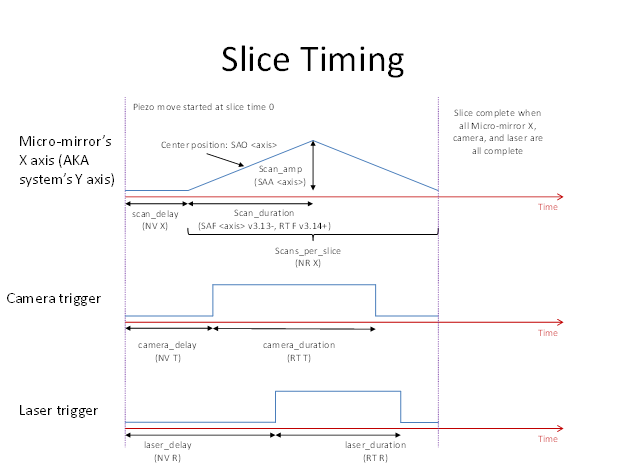
- Delay before scan: time before scan begins (gives piezo stages time to move/settle before sheet acquisition is started). (NV X)
- Line scans per slice: how many one-way beam scans per slice. (NR X)
- Line scan period: time for one sweep of the beam (SAF <axis>)
- Delay before laser: delay before laser trigger is fired. (NV R)
- Laser duration: duration of the laser trigger. (RT R)
- Delay before camera: delay before camera trigger is fired. (NV T)
- Camera duration: duration of camera trigger. (RT T). In current version of the plugin, the camera exposure is set to this value as well for edge triggering, or set to 1 ms for overlap/synchronous mode.5)
Easy Timing Mode
By default the controller’s timing settings are not directly accessible; instead specify the “Slice period [ms]” and “Laser exposure [ms]” in the Volume Settings. Use the button “Calculate slice timing” to automatically calculate the controller’s timing parameters. The timing depends on the reset and readout time of the cameras, which is computed according to the ROI as specified using the main Micro-Manager window. Any extra time in the slice is placed before the camera trigger to allow maximum time for piezo settling. The values computed by the easy timing mode are shown in the slice timing settings and can be subsequently modified manually.
The basic algorithm that the easy timing mode uses is described here for the curious. Only one line scan per slice is used. Each period consists of camera readout time, then any extra delay time, then camera reset time, then beam scan time. During beam scan time, the laser is off for the first 0.25 ms and last 0.25 ms of the scan and on otherwise (because the beam scan is limited to increments of 1 ms then the laser exposure time must be a half-integer number of milliseconds). An empirical scanner delay according to its Bessel filter is included (so the scan signal is shifted slightly earlier). Times are rounded to the nearest 0.25 ms except the camera readout and reset times which are always “rounded up” to the next multiple of 0.25 ms. Camera reset and readout times are computed according to manufacturer’s timing information and the ROI; they try to account for worst-case jitter. The camera readout time is set to 0 if the “Overlap” on “Synchronous” mode of the cameras is used.
Setup Tabs
There are two setup tabs, one for each optical path. This tab is essential during diSPIM alignment, and it is also used to set the center position of the imaging piezo (by extension the center of the imaged 3D volume). If you have a single-sided (iSPIM) system then ignore the second tab.
Tab-specific joystick, sheet, and camera controls
Each setup tab has an independent set of joystick/wheel controls, beam controls, and camera control. These settings belong to the tab; e.g. the joystick settings can be separately specified for the two different Setup tabs. The joystick settings become active when switching to the tab. The beams settings on this panel will be automatically set on changing to this tab if the “Change settings on tab activate” box is selected, otherwise the beam settings will remain the same as they were before switching tabs. The beam control uses the scanner “blanking” feature, so it assumes that both scanners have input light (e.g. a passive splitter between the laser and the scanner). Unless the “No change” option is selected, the camera will automatically be set to the specified camera when the tab is selected.
Similar controls exist on the Navigation tab.
Imaging center and calibration display
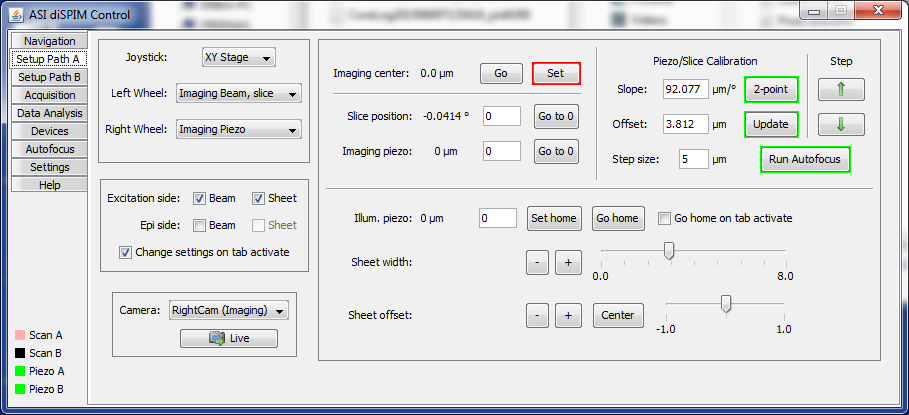
The center position for the imaging piezo is shown and can be changed on the top line of the right side. When the “Set” button is clicked, the current imaging piezo position is selected as the new center. This setting is crucial for acquisitions, but can be ignored during alignment.
The up and down arrows in the far upper right of the Setup tab move the piezo and slice together according to the calibration relationship. The amount of piezo travel per button click is set just to the left of the arrow buttons. This is useful for checking whether the calibration relationship is correct, and also for moving through an actual object of interest to make sure that acquisition settings are correct.
Position display and sheet control
The position of the slice is shown, along with the positions of both the imaging and illumination piezos. You can enter a specific position for the axis to move to using the white-background text entry boxes.
For single-sided operation there is no piezo stage on the illumination side. For diSPIM, the illumination piezo has a special home position where it goes while being used for illumination (recall that the imaging piezo will be moving along with the slice position). The illumination piezo will automatically go to this home position when the tab is selected if the Go home on tab activate is checked.
The sheet width and offset affect the sheet dimensions, i.e. the width and center position of the illuminated area. The + and - buttons change the value in small amounts; the sliders are easier to use for making large changes.
Setting piezo vs. slice calibration
After alignment is complete the scanner movement in the slice direction needs to be cross-calibrated with the imaging piezo. During acquisition in the usual mode, the piezo and slice will move together through the sample to create a stack of images.
Both the piezo objective movers and micro-mirror-based scanners have decent intrinsic linearity, so it suffices to identify two distinct locations where the piezo is focused on the light sheet and compute a linear relationship (slope and offset) between the scanner position and imaging piezo. The plugin identifies these two positions as “Calibration Start Position” and “Calibration End Position”.6) In newer versions of the plugin, access the sub-window with the start and end positions by clicking the “2-point” button. In older versions the two positions are displayed in the main Setup tab. After setting these two special positions where the piezo and slice are in focus using the red-bordered buttons “Set”, click the green-bordered button labeled “Use these!” to populate the slope and offset of the calibration relationship. The computed values can be manually tweaked if desired.
From experience the calibration slope will remain relatively constant but the offset can change slightly. It is easy to update the offset by clicking on the green-bordered button labeled “Update” next to the offset value; this will adjust the calibration offset without changing the slope based on the current position, so the sheet should be in focus when you click the button.
The plugin has autofocus capabilities described elsewhere. The autofocus can find the focus when doing the 2-point calibration or else updating just the offset.
The recommended procedure to set the calibration start and end positions is as follows:
- Introduce a fluorescent dye or bead sample where the sheet can be easily visualized, in particular whether the imaging piezo is in focus.
- Make sure the upper Z stage and illumination piezo are in good positions.
- Move the imaging piezo to what will be approximately one end of the image. For example, if you are imaging an object that is 50 um across (and the imaging center is close to zero), move the imaging piezo to 25 um. You can do that by manually entering the imaging piezo’s position.
- Use a joystick knob to move the scanner’s slice position until the beam is in focus. In a dye solution this is easiest when the sheet is turned off, or with a bead slide it is easiest when the sheet is turned on. If you are already relatively close then you can use the “Run Autofocus” to adjust the slice position.
- Click the red-bordered “Set” button under “Calibration Start Position”.
- Move the imaging piezo to the other end of the imaging piezo’s normal range, e.g. -25 um for this example.
- Use the joystick knob or autofocus to move the scanner’s slice position again until the beam is in focus.
- Click the red-bordered “Set” button under “Calibration End Position”.
- Click the “Go to” buttons for both start and stop to make sure that the imaging piezo and scanner’s slice position are correct (i.e. beam in focus) at both points.
- Click the green-bordered “Use these!” button to compute the slope and offset of the calibration relationship.
- Check the computed calibration using the up and down arrows in the upper right of the Setup tab (you may need to increase the increment before doing this).
The recommended procedure to update the calibration offset (e.g. when introducing a new sample) is as follows:
- Move to a central part of the sample.
- Click the “Run Autofocus” button. The system will attempt to move either the piezo or slice position to the best focus depending on options in the Autofocus tab. Alternatively use the joystick knob to move the scanner’s slice position and/or the imaging piezo's position until the slice is in focus as best as possible.
- When focus looks good, click the button “Update” next to the offset value to adjust the calibration so that the current in focus position is now on the calibration line.
Light Sheet Synchronization
When the cameras have been set to utilize the light sheet mode (available since 20170217 nightly build, set the acquisition trigger mode on the Camera tab) then settings will appear for light sheet synchronization, so that the beam forming the light sheet is synchronized with the rolling shutter of the camera at it moves across the image sensor. The piezo/slice calibration, on the other hand, is so that the plane of the light sheet is coincident with the imaging objective as it moves to collect piezo stacks.
Light sheet synchronization is achieved by adjusting both the speed of the sweeping beam and its starting point.7) These settings are exposed to the user as a slope parameter (speed) and offset parameter (starting point) in the bottom of the setup panel. These settings are only visible when light sheet mode is selected on the camera tab and take the place of the usual sheet width and offset adjustments. At present the parameters need to be tuned manually. In the future hopefully there will be a semi-automated way of doing this tuning, much as there is a semi-automated way of performing the slice/piezo calibration using autofocus. For adjustments in ROI the slope parameter may need to be slightly tweaked. The offset parameter is sensitive to the exact lateral position of the objective so it may need to be tuned slightly daily, much as the offset of the piezo/slice calibration.
A prerequisite for light sheet mode usage is that the beam must remain horizontal across its entire scan range. This requires having a “4f” configuration of lenses so that the tilt of the scanner's mirror is converted into a pure translation in the image plane with no residual tilt. There is a spacer placed between the lower Cube and the scanner tube lens, this spacer may need to be adjusted to achieve a “4f” configuration. For the Nikon 40x/0.8 objective a 10 mm spacer is about right; many existing systems have either 7.5 mm spacers or 15 mm spacers which are not ideal but may be satisfactory for small fields of view. Contact ASI if you need other spacers. As of late February 2017 ASI is prototyping a continuously-adjustable spacer.
Here is a protocol for tuning the light sheet synchronization parameters:
- Align the system if it isn't already aligned.
- Use a very uniform sample, e.g. dye in solution, to tune the light sheet parameters.
- Set the start/offset parameter to 0. This will be relatively close to the final value.
- While in live mode adjust the speed/slope parameter until the sheet exactly fills the field of view. This will be relatively close to the final value.
- Run a test acquisition. Consider setting the acquisition mode to “No scan (fixed sheet)”. You should get images with some fluorescence. If only a short horizontal bright stripe appears then add a minus sign to the speed/slope parameter to invert the direction of the beam scanning.
- Iteratively tune the two parameters by finding a best setting for one, adjusting the other, and so forth until you have zeroed in on the best setting. In each case the tuning procedure is to run a test acquisition, evaluate the results, and adjust the parameter again until you find the best setting where changing the setting in either direction gives worse results.
- For the speed/slope parameter:
- Start with ~3% changes to the parameter and work down to <1% changes.
- Try to maximize uniformity of sample brightness from top to bottom of the acquired images (it helps to have a perfectly uniform sample). If the speed of the beam is not the same as the speed of the rolling shutter there will be a brighter band when one passes the other. Your goal is to make the two speeds equal by tuning this parameter.
- You can conveniently visualize the uniformity using ImageJ's plot profile. First, in ImageJ's options for plot profile enable “vertical profile” (now with rectangular ROI each row will be averaged). Then with the acquired image open click the “Plot Profile” button which uses the entire image for the plot profile. You can adjust the rectangular ROI to include just the center section if desired. You want the profile to be approximately level, not with a distinct peak.
- For the start/offset parameter:
- Changes should be ~3% of the speed/slope value at first, working down to changes <1% of the speed/slope value.
- Try to maximize the brightness of sample in the acquired images (it helps to have a perfectly uniform sample). If there is some constant offset of the beam from the rolling shutter the acquired image will be dimmer than if they are exactly coincident. Your goal is to make the two coincident by tuning this parameter.
- You can conveniently visualize the average intensity again by using ImageJ's plot profile with rectangular ROI, or else using ImageJ's histogram or measure commands.
Note that Micro-Manager's live mode won't work properly with “light sheet” camera operation because it requires tight synchronization between the beam and the camera shutter. In live mode, the camera is free-running. Perhaps in the future the plugin will implement some sort of pseudo-live mode.
Navigation Tab
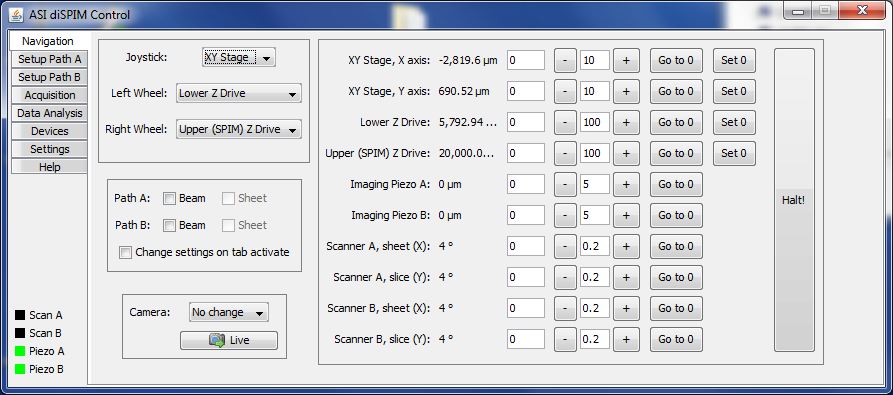
The Navigation tab (Figure ##) allows the user to easily view and change the position of all ten diSPIM axes. The position of all available axes are visible. By default positions are updated once per second; see the Settings tab to enable/disable updates and change the update interval.
Below the tab names there is a “quick glance” indication of positions to avoid needing to return to the Navigation tab just to make sure an axis is centered. The color code is as follows:
- Gray = no device
- Green = centered
- Orange = near center
- Red = far from center
- Pink = making sheet (scanner only)
- Black = beam turned off (scanner only)
Like the Setup tab, there are tab-specific joystick, beam, and camera controls. See Section [sub:Tab-specific-joystick-sheet-camera] for details. You can enter a specific position for the axis to move to using the white-background text entry boxes to the immediate right of the current position.
The white-background text entry boxes between the “–” and “+” buttons specifies an increment that the “-” and “+” buttons will move each click.
A button is provided to move each axis to the zero position. It is very useful to move the upper and lower Z axes to the imaging position, then use the “Set 0” button to set that position as zero so it can be easily returned there with a single button click.
Finally, clicking the “Halt!” button will send a command to the Tiger controller to stop the movement of all axes; this is useful mainly if a crash is about to happen.
Autofocus Tab
The diSPIM plugin can leverage software autofocus routines that are already part of Micro-Manager to facilitate setting the scanner/piezo cross-calibration. The autofocus can also be set to run periodically during acquisition to counter any focus drift. This tab contains the related settings.
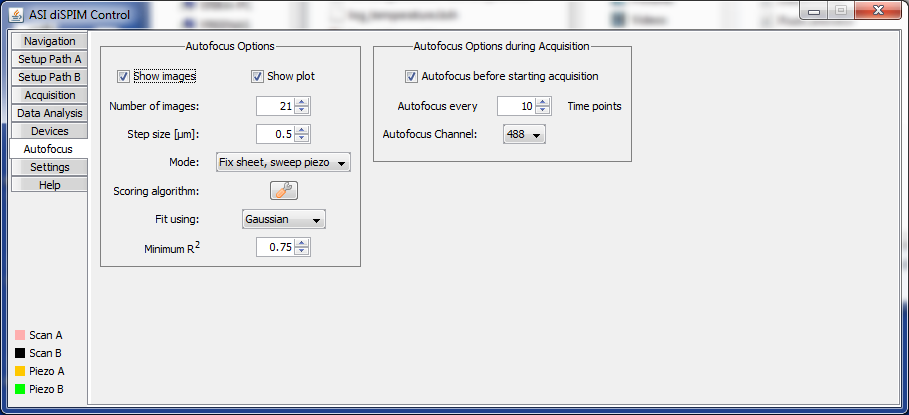 Figure ##: The Autofocus panel of the diSPIM plugin.
The autofocus works by taking a stack of images (sweeping either the piezo or slice while keeping the other fixed) and then passing each image to a focus scoring algorithm. Multiple such algorithms are built into Micro-Manager already. The position vs. fit score is plotted and fit to a curve, e.g. Gaussian, and the optimal position is determined by the maximum of the fit curve. Further the R^2 value of the fit is determined. If the R^2 value exceeds the minimum value set and the optimal position is within the center 80% of the sweep range then the swept axis is set to the optimal position. It is up to the user to verify that this position is appropriate and update the calibration offset or set this as an input point for the 2-point (slope) calibration.
Settings Tab
The Settings tab (Figure ##) contains various settings not belonging elsewhere.
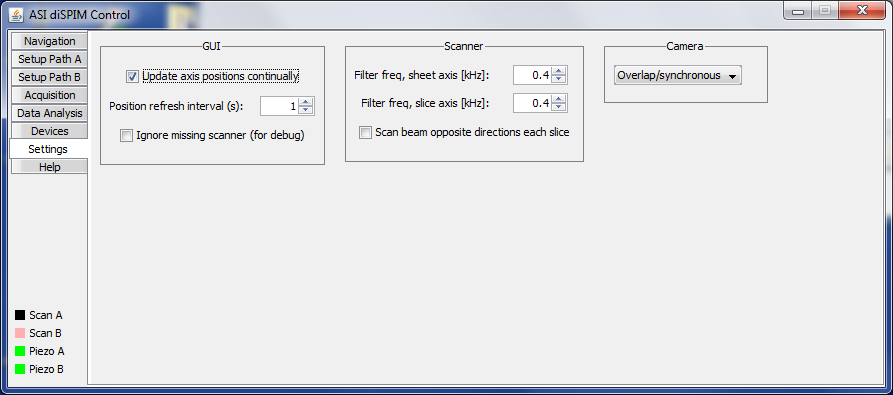 Figure ##: The Settings panel of the diSPIM plugin.
The micro-mirror drive card has adjustable Bessel output filters to protect the filter from being driven near its mechanical resonance (usually 2 kHz). Settings as high as 0.8 kHz are usually acceptable, and in general the shorter the scan period (and faster frame rates) the more this matters.
The camera triggering mode is specified here. For Andor Zyla and Hamamatsu Flash4 cameras there is the possibility to have consecutive triggers determine the start and end of a image capture; this is termed respectively “Overlap” and “Synchronous” by the manufacturers but referred to uniformly as “Overlap” in the plugin. Because the image sensor is simultaneously read out and also reset to begin the subsequent exposure, the camera overhead time is reduced and it allows for faster camera frame rates.8). The downside is that there can be slight “ghosting” or bleedthrough from frame to frame because the reset isn't quite complete. The same mode is not available with the PCO Edge or Photometrics Prime 95B, however, a new exposure can begin shortly after the readout starts which is a mode we refer to as “Pseudo Overlap”.
Data Analysis Tab
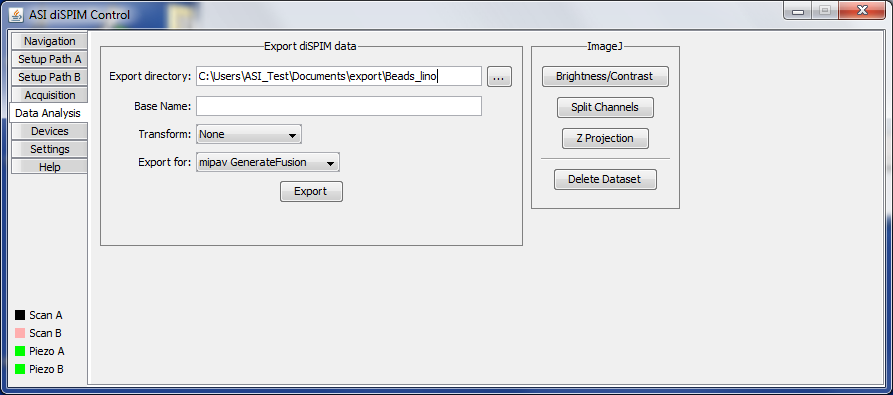
In the future we would like to include the ability to manipulate the acquired data including registration of the two views and joint deconvolution directly in the diSPIM plugin. At present the Data analysis tab (Figure ##) allows exporting the acquired data to the format required by the MIPAV GenerateFusion plugin. As of April 2015 Fiji’s Multiview Registration plugin can directly import diSPIM data. Exporting operates on the top-most image window.
Also in this tab there are some buttons to access commonly-used ImageJ commands. They are simply shortcuts to the ImageJ commands, so they operate on the top-most image window.
Set the Stage Limits
When first setting up your microscope you should set the limit magnets on the motorized stages to prevent crashes that can break coverslips or worse. This is especially important when using the 24 x 50 mm coverslip chamber, where there is not much lateral travel room and the coverslip glass is easily broken. Although the TG-1000 firmware supports software-defined limits, setting hardware limits using the provided magnets is the most foolproof way to prevent crashes.9) The limit magnets move with the stage body; when the magnet passes the Hall effect sensors affixed in the stage body the firmware detects a limit condition and stops the stage.
There are several methods of seeing whether the stage is at a limit. One method is to continually query the limit condition over serial, e.g. using the RS <axis>- command; the controller will reply with or for upper or lower limit respectively. Some programs, such as Advanced Serial Port Monitor, allow sending such a command repeatedly for easy monitoring. Another method is to watch the LED of the corresponding drive card on the controller front panel; the LED will flash rapidly when one of its axes is at a limit. Third, a feature is planned for the new version of ASI Tiger Console where an audible beep can be heard when the axis is at a limit.
Set the upper Z stage limits
The lower limit of the upper Z stage (the LS-50 that raises and lowers the SPIM assembly) is the most important limit to set, and also the most difficult. For the typical Nikon 40x SPIM objectives, the objectives nominally sit approximately 250 um above the cover slip, so the limit must be set within 0.25 mm accuracy to allow the needed range while preventing a crash. To set the lower limit of the upper stage:
- Prepare a coverslip with a feature on the upper surface (e.g. make a small dot with a permanent marker) and place it in the sample holder.
- Use the lower objective to focus on the top surface of the coverslip (e.g. focus on the dot). If you cannot focus on the top coverslip surface, the limit magnet is probably set too conservatively and you can move it upwards.
- Gradually lower the SPIM assembly (e.g. using the joystick or knob set appropriately in the Micro-manger diSPIM plugin Navigation tab) until reaching the coverslip, watching carefully for the moment that the objectives touch the coverslip by noting the change in focus in the bottom camera.
- While monitoring the limit condition (see Section ), move the appropriate limit magnet (the top one on the LS-50, very easily accessible) until the limit condition is reached. There is a range of a few mm over which the limit condition is reported; adjust so that the magnet is on top end of that range, i.e. where the controller reports a limit condition but moving it slightly higher takes it out of limit condition.
- Check that the hardware limit stops the motion appropriately by moving a mm or so up and then back down the same amount (e.g. by issuing the command
R F=10000followed byR F=-10000or dialing back and forth with a control knob). The stage should stop itself slightly short of the prior position, with the objectives nearly touching the bottom of the sample holder (get the position by issuing the command before and after the move).
Set the XY stage limits
It is also important to set the limits of the XY stage to prevent the objectives from crashing into the sides of the sample holder, which will perturb objective alignment. To set the limits of the XY stage:
- Start with the SPIM assembly lowered down to its limit position as set in the prior sequence. When the XY stage is moved too far the objectives will crash into the sides of the sample chamber.
- Move the XY stage (e.g. with the joystick) until the objectives are just about to crash (or barely crashing) into the side of the sample chamber. Query the appropriate limit status of the appropriate axis (e.g.
RS X-orRS Y-) and move the limit magnet until the limit condition is barely reached. You may need to turn the limit magnets around so the dots are facing each other. Repeat for all 4 limits. - For all of the four directions, check that the hardware limits stop the motion before the objectives crash into the sample holder using the joystick with the fast speed setting.
- To access the limit magnets for the X axis, you may need to temporarily move the limit magnets for the Y axis and then move the stage forward to expose the limit magnets.
Set the lower Z stage upper limit
This step prevents the lower Z stage from damaging itself, which can happen in the lower LS-50 motorized stage is lowered so much that the attached objective mount crashes the cube that is attached to the LS-50 .
This step does not apply to SPIM systems mounted on non-ASI inverted microscopes. For ASI inverted microscopes this limit magnet is generally set during factory assembly.
To set the upper limit10) of the lower Z stage:
- Gradually lower the lower objective (e.g. using the joystick wheel) until there is a few millimeters of space between the cube mounted to the side of the lower stage and the lower objective holder.
- While continuously monitoring the limit condition (e.g. ), move the appropriate limit magnet (the top one on the LS-50) until the limit condition is reached. Adjust so that the magnet is on the top end of the range. If needed, the magnet can be flipped around so that the set screw doesn’t attach in the region where the magnet track is expanded.
- Check that the limit stops the motion appropriately by moving a mm or so up and then back down the same amount (e.g. by issuing the command followed by ). The objective should stop itself slightly short of the prior position, well before a crash could occur.
Set the lower Z stage lower limit
This step is less critical because the lower Z stage (the LS-50 that raises and lowers the inverted objective) is unlikely to be moved around much, but it is still recommended to set its hardware limit to prevent crashing the objective into the bottom of the sample chamber. The limit can be set anywhere between the focus point of the lower objective in the sample and where it touches the sample chamber bottom, typically 1 to 3 mm depending on the working distance of the lower objective.
This step does not apply to SPIM systems mounted on non-ASI inverted microscopes.
To set the lower limit11) of the lower Z stage:
- Raise the SPIM assembly up a few mm from the coverslip in the sample holder so the subsequent steps won’t break the coverslip.
- Gradually raise the lower objective (e.g. using the joystick wheel) until the sample holder begins to move upwards, being pushed by the lower objective. Watch the sample holder from the side to see its vertical movement. Lower the objective until the sample holder is stationary again.
- While continuously monitoring the limit condition (e.g.
RS Z-), move the appropriate limit magnet (the bottom one on the LS-50) until the limit condition is reached. Adjust so that the magnet is on the bottom end of the range. If needed, the magnet can be flipped around so that the set screw doesn’t attach in the region where the magnet track is expanded. - Check that the limit stops the motion appropriately by moving a mm or so up and then back down the same amount (e.g. by issuing the
R Z=10000command followed byR Z=-10000). The objective should stop itself slightly short of the prior position, but still very close to the bottom of the sample holder.
diSPIM Alignment
Overview
Before acquiring data the optical paths of the diSPIM must be aligned. This is the trickiest thing for new diSPIM users to learn. If the system is not disturbed then the alignment can last for months. Changing objectives, crashes, filter changes, and so forth will usually require at least partial realignment.
Think of the process of aligning the diSPIM as a giant inward spiral. There are lots of different adjustments to be made, and you will adjust the same thing multiple times as you spiral inward to the perfect alignment. First do a coarse mechanical alignment step using your eye and simple mechanical tools. Next, use the cameras imaging a solution of dye and finally a coverslip with beads to zero in on the perfect alignment.
The scanners are aligned at the factory and are likely to be suitable to use without further adjustment. One of the first checks is to verify that they are indeed not terribly mis-aligned before proceeding with other steps. If the scanners fail this initial check, they should be removed and aligned on the bench using the methods described in Section [sec:Align-the-Scanners].
Ideal final alignment
Below follows a suggested alignment procedure. However, if you achieve good alignment by following some other means that is OK. Here are characteristics of the final alignment you are looking for, which apply to both optical paths of the diSPIM:
- epi spot centered on epi camera
- beam waist centered on imaging camera
- beam/sheet plane coincident with imaging focus plane near the center of the piezo travel
- beam perpendicular to camera field of view
- sheet centered in camera field of view
- sheet centers in center of bottom camera’s field of view (i.e. co-alignment of SPIM objectives with bottom objective)
Beam position and angle: what affects what?
We are concerned with getting both the beam position and angle correct in the sample. Fortunately, the adjustments to do so are mostly “orthogonal” or independent of each other. The following table can be derived by understanding the lens system from the fiber input of the scanner to the sample and then through the imaging path to the corresponding camera on the opposite side of the microscope. Table 1 shows how various “knobs” affect the beam position and angle.
| Adjustment | Position? | Angle? | Comments |
|---|---|---|---|
| Tilt of dichroic mirror | Some | Yes | Position effect varies 12) |
| Tilt of camera mirror | Yes | No | Set during scanner alignment and not after |
| Position of upper Z stage | No | No | Angle varies if scanners are not connected to dichroic tubes |
| Objective bushing (focus) | Maybe minor | Maybe minor | If the bushing isn't perfectly concentric then slight movements can occur but this isn't usually a problem |
| Linear objective adjustment | Yes | Maybe minor | |
| | | | |
| | | | |
Coarse Alignment
The following coarse alignment steps are done by eye so that the beams are easily found in the SPIM cameras for the fine alignment.
Co-align the SPIM objectives
Double-check that the SPIM objectives are approximately aligned as described in Section [sub:Insert-the-objectives-2014].
Check rotation of cameras and scanners
Verify that the cameras and scanners are parallel/perpendicular to the SPIM arm cubes as best as possible by eye. Adjust the angles of the devices at their C-mounts as required. With careful sighting along parallel surfaces you can be sure the scanners and cameras are aligned with the rest of the SPIM system to better than 1 degree of rotation. In the long run this will save time having to re-do alignment steps later.
Check course scanner alignment
This step is not usually necessary, feel free to skip.
Warning: be very careful with exposed laser beams; wear appropriate eye protection. Remove the dichroic filter cube assembly (Figure 17) and place the square alignment target shown in Figure 21 over the cube opening. Be sure that the scan mirror is not being deflected (turn the controller off to be sure), power on the laser, and observe where the laser spot is hitting the target. If the laser spot is well within the first target ring, proceed to the next steps, otherwise proceed to complete scanner alignment in Section [sec:Align-the-Scanners].
Note that it is possible for the scanners to be misaligned in a way that passes this simple test. If in doubt, contact ASI for help.
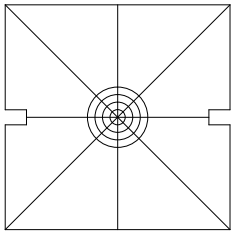 Figure 21: Square target; fits on a cube in place of the cover after downloading and printing at full size.
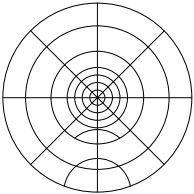 Figure 22: Round target; trim to fit desired size after downloading and printing at full size.
Adjust dichroic mirror tilt
Re-install the dichroic mirrors so the laser will be reflected into the objective. With upper Z stage (SPIM objectives) raised, tilt the dichroic mirrors in the adjustable cubes (items 9 in Figure ##) as described in Section [sub:Adjusting-the-Mirror] so that the laser exits the objectives in a straight line. One trick is to use a 45 degree surface like a folded business card or part of a C60-D-CUBE with a piece of paper, as shown in Figure [fig:Scanner-mirror-and]. Use the cube mirror adjusters to adjust the tilt of the filter cube as described in Section [sub:Adjusting-the-Mirror] so that the beam exits the objectives in a straight line.13) This is a course adjustment only, you will return to adjusting the beam pointing using the cameras later.
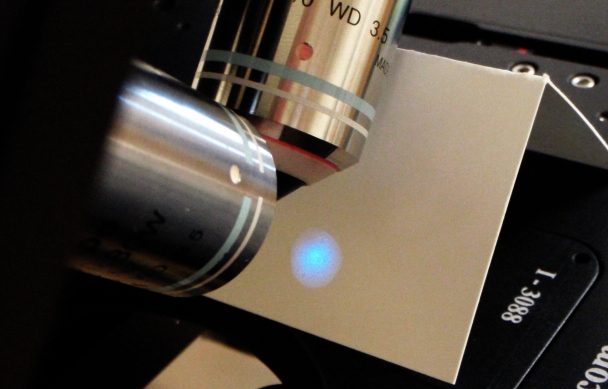 Figure 23: Scanner mirror and iris diaphragm are imaged by the laser on a target in the far-field of the objective. The emerging beam is adjusted to be centered leaving the objective.
Check scanner beam centering
Check the centering of the scanners since it is easy to do at this point. You should be able to see the extent of the scanner mirror with the scanner iris fully open. See Figure 23. The center of the Gaussian beam, the center of the iris aperture, and the center of the scan mirror should all be approximately concentric. In practice this is hard to achieve perfectly. If you are not satisfied, proceed to Section [sec:Align-the-Scanners] to improve the situation, or contact ASI for assistance.
Fine alignment
For the rest of the alignment we will use the SPIM cameras. The following steps may need to be repeated several times in an alternating fashion until the alignment is complete. It is recommended to first get each alignment relatively close, proceed with the rest of the alignment steps, and then come back to each step to finish; in other words go around the “alignment spiral” a few times not worrying about perfection at first. It is easiest to begin the fine alignment in a uniform dye solution and end it with a solution of fluorescent beads, although a bead solution can be used throughout the process. The final steps can also be performed with a 2D sample of fluorescent beads. For a uniform dye solution a bit of fluorescein in water is ideal because it is easily washed off (a dip of standard highlighter pen works in a pinch). For beads in solution it is handy to use a highlighter that results in bead-like droplets when briefly dipped of dye in water (Zebra Mildliner and Zebra Eco Zebrite both seem to do this).
You will need Micro-Manager running to have a live view of the camera images. It is helpful to set a relatively long exposure time for the cameras, e.g. 100 ms. Launch Micro-Manager, the diSPIM plugin, and configure the plugin as described in Sections [sub:Before-Running-the-plugin] and [sub:Devices-Tab]. You will use the Navigation panel (Section [sub:Navigation-Tab]) extensively, as well as the two Setup panels (Section [sub:Setup-Tabs]).
An overview of the recommended order of operations is as follows. See details below.
Phase #1:
1. Co-align the SPIM objectives (beams in focus and centered)
2. Adjust the dichroic mirror tilt (beam horizontal and uniform through focus)
3. Adjust imaging mirrors (epi spot centered)
Repeat 1/2/3 multiple times as you spiral in on perfect alignment. In the initial passes there is no need to be perfect, but demand more and more perfection as the spiral tightens. In this phase you are only looking at beams, not sheets. After initial setup is complete these are usually the only required steps and any required adjustments should be very minor.
After Phase #1 is complete and alignment of the beams look good in all aspects, proceed to Phase #2. These steps should be done in order, particularly 5 and 6:
Phase #2:
4. Check collimator focus (beam waist centered in FOV)
5. Check scanner tilt (sheet uniform through focus)
6. Check camera orientation (epi view of sheet is vertical)
After 4/5/6 are complete, re-check 1/2/3; it is likely they will need to be repeated if you made any adjustments. Afterwards re-check 4/5/6.
Co-align the SPIM objectives
Use only three adjusters to manipulate the focus and relative beam positions, the two objective threaded bushings for focus, and the lateral objective position adjuster. See Figure [fig:Three-orthogonal-objective]. Bring the beams into focus with the imaging objective bushing threads. Alternate between adjusting the two bushings and only move half way to the focus at a time (before alternating sides) to achieve convergence even if there is a bit of play in the objective bushings.
Overlay the images from both cameras using the MultiCam feature and move the lateral adjustment to place the red beam on the red spot, and green beam on green spot. Figure ## through Figure ## illustrate the procedure. Alternate between the steering adjustment and focus adjustment. If it seems impossible to get a uniform pencil beam, realize that the desired parallel beam might tip it quite far from your current focus point. Go for uniform width first, then focus. As a last resort, see section [sub:Adjust-scanner-slice-offset] to rectify this.
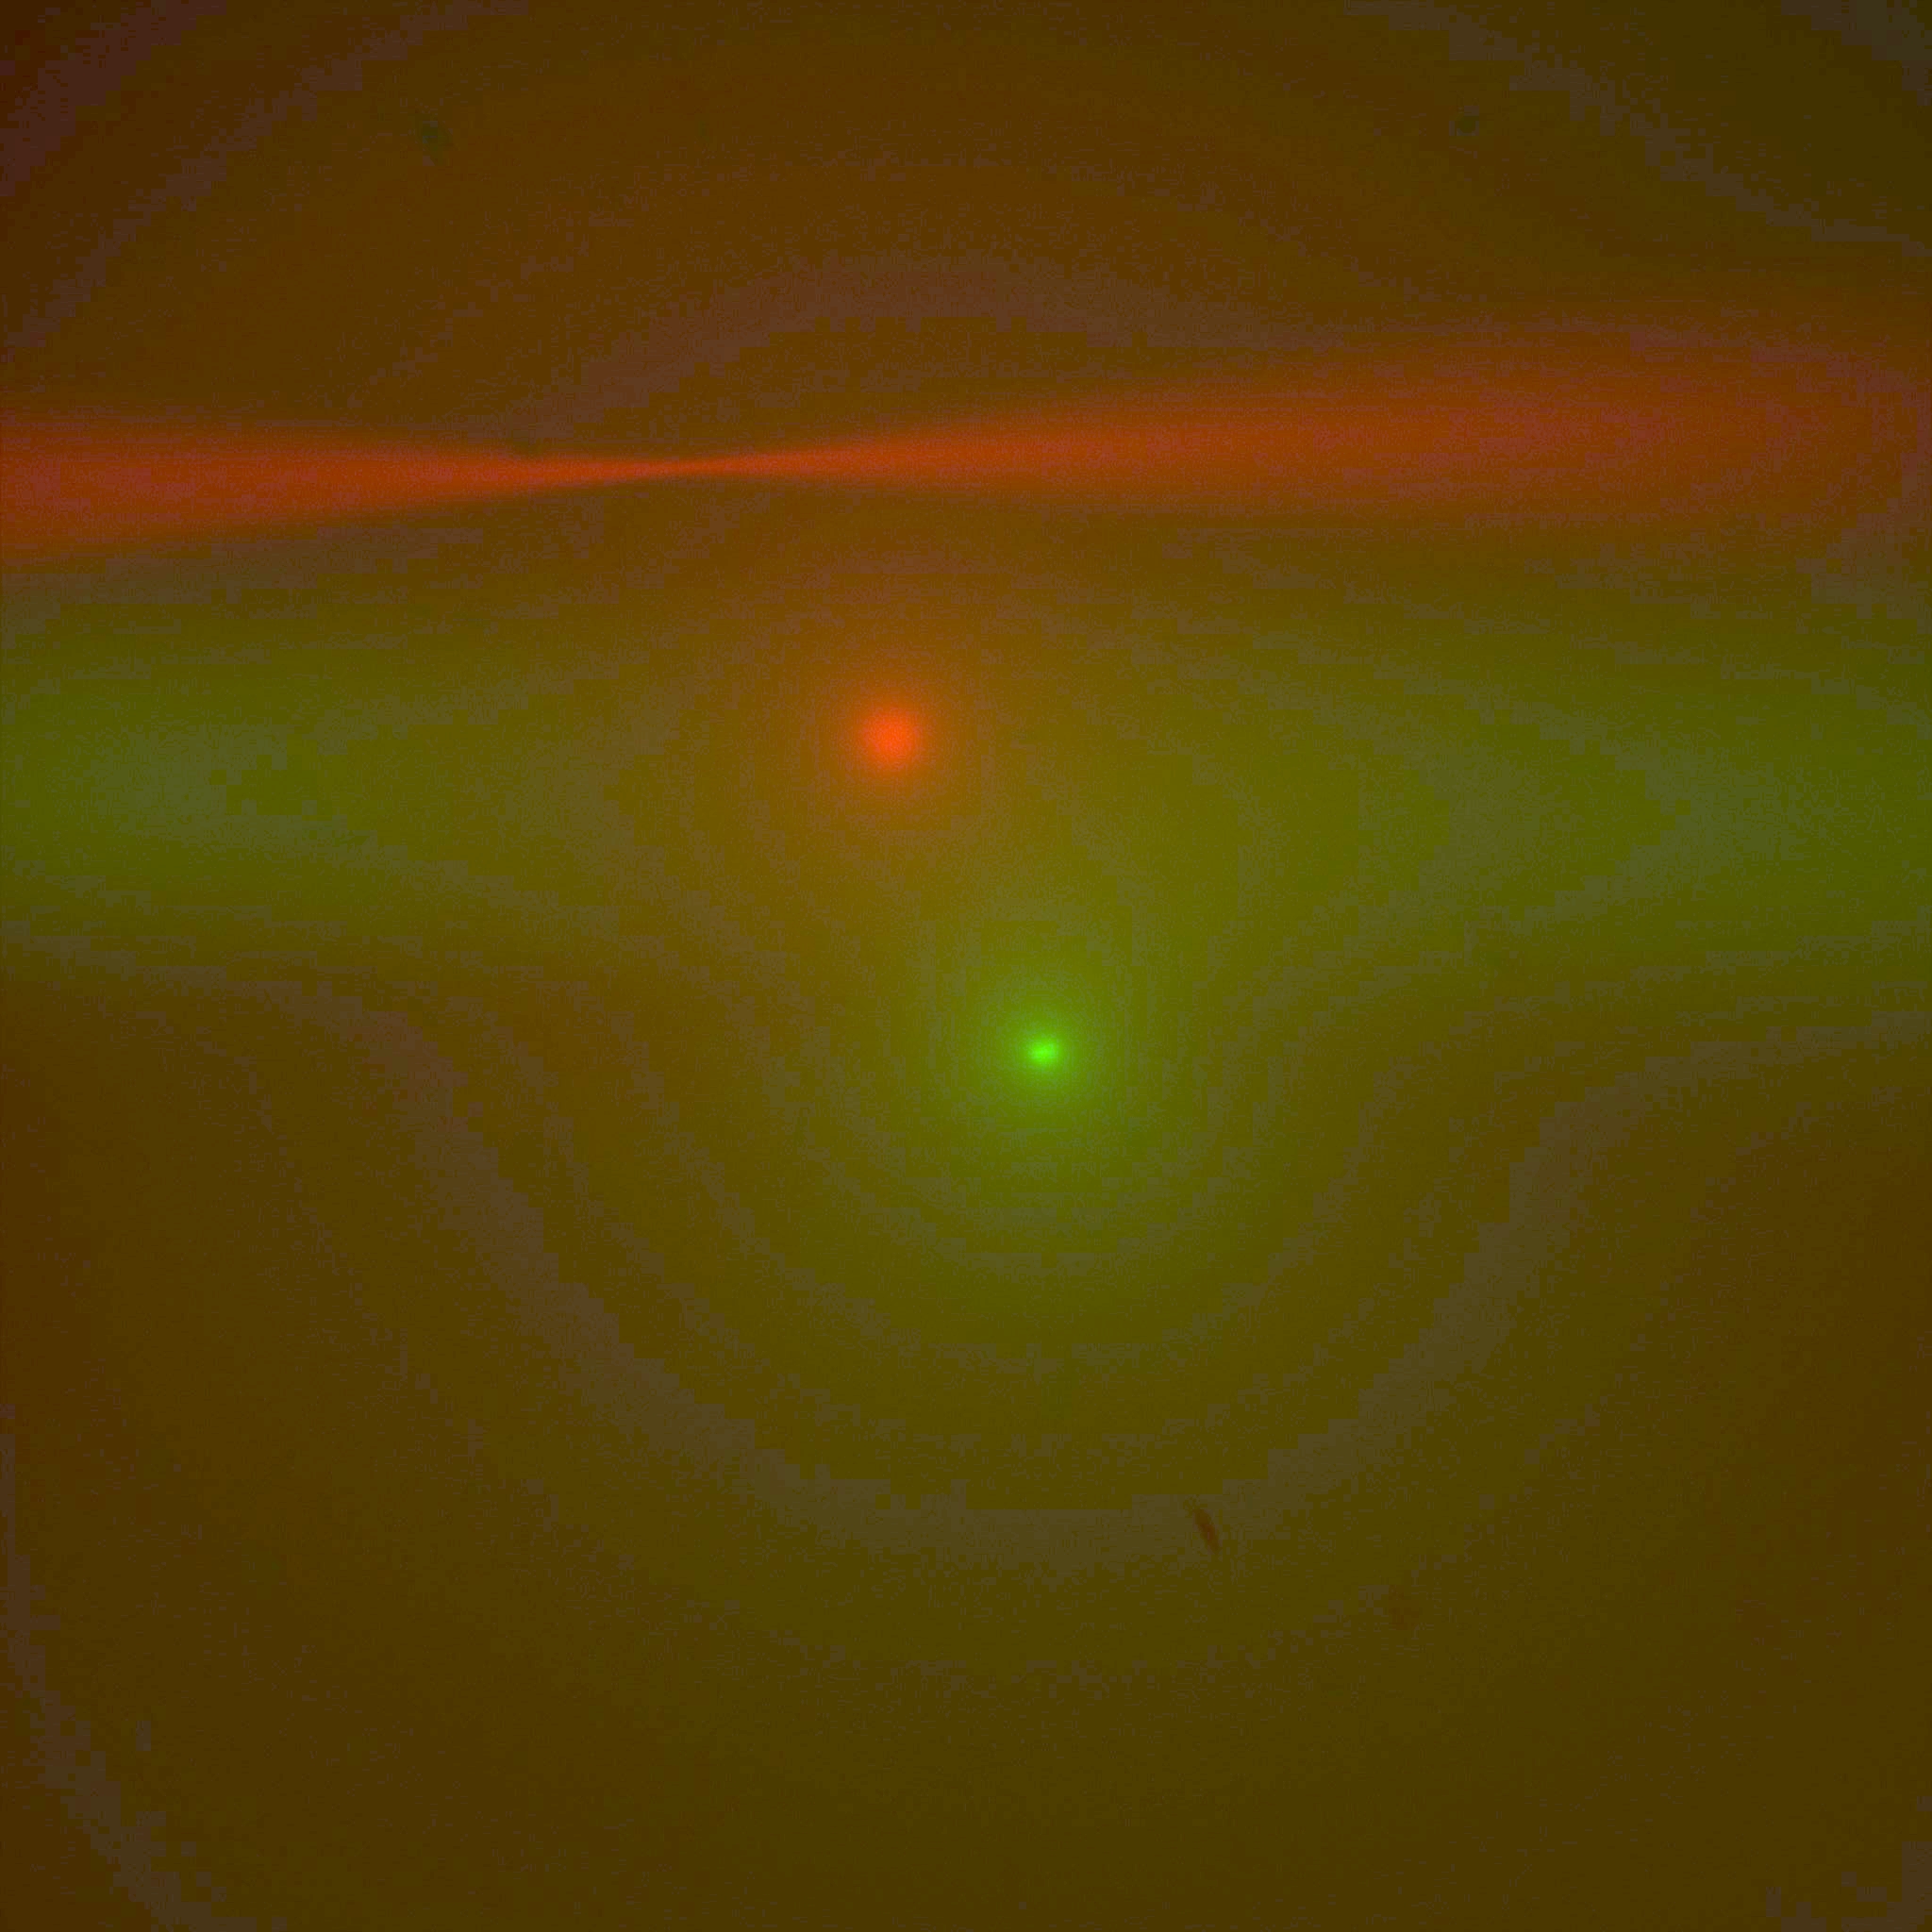 Figure ##: Co-aligning objectives, starting out with both beams and epi-spots, nothing very well aligned.
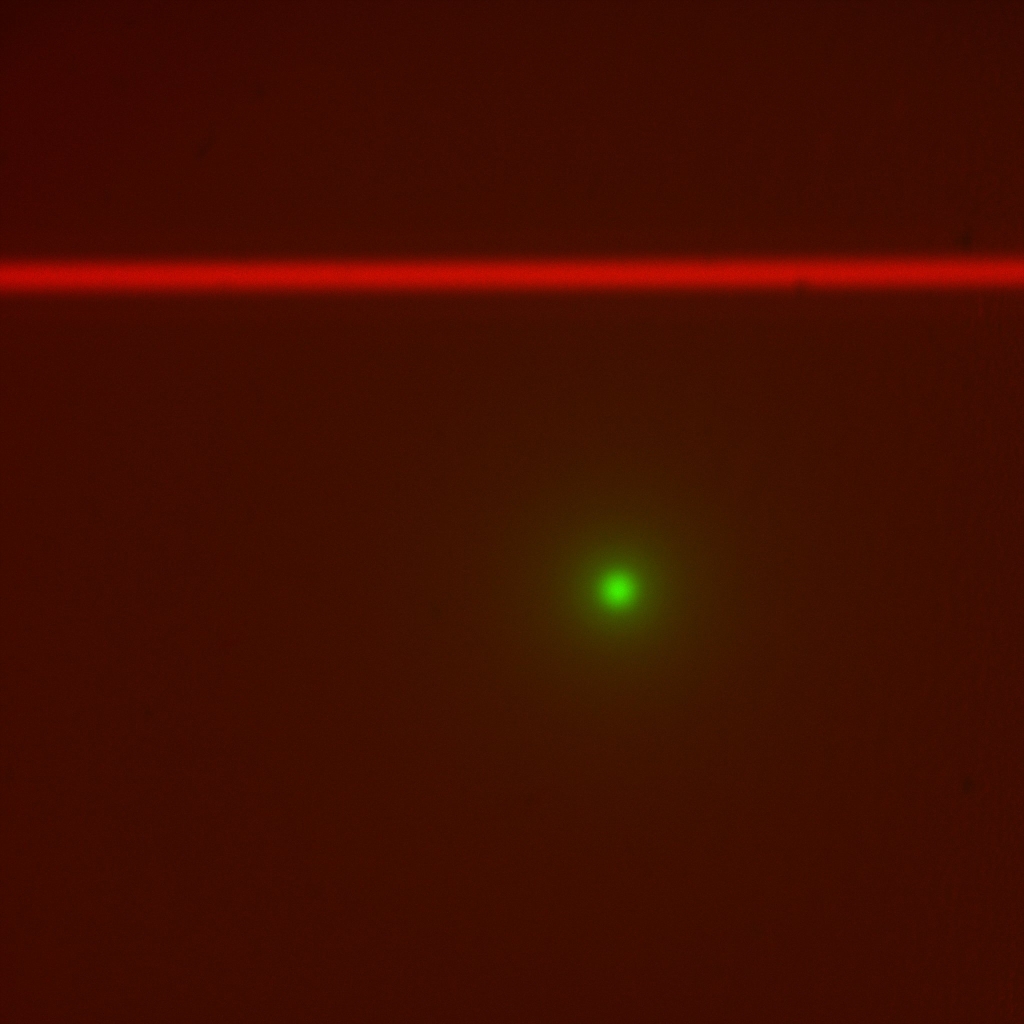 Figure ##: Look at red beam only with scanner iris closed down all the way so laser is a “pencil beam.” Use adjustment
screws on the scanner’s dichroic mirror holder to make the pencil beam straight horizontally and
in focus along the beam. Adjust imaging objective bushing focus as necessary to keep the beam in focus as you
make changes to the beam steering adjusters.
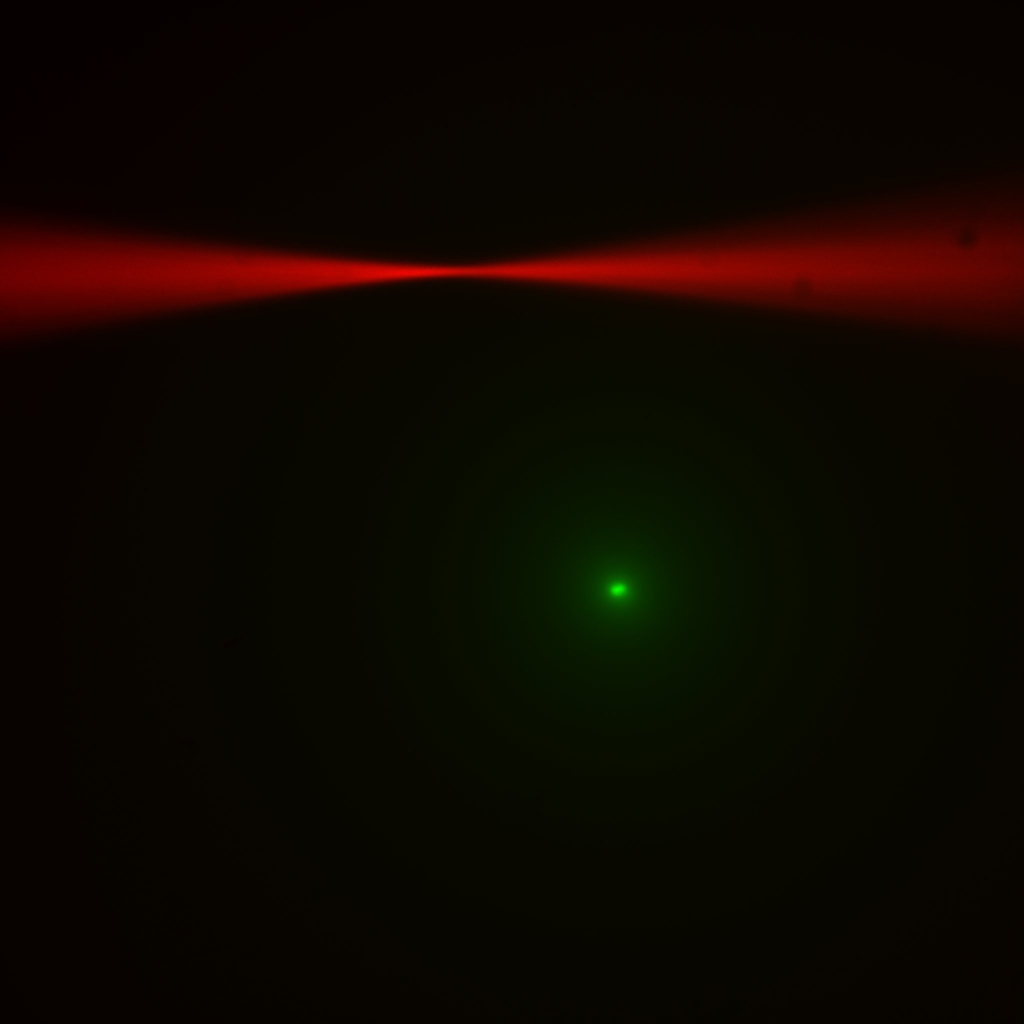 Figure ##: Open the scanner iris and observe the beam waist.
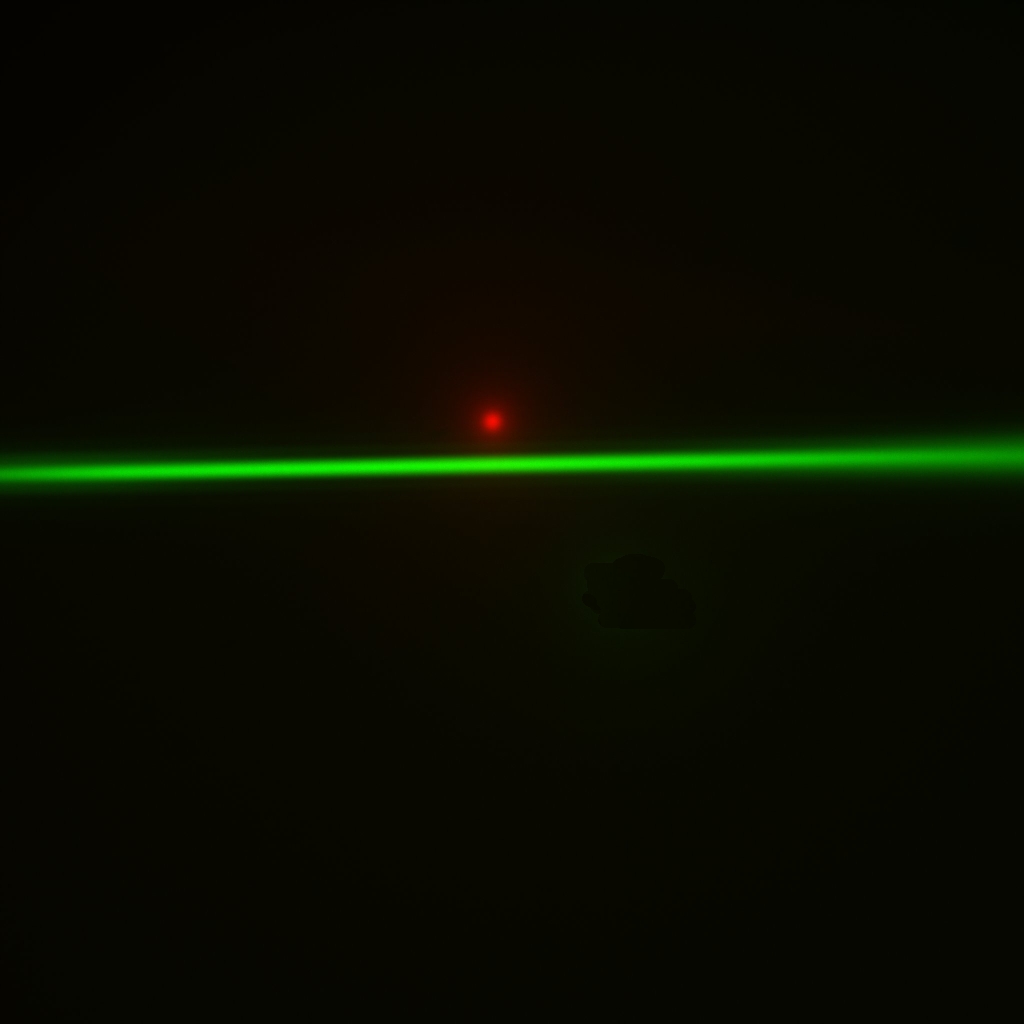 Figure ##: witch to the other beam and repeat the alignment of the pencil beam on the other side.
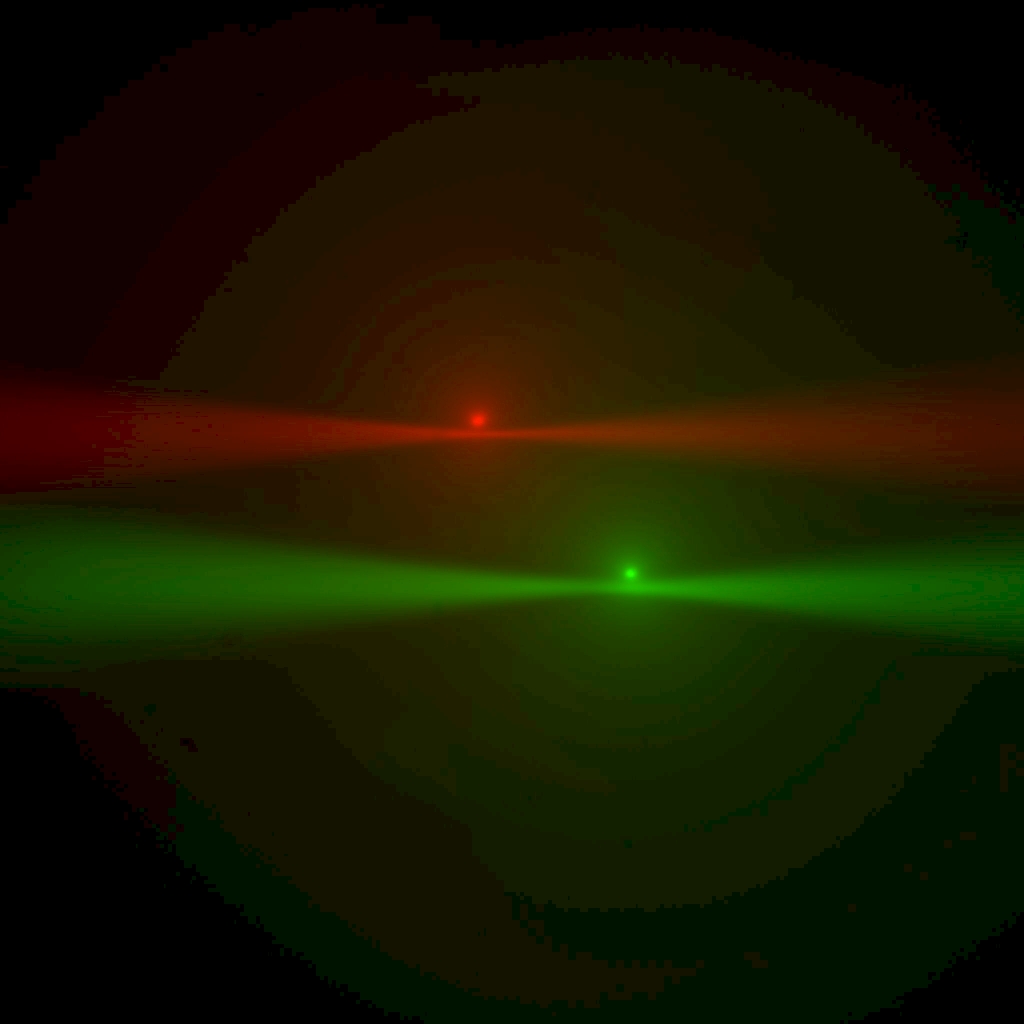 Figure ##: Now turn both beams on again and use the lateral objective adjuster to bring the red beam to the red spot and green beam to green spot. Notice when everything is in focus, the beam waist is near the epi-spot from the opposite-side beam. You can use this
effect to aid in co-focusing the objectives.
 Figure ##: Finally the steering mirrors for the
cameras (items 8 in Figure 1) are adjusted to bring the epi spot to the center of the camera frame. First on one
side and then to match on the other side.
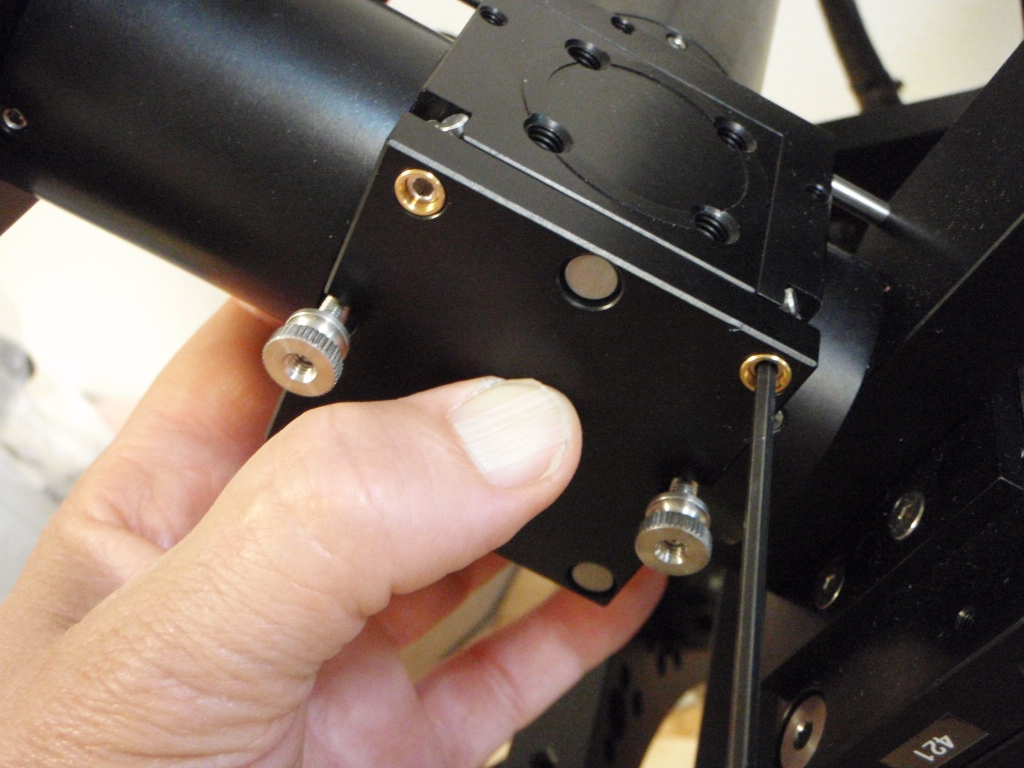 Figure ##: Adjusting the mirror steering screws.
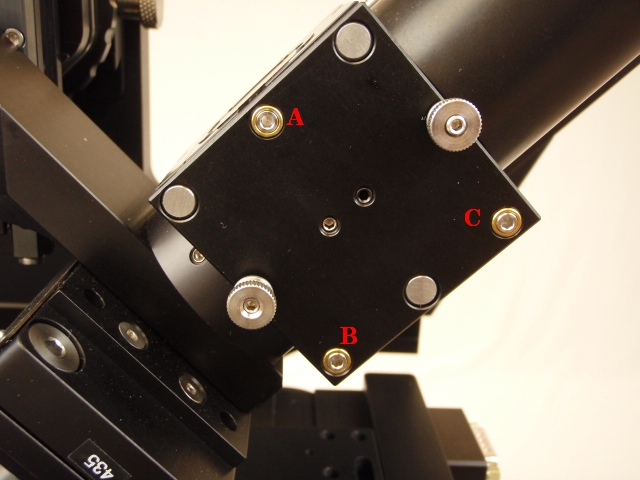 Figure 27: Use adjuster A alone, or B and C in tandem, to tilt beam in/out of focus plane. Use adjusters B or C alone, or in opposition, to tip beam horizontally to align parallel with the edge of the camera image.
Adjust dichroic mirror tilt
Verify that the the piezos and scanners are in their neutral positions everything at zero (use the MicroManger diSPIM plugin Navigation tab). Adjust the beam pointing to get the beams pointed exactly perpendicular to the field of view and exactly in the image plane. This was adjusted approximately previously in Section [sub:Adjust-dichroic-tilt]; now adjust it based on the camera images. Use the scanner iris to stop the beam down into a pencil beam. Use the MIM-CUBE-II mirror adjusters (see Section [sub:Adjusting-the-Mirror]) to make the beam horizontal and in-focus the entire length. Work with one beam at a time. It is not important that the imaging piezo is exactly at 0 at first, you will return to step [sub:Co-align-the-objectives] again after this step.
Check that the beam plane is coincident with the image plane by adjusting the imaging piezo (e.g. using the joystick knob) to make sure that the pencil beam comes in and out of focus uniformly. It may be helpful to use a LUT (false-color heat map) on a single-camera view to aid in judging uniformity. If the iris is fully opened to create a pronounced beam waist, then the waist position will remain unchanged as you focus and defocus using the imaging piezo. Adjust the mirror adjustors until the beam plane is coincident with the image plane; Figure 27 shows which adjustment screws to use.
After the tilt with respect to the image plane is correct, then adjust the mirror tilt to get the beam horizontal. The grid overlay in the Pattern Overlay plugin in Micro-Manager () can be helpful by providing reference lines. Confirm that the tilt adjustment did not tilt the beam relative to the image plane. See Figure 27 for which adjustment screws to use.
Adjust imaging mirrors
Using the mirror adjusters on the two camera mirror cubes, move the epi spot to the center of the camera image. The two sides should overlap in the center. See Figure ##. You may need to repeat this step again several times as other adjustments slightly disturb this. The crosshair overlay in the Pattern Overlay plugin in Micro-Manager () can be helpful by marking the center of the image.
Check collimator focus
Open the iris completely to see the focus point; we want that to be in the center of the image. Equivalently, this corresponds to a maximum epi-spot intensity. Insert the fiber collimator focus tool in the opening in the side of the collimator and engage the lip on the lens mount. Turning the tool should change the focus point along the beam (if needed, slightly loosen the retaining set-screw on the opposite side). Only small movements should be needed. See Figure 31. Adjust it so that the beam focus is at the center of the image.
The lens assembly can slip entirely out of the collimator housing if you loosen the set screw without the tool engaged; if that happens you will have to unscrew the fiber collimator from the scanner housing to put it back together. 14)
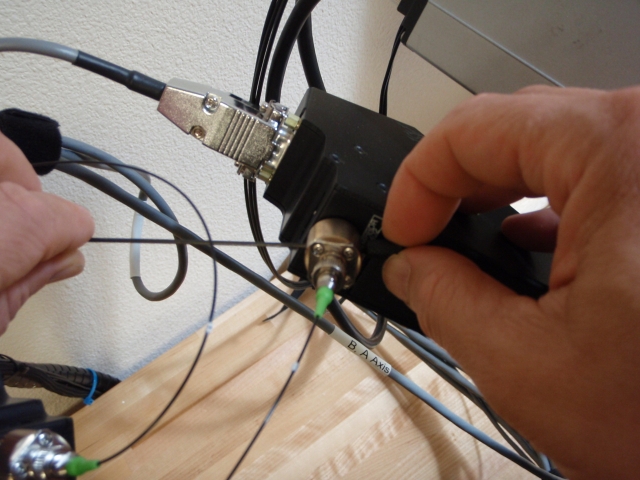 Figure 31: Focusing the fiber collimator to get smallest epi-illumination spot.
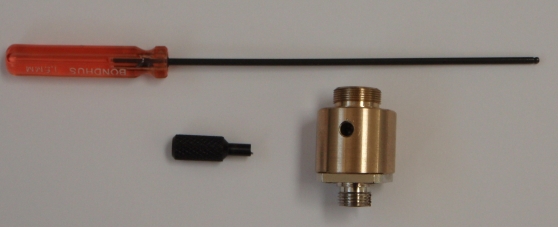 Figure 30: Collimator adjuster tools
Adjust scanner slice position offset
Usually it is possible to get the objectives co-focused with the piezos near their centered or 0 position. If you have achieved this you can skip the remainder of this step.
If it seems impossible to get the two objectives co-focused with the piezo positions near 0, you have two options: use a non-zero piezo offset or use a non-zero scanner slice position offset. If the sample of interest occupies most of the piezo range, only the later is viable. However, using a piezo offset is a simpler approach. In either case start with the objective bushings moved to a middle position that remains fixed.
Using a piezo offset is straightforward: an offset will be computed automatically by the piezo-scanner cross-calibration explained in Section [sub:Cross-calibrate-piezo]. Simply you will only need to use start and end points of the calibration curve that are not symmetric about 0.
To use a scanner slice position offset, the piezo-scanner cross-calibration explained in Section [sub:Cross-calibrate-piezo] will make the offset appear during imaging, but you should compensate for the offset by moving the imaging mirrors (Section [sub:Adjust-imaging-mirrors]) so that in the middle of the range the epi-spot is centered in the epi camera. Do this by setting the piezo to 0, moving the slice position until the beam is in focus, then adjusting the imaging mirror. Repeat for the other side. This should make it so that the epi spot is overlaid with the beam focus.
Check scanner tilt
Generate a sheet beam using the Micro-Manger plugin Sheet check box (Navigation or Setup tabs). Adjust the width of the sheet to fill most of the camera field of view. The optimal method is to use a solution of freely diffusing beads (or Zebra highlighter pen) and judge whether the sheet comes in and out of focus uniformly from top to bottom of the image. Taking an autofocus stack using the plugin can assist. Alternatively, in a dye solution both edges of the sheet should be well focused near the beam waist. Finally, you can move the stationary beam from one side of the sheet to the other using the Navigation panel of the plugin.
If the focus is not uniform, then the entire scanner needs to be twisted slightly until things are perfectly uniform. It is usually possible to firmly grasp the scanner tube lens and rotate slightly (watch the fiber collimator to see if it moves); what you are really doing is rotating the threads on the retaining ring that holds the lens in place near the collimated side of the tube lens. See Figure 32 and Figure 33. Check both scanners. If you have to twist one of them, return to the start of the fine alignment.
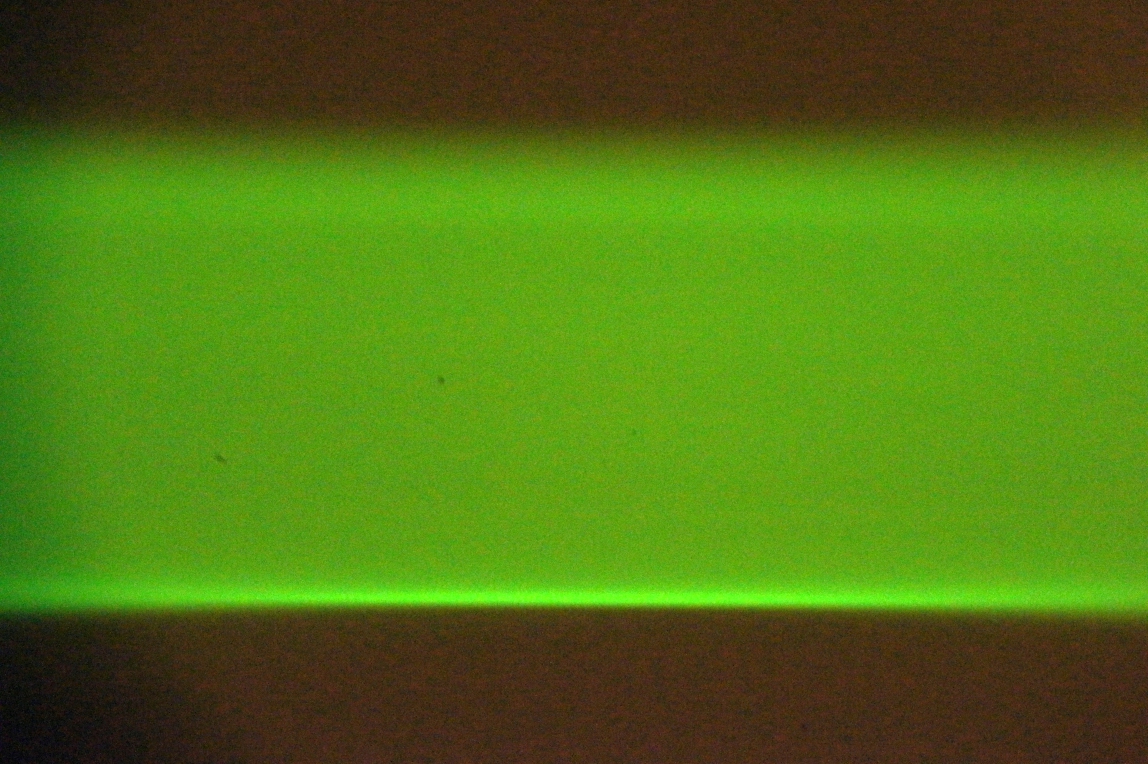 Figure 32: Tilted light sheet.
 Figure 33: Corrected by twisting the scanner.
Check camera tilt
Check that the line generated in the epi view while scanning the beam to create a sheet is exactly vertical in the camera image. Because we have verified in the previous step that the scanner is tilted correctly, any remaining tilt must be in the camera. If the epi line is not vertical, adjust the camera until it is and then return to the start of the fine alignment. In older systems (~up to 2015), loosen the set screw in ABTS-1013 which holds the SPIM cameras’ tube lens onto the SPIM assembly. In newer systems there is a wide split ring (RAMM-B1056) holding the camera tube lens which is more stable; loosen the two bolts until the tube lens will rotate, adjust the rotation, and re-tighten the bolts. Check both scanners.
Establish coverslip location
Slowly lower the objective pair into the dye solution until the coverslip becomes apparent where the fluorescent beam stops. See Figure 34. The objectives will touch the bottom of the chamber very near the point where the two beams meet in the center of the camera image. Set the Upper SPIM Z-drive coordinate value to zero somewhere near or slightly above this point. In the future, when changing samples you can use the Navigation tab to move the microscope 25 or 30 millimeters and then quickly get back to the coverslip by pressing the “Go To 0” button.
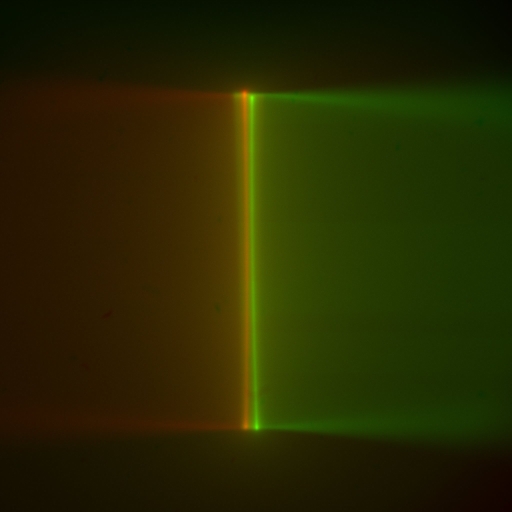 Figure 34: Converging light sheets in dye striking the coverslip. Note the epi-beam line of light corresponding to each sheet. Here the objectives are very close to the bottom of the chamber. The light sheets are are barely crossing each other before they disappear when they encounter the coverslip. With the light sheets focuses across the width of the sheet, the epi-beam should be appear parallel to the edge of the camera field.
Align bottom objective with SPIM objectives
Locate the image of the laser spots/sheet where it intersects the coverslip in the bottom camera. Bring the laser spots to the center of the camera image by adjusting either the CDZ-1000 XY translator that holds the entire SPIM microscope, or use the bottom-side objective adjuster to center the image (RAMM systems). For larger adjustments, you can add shims between the SPIM mount and the CDZ replacement block for front to back adjustments and shift the dovetail on the LS-50 mount for side to side adjustments. Focus the lower objective and set the coordinate for the coverslip as zero in the Micro-Manger Navigation window. When using the bottom objective for sample spotting, it is useful to know the relative positions of the light sheets in XY and Z compared to the bottom camera image. Setting appropriate Z-references helps in this regard.
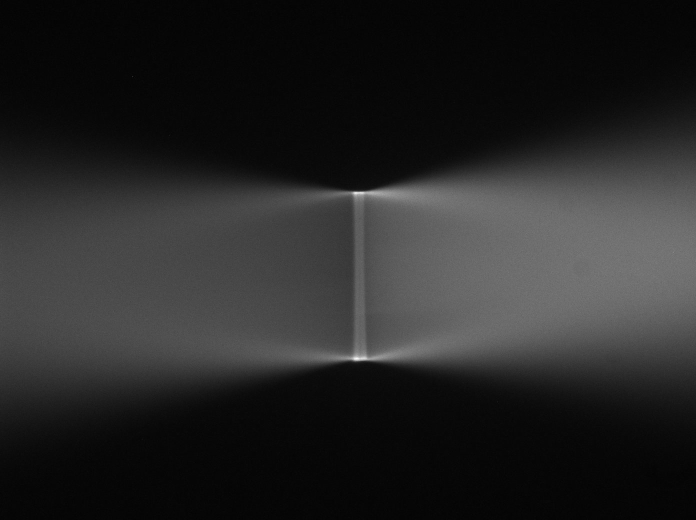 Figure 35: Bottom camera aligned to the centered light sheets shown in Figure [fig:Converging-light-sheets].
Repeat steps [sub:Co-align-the-objectives] to [sub:Check-collimator-focus] at least once
Cross calibrate piezo and scanner movement[sub:Cross-calibrate-piezo]
This process can be accomplished with a either the focused beam in dye, or with a sheet beam using a field of fluorescently labeled objects such as beads on a coverslip or dispersed fluorescent objects in the users sample. We will describe the process using dye as a natural progression from the previous steps. However, when imaging real samples, you may wish to verify this calibration step fairly often (and redo as needed), in which case you can use fluorescent objects in the sample preparation as target objects rather than the focused beam waist described here.
Use the diSPIM control Setup Path A tab. Establish a focused beam in the dye solution. Set the manual controls so that the left knob control the Imaging Piezo and the right Knob controls the Sheet Beam, Slice Position. Follow the instructions in Section [sub:Setting-piezo-vs-slice-calibration] to calibrate the scanner movement in the slice axis with the piezo movement.
Acquisition
Resolution and Z-step Size
Think about the classic problem of distinguishing two nearby point sources. If your camera pixels are so large that both point sources fall on the same pixel, then you won't be able to tell them apart no matter how good your optics. It turns out that you need the camera resolution to be at least 2x the optical resolution (e.g. PSF) to avoid having the camera be the limiting factor; you can think about this as requiring a dark pixel between the two bright pixels lit up by your two nearby point sources. More mathematically, this is a manifestation of Nyquist sampling theory which may be unfamiliar to biologists but is standard fare for engineers.
The standard formula for the optical (lateral) resolution is 0.61*lambda/NA. For our 40x/0.8 objective at 500nm that's ~380nm. Our 40x objective with standard sCMOS camera is spatially sampling at 6.5um/40x or ~162.5nm pixel size. Because 380nm/162.5nm = 2.34 we meet the Nyquist criteria (but we wouldn't if we were using 400nm light).
The same Nyquist sampling concept applies in Z; i.e. to have axial resolution limited by optics you should set your z-step tighter than 2x the optical axial resolution. Optical axial resolution, AKA depth of field, is usually taken to be lambda/(NA^2) which is ~780nm for the 40x/0.8 objective at 500nm. So if we set the z-step to be anything more than 0.39um then we will loose some axial resolution vs. the optical limit.
For the special case of the diSPIM we have two views that can be merged computationally, and the axial direction in each view is a lateral direction (with higher resolution) in the other view. So we can get away with undersampling in Z to a certain extent, which is advantageous from a speed perspective. However, if you give up too much axial resolution then the registration of the two views will suffer. In an extreme case, imagine your z-step is large enough to completely skip over a point source. For this reason I suggest always keeping the z-step to be at least as small as the objective's depth of field. With Fiji MVR and bead datasets it's easy to register datasets with 0.5um z-step spacing but not with 1um z-step spacing.
